


A few of the most asked questions I get as a blogger is how I manage to get traffic to my website, how I get people to stay and how I do all this without losing track. Maintaining a blog is a lot of work, but once your hard work pays off, it is definitely fun too. In this post, I will show you my step by step guide to creating the perfect blog post!
There are three moments you can distinguish when crafting the perfect blog post: before publishing, immediately after publishing and some time after publishing. We’ll go through each of these three steps!
Before publishing
The first step is the most obvious one for every content writer. Before publishing, you obviously need to write your text and optimize it for SEO.
Topic
When you are a blogger, you often do not write what others want to know, but rather what you want to share from your experience. It’s the very reason why I started the Caroline’s Corner series at Yoast. As a blogger, it can be difficult to focus on SEO, as you often write from your own experience and are more focused on entertaining people than informing. I keep a list of blog post ideas with me, so I always have something to blog about.
Read more on finding inspiration for your next blog post
Keyword Research
After you picked your topic, it’s important to see if you are solely writing for entertainment purposes, or can give information to your readers too. Even if you think you can only entertain, often there is a bit of information to give to your readers too. One of my favorite courses of Yoast is the Keyword Research training. If you as a blogger struggle with your keywords, then I highly recommend this training.
Text and tone of voice
Are you wondering when you finally can start writing your post? That time is now! I often skip the keyword research step but trust me, this will do you no good. If you want to rank in Google, your keyword research is absolutely important. Optimizing after you wrote your post can be done, but it is sometimes quite tedious. And wouldn’t you rather focus on a new post anyway than optimizing an old one?
Write your blog post and do not forget this should be in the same tone of voice the rest of your blog is. If you are known to write funny texts and people come to you because you are so honest, they don’t want you to sugarcoat things. In other words: create your personal brand and stick to it .
Images
Some bloggers prefer to create photos and images before they start writing their texts. Others, like me, prefer to first write and then find the correct images. Whether you use stock photos or create your own graphics, make sure you at least have a header image that also can be used to be shared on social media. In Yoast SEO Premium, there is a social preview where you can see what it looks like when your post is shared on Facebook or Twitter. You can set a different social image if desired.
Social media texts
Not only you can set your own social image, you can also write a different description for Facebook and Twitter than for Google. People who find you through Facebook, often have a different connection with you than those who find you through Google. Make sure the description resembles that! I have made the decision that through social media I want to entertain people, so I focus more on the fun parts of the blog posts on social media. An example: if I write about idiot things my cat does, I would for example tell my followers on Facebook how I found another dead mouse in my kitchen this morning and how I gave the little fella a funeral. For Google I would focus on the behavior of cats and this would show in the meta description as well.
I have a genuine love-hate relationship with Pinterest. Although I love the way it brings me visitors, I’m not someone who enjoys creating graphics for the platform. I love writing, I don’t love designing as much. As a blogger, you have to design things as well. Or become rich and hire someone to do it for you, that’s an option too! A part of your blog post’s preparation is designing a Pinterest image. These should have a ratio of 2:3, which means that it’s vertical. Pinterest comes with a scheduled feature now, so you can schedule your pin before publishing the post, just make sure you put the correct publishing URL in!
SEO
And now, the most dreaded thing for every blogger world wide… I’m just kidding, there are people who absolutely love SEO, my colleagues included. Me, not so much. I do love it when people come to my blog through Google, but more often than not I am known for muttering: ‘I don’t want to do SEO, I want to write’. Optimizing for search engines is of course a big part of your blog strategy. It’s important to check your meta description, your social descriptions and of course the distribution of your keywords and the readability analysis. As you most likely are aware, you know our plugin helps you with this step! Don’t forget to add proper internal and external links and you’re good to schedule or publish your post.
Summary
To sum up of all the steps before you publish a blog post:
- Pick a topic;
- Do keyword research;
- Write your text in your brand’s voice;
- Create your images;
- Create your Pinterest image and schedule it;
- Do a last SEO check;
- Publish or schedule your post.
Immediately after publishing
After publishing your blogpost, you can either sit back and hope people will pick up your newest masterpiece, or you shoutout your new blogpost digitally. If you want visitors, I hope you are ready to make some noise and get the story out there!
Share your posts on social media
Although social media are designed to keep their users on their platforms, instead of clicking a website, your followers love to hear from you. Especially if you write for your audience on your social medium accounts, it’s important to post your blog posts there. There are plugins that push your blog posts to social media as soon as you hit publish, but at Yoast we schedule this after publishing ourselves.
And although Pinterest isn’t a social medium, but a visual search engine, I want to discuss this here as well. Where Google knows about your new blogpost through crawling and sitemaps, Pinterest doesn’t know. You need to actually tell Pinterest you have a new post. If you have not used the scheduler or want to place your pins on more boards, now is the time to do so!
At Yoast, we publish our blog posts on Facebook and Twitter. As I’m personally not active at Twitter, my own blog posts only are shared on Facebook and Pinterest by me. It’s whatever fits you. Pick something and stick with it! I have a friend who doesn’t even put her blog posts on social media and has seen a steady increase of visitors to her blog through Google. There’s no wrong or right. It’s better to focus on one thing and commit to it a 100% than focus on ten things and only invest 10% of what you could’ve put into it.
Internal linking to this post from other posts
By now you probably know how important your site structure is. Internal links are links that are in your text and they tell Google all about context. It’s important to link to and from your blog post. While writing your post, you most likely linked to other posts you’ve written already. But you could not link yet to your newly created blog post. Your visitors would end on a 404 and Google doesn’t like 404s either! So after publishing, make sure you check which blog posts could do well with a link to your new post and add them immediately. Trust me, you will thank me later when you don’t have to go through all your orphaned content and spend hours upon hours finding context and relevant posts!
Summary
To sum up of all the steps right after you publish a blog post:
- Share your posts on social media;
- Internal link to your new post from other posts.
A while after publishing
After you published your blog post and have done the things you have to do immediately after, you can sit back and wait for the traffic to come in. I’m kidding. Blogging is hard work. There’s plenty to do, apart from working on your website’s foundation, you probably have new blog posts to write and older ones to revisit! ‘A while’ is a pretty abstract time frame and I cannot tell you when you exactly should look at your blog post again. If you are going to share the post in a newsletter, I would say to do this after a few days or two weeks at most. But when you need to optimize your blog post, you’d do that a few months later, after you have data to analyze!
Newsletter
A lot of people will tell you to maintain a newsletter. At Yoast, we have a newsletter as well and I am currently experimenting with my own newsletter for my personal blog. However, it can be quite hard to keep up with all of this if you also have various active social media accounts. If you decide to go for a newsletter, you have to decide if you are going to share all your blog posts, or will only share your most funny ones or the most informative ones. You can share your newest blog post in today’s newsletter, but if it’s still relevant six months from now, you can decide to put it in your newsletter six months from now. I would advise against putting your blog post in every newsletter, even if you want everyone to read it. People might feel like you’re forcing it down their throats and that you have nothing to say than that your cat brought you yet another gift in the form of a dead mouse. You become repetitive. Like that cat with the dead mouse. See what I did there?
Social media
You shared your blog post on social media right after you published, but that doesn’t mean you cannot republish it again after a few months! The same goes as with the newsletter. Don’t overdo it, but it’s safe to reshare something 6 months after you already shared it. You can decide to even use another social image or another introduction text.
There’s no such thing as oversharing on Pinterest. If there’s one place where you can shamelessly self promote, it’s Pinterest! Apart from of course repinning relevant blog posts from your colleague bloggers, you can repin your blog post you just pinned two weeks ago. Pinterest is about the snowball effect and the more it’s on there, the more Pinterest will learn about it and will give you visitors. I usually share my post every week on a different board. If I have about 16 relevant boards, that means for the next 16 weeks, my post will be repinned on there. The more active you are on Pinterest, the more visible you are!
Analyzing the post performance
After a month you can start to analyze your post’s performance. This is something you need to do every three months. More often or less often if desired. You should check in Google Search Console how the people find your blog post, if you rank for the keywords you wish to rank for and if you possibly should create more posts surrounding the subject or make the blog post even more in-depth. This is one of the most tedious jobs in my opinion, as this maybe only slows down when you rank in the top three of your preferred search engine.
Optimizing where necessary
SEO is an ongoing process. Where you might’ve ranked first on a keyword last month, your competitor could’ve created a better piece and ranks first now. This is why you should revisit your blog post with the data you have collected and optimize where necessary. Check what your competition does better than you and decide whether you want to optimize. I don’t optimize a post if I’m already ranking the top three, not even if I dropped from the first to the second place. But this could be different for you. Optimizing could mean you are going to focus on link building, but could also mean you want to elaborate more or focus on Schema. Check what your competitors do what you don’t. Don’t copy, but learn from them.
Internal linking
So you already worked on your internal linking when you just published your post, that’s awesome. If you’ve done that, then you can skip this step. If not, you probably need to work on your internal linking again! Use the orphaned content filter in Yoast SEO Premium to see which articles need some much-needed love.
Revisit your cornerstone content
Every 6 months, you should revisit your cornerstone content and check if it’s still up to date. Your cornerstone content contains lengthier articles that give a lot of information: they are also known as evergreen content and are most likely the posts you are most proud of. In Yoast SEO Premium we have the stale content filter that will let you know when a blog post has not been updated the past 6 months and might need to be checked for new additions or updates.
Summary
To sum up of all the steps right after you publish a blog post:
Ongoing on a weekly basis
- Pin your post to Pinterest
Recurring after a month on a three monthly basis
- Analyze the post performance
- Optimize the post
- Check the internal links
Once every 6 months
- Share on social media
- Share in your newsletter
After 6 months twice a year
- Revisit your post and check if you need to update
Checklist

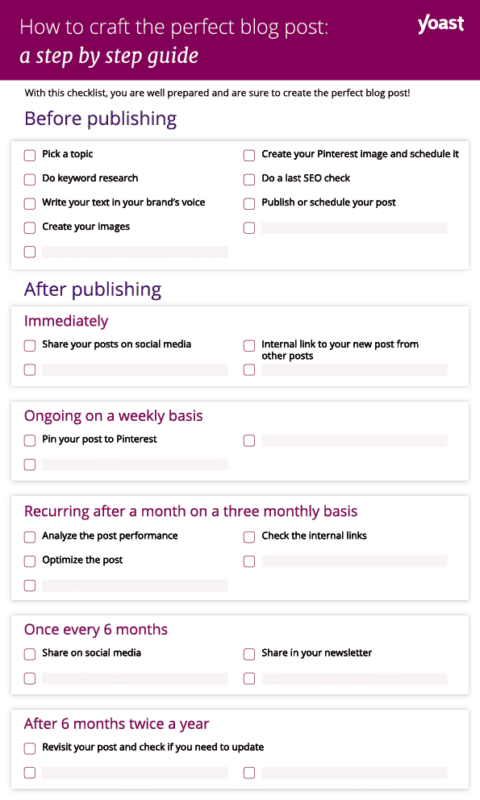
To keep control over your blog and to create your perfect blog post, we’ve created a checklist you can print and keep with you when you are writing. We even added empty checkboxes so you can add extra steps if we didn’t cover something you deem to be absolutely necessary!
Download the free checklist here!