
Bloom is one of the most popular plugins from the Elegant Themes team. With this its release, they’ve been disrupting the email-optin form plugin space in much the same way they previously disrupted the social sharing plugin space with their superb social sharing button plugin, Monarch, and raised the bar in the page builder category with their Divi Builder plugin.
Growing your list of email subscribers is arguably one of the most important tasks for any blogger or website owner to focus on. It’s no surprise, then, that WordPress users are particularly well served by plugins that can help them do this. From basic free options to fully featured premium products, there’s almost certainly a plugin that’ll fit when it comes to adding email newsletter optin forms to a WordPress-powered website.
With this in mind, let’s see where Bloom fits into the current email signup form landscape, and take a look at its features and how easy it is to use. Let’s get started.
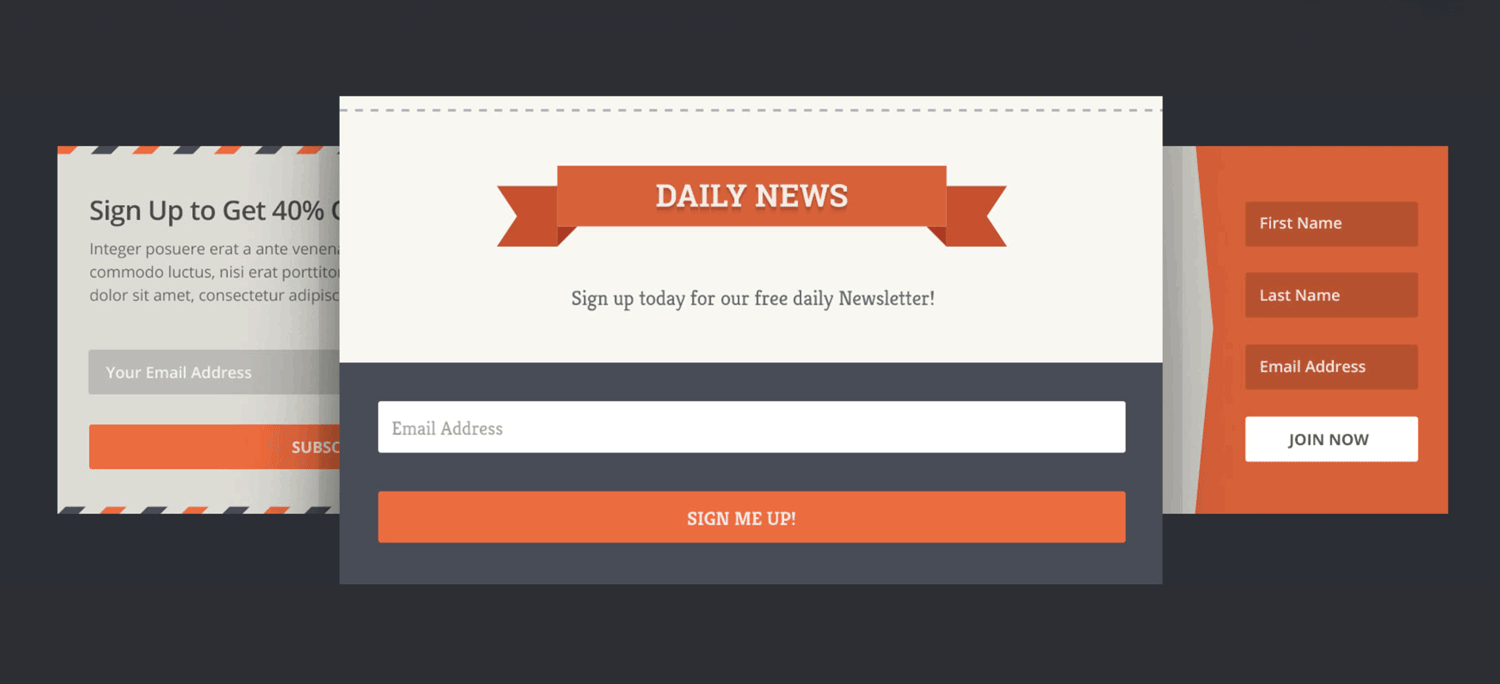
Bloom has a great selection of form templates for your optins.
Why Use the Bloom Plugin?
The purpose of Bloom is to give you the ability to display email signup/optin forms on your website. When visitors enter their contact details into those forms, they’re added to your email newsletter or marketing service, such as MailChimp or Aweber. Once a visitor has joined your list, you can email them at will.
Having access to a list of email subscribers is highly valuable. It gives you the means to encourage first-time visitors back to your website; without that extra push, it’s estimated that 50% to 80% never return.
Your email list gives you the ability to develop better connections with your target audience, provide them with useful content, and bring them back to your website. Additionally, when the timing is right, you’ll be able to promote your products and services to them with added effect.
Bloom Features: What This Email Optin Form Plugin Has to Offer
For Bloom to compete with market leaders in this field, such as OptinMonster (which we covered in a previous article), it needs to be easy to use. Not only that, but it must also include most — if not all — of the important features users of other popular optin-form plugins have come to expect.
For those in a rush, Elegant Themes has produced a well-made two-minute video that gives a nice overview of what Bloom can do. But if you have more time and are looking for the full story on this plugin, read on.
Six Email Optin Form Types
Thankfully, when it comes to features, Bloom doesn’t disappoint. It’s only available on one licence or pricing plan (more on this below), which means users get access to all of its features — such as the ability to choose between six types of optin form.
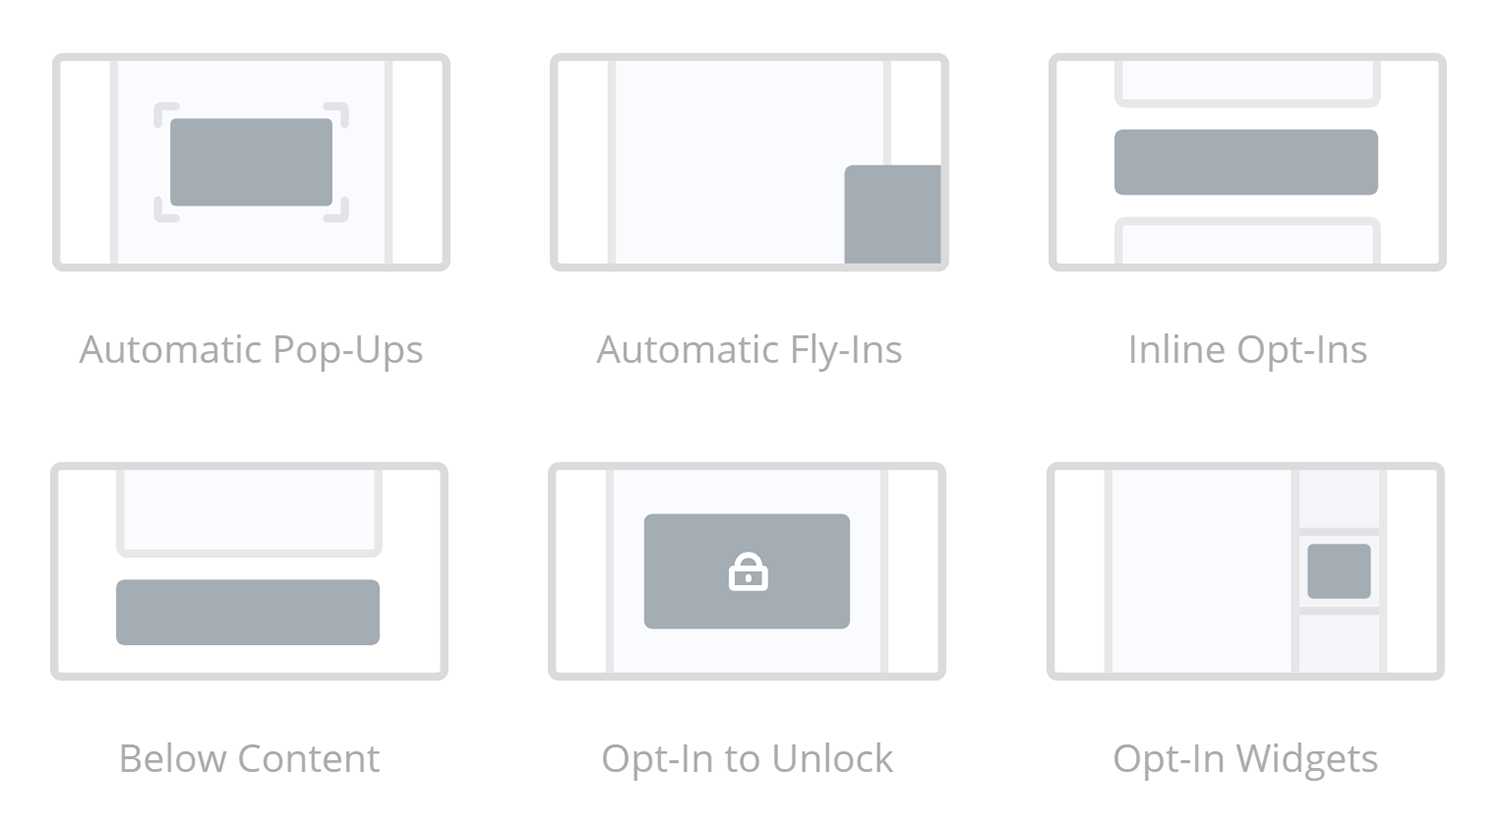
The six form types give you lots of options for using optins and pop-ups.
The form types range from standard forms displayed after each post to animated fly-in and popup forms. There’s also a locked-content form that can be used to hide your content until the reader enters their email address to join your list — a method of encouragement that’s commonly employed when a site owner has something to offer in return, such as a free eBook or another type of downloadable file.

You’re free to use multiple form types on your site.
The only notable absence in the collection is the header ribbon format*.
However, Bloom’s ability to create beautiful popup and slide-in forms, display forms in both the sidebar and after post content, and also insert them midway through a post using shortcodes, gives you plenty to work with.
Countless Form Templates and Customisation Options
A great set of form types isn’t all Bloom has to offer by any stretch of the imagination — it has heaps more up its sleeves, such as access to high-quality prebuilt form designs.

The customizable templates make it easy to give your forms the right look for your site.
These form templates can either be used as is, or customised through the design options. While you don’t get a visual builder tool to modify the templates, you can easily preview the form at any time by clicking on the floating preview button.
The design options are again very extensive. These allow you to customise almost every aspect of the form, including the title, message, image, animation effects, fonts, borders, and the various built-in form fields, as well as their positioning — and, if that isn’t enough, you can also easily insert your own custom CSS.
The floating preview button is a particularly nice feature, letting you instantly see how your form is developing by displaying it in a lightbox popup window. And, because the button is always on display, it eliminates having to switch browser tabs, save your work, or lose your place by scrolling up or down the page.
Detailed Form Display Settings and Triggers
The display settings cover when and where to show the form on your website, and also enable you to set an animation for some form types — such as slide-in and popup effects.
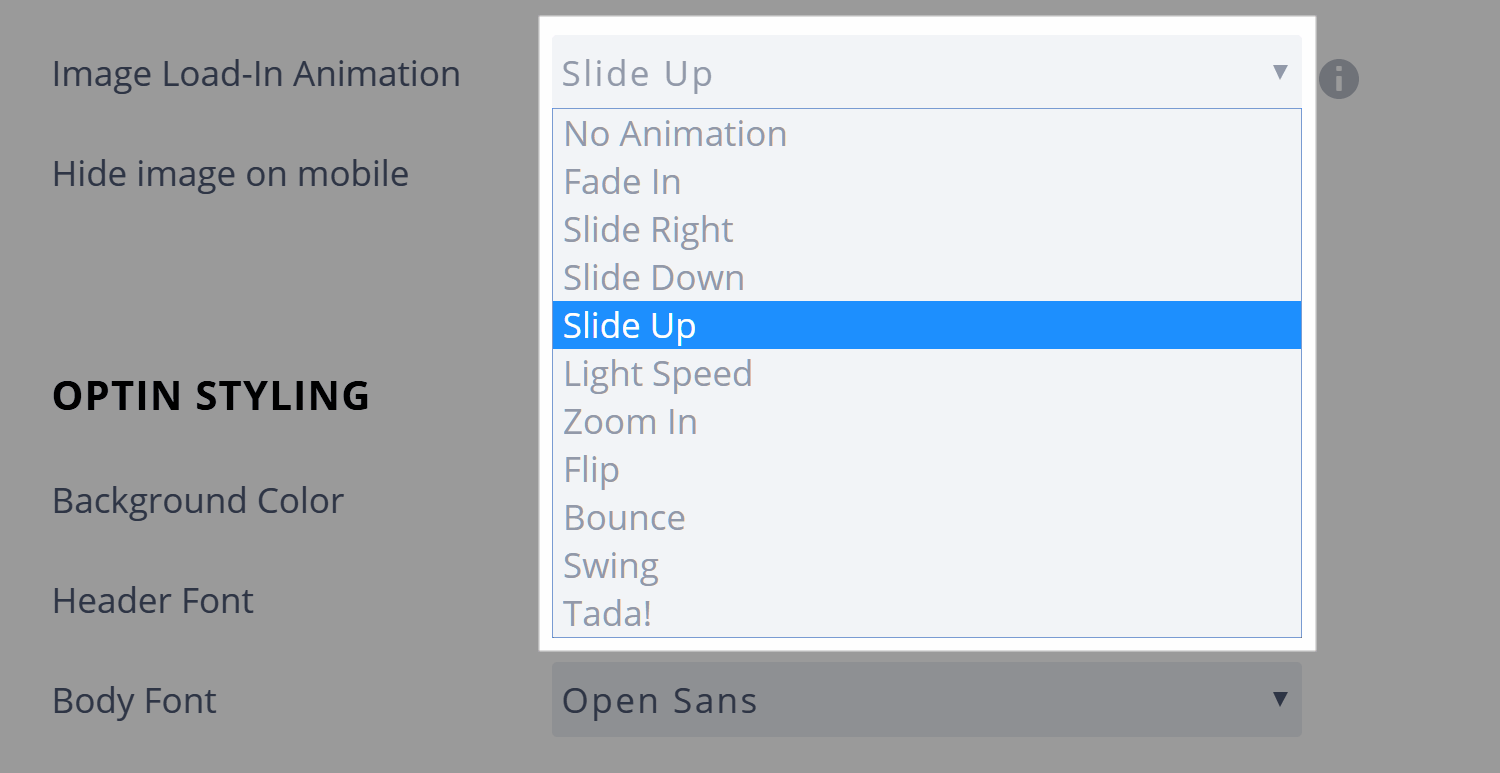
Animations can be used to help your forms catch the attention of your visitors.
Trigger options include: displaying the form after a set time delay; after a period of inactivity; when the user reaches the bottom of the page or has scrolled a certain percentage down the page; or after they’ve left a comment.
In a recent update to the plugin, you can now set the popup and fly-in forms to be displayed using the on-click trigger. This lets you create links that will launch the form, allowing you to make use of the popular conversion-rate-increasing two-step optin process found in services such as LeadPages.
Unfortunately, there is no exit intent trigger. The leader in this respect, OptinMonster, was one of the first premium email signup form plugins to give you the ability to only display a popup form when the user is about to leave your site. Now, though, it’s a feature that’s found in most premium plugins of this type.
There are alternatives to the exit intent trigger, though. With Bloom, you can trigger a popup or slide-in form to be displayed when a user scrolls past a certain percentage of a page, reaches the bottom of a page, or has been inactive on your site for a set period of time.
Plus, since the plugin integrates with WooCommerce, you can even set the trigger as the ‘thank you for purchasing page’, allowing your site to display a particular form only after a customer has checked out of your store, which is an excellent touch.
To avoid annoying visitors who don’t want to subscribe, you can also change how frequently your forms get displayed, while mobile users can be catered for by opting to hide the forms on small screen devices.
The other display settings cover which parts of your website the form will be displayed on. As well as general settings, such as the homepage, everywhere, posts, pages, and category and tag pages, you can also choose to enable the form for individual categories. Furthermore, you can even choose individual posts and pages to display (or not display) your forms on.

Bloom gives you a good amount of control over where your forms are displayed.
As Bloom supports multiple optin forms on one site, you can also create different forms to be shown on specific posts and pages, thereby allowing you to display content optimised for the articles they’re being shown on.
Effective Split Testing and Optimisation
With so many form options and design templates to choose from — not to mention all the customisation settings — it can be hard to know if you’ve chosen the right form for your website. Thankfully, the split testing tool makes it easy to compare multiple designs to find the best performer.
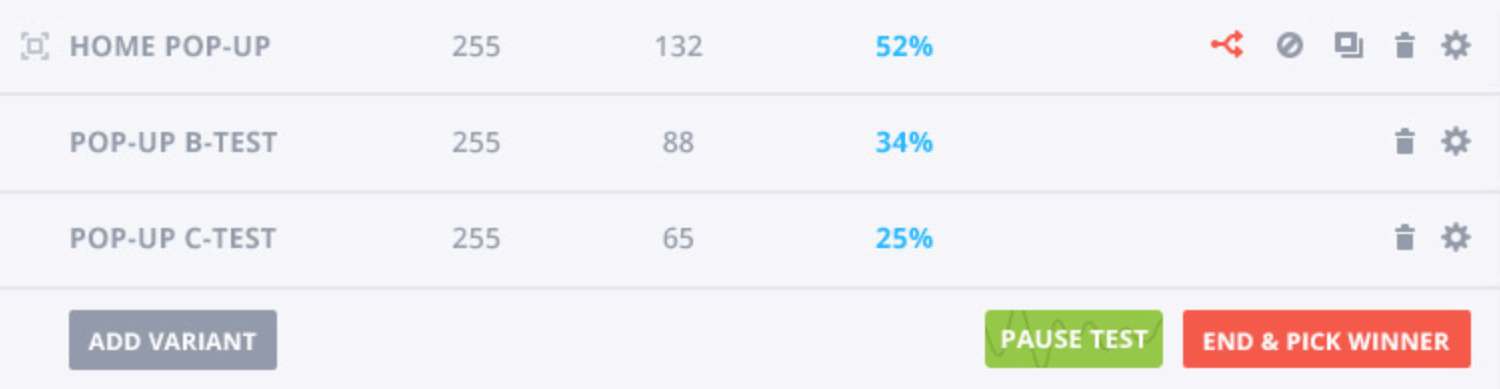
Split testing is easy to setup and will help you find the best form for your audience.
Bloom also lets you instantly clone a form. You can then modify that clone and start testing it against the original, which enables you to establish which one converts the most visitors into subscribers.
Multiple Email Marketing Service Integrations Supported
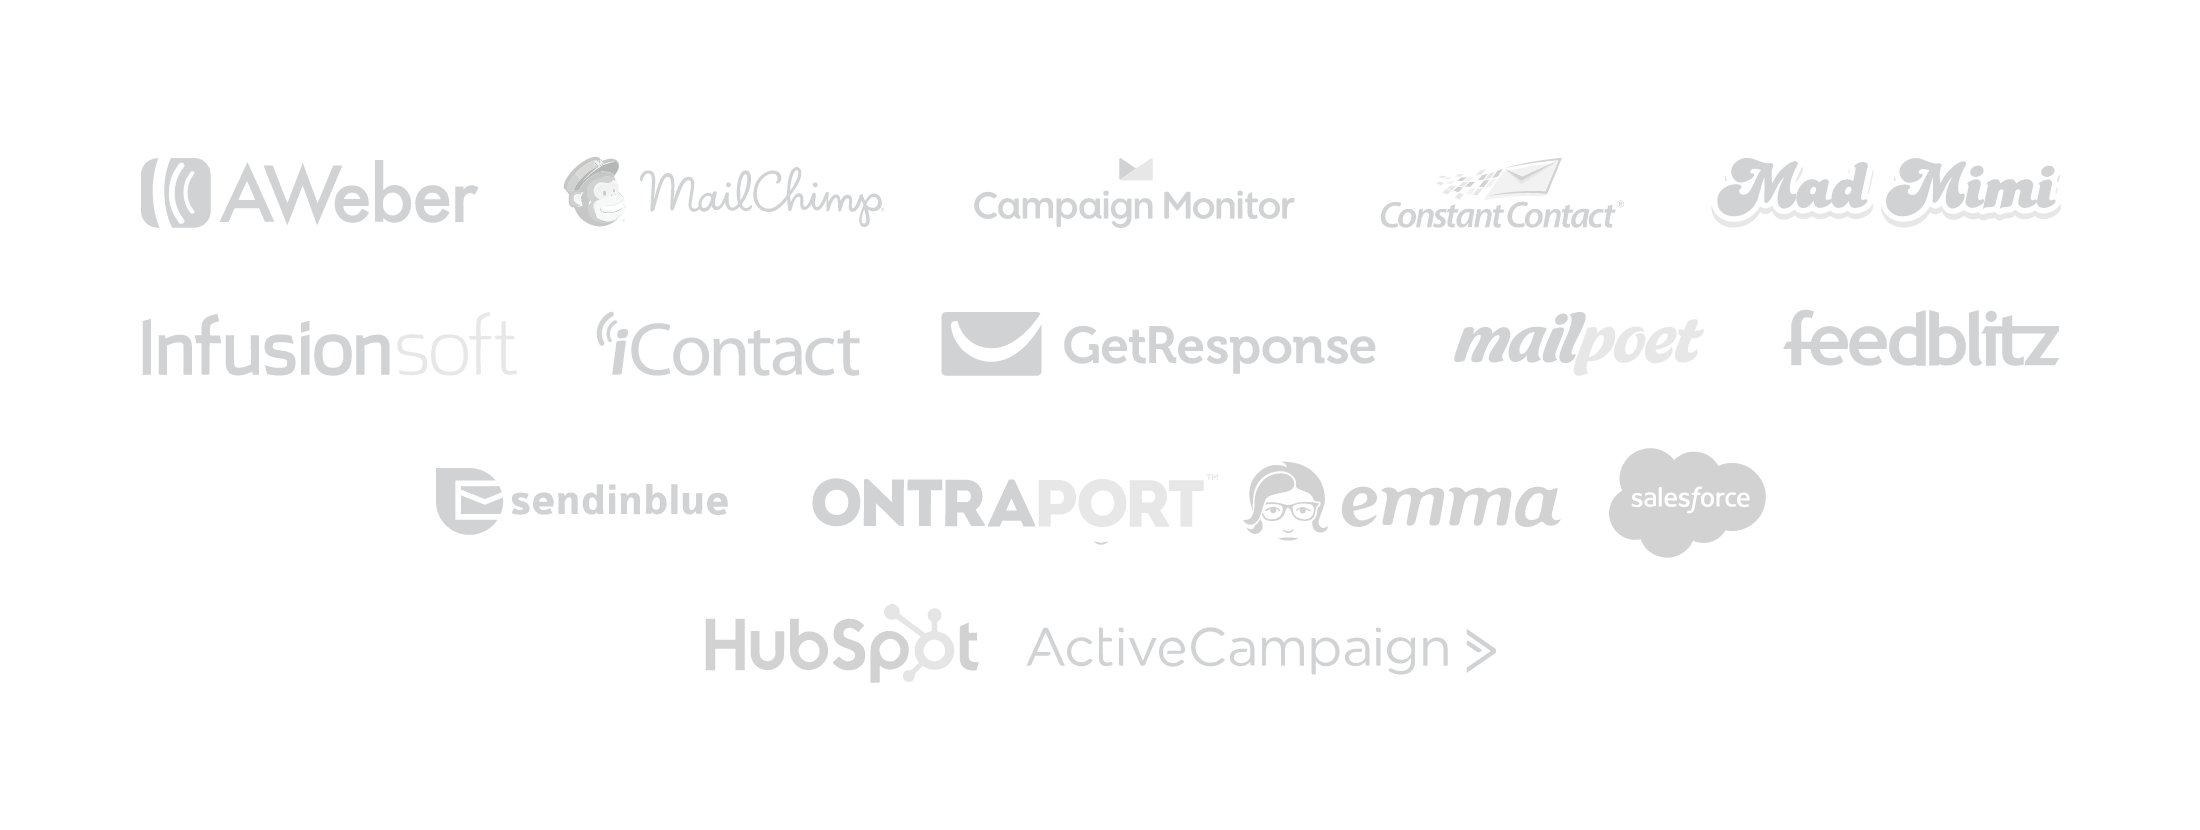
Bloom is essentially a tool to entice your visitors to subscribe to your email list or newsletter. Therefore, it’s good to know that it integrates with all of the most popular email list management services, including AWeber, MailChimp, Constant Contact, ConvertKit, Get Response, Infusionsoft, MailerLite, and many more. You can also integrate the plugin with multiple accounts, which means you can subscribe visitors to the different lists you manage.
Bloom works with all the best email marketing services.
The integration process is very straightforward: unlike some other premium options, there is no need to generate the raw HTML for the forms, and then copy and paste it into the plugin.
What’s more, updates to the plugin have seen support for even more email marketing services added to Bloom — including HubSpot, Mailster, SalesForce, and ActiveCampaign — so, if there’s a service you’re using that’s not on the list, there’s a good chance it’ll be added before too long.
Useful Optin Form Performance Statistics
Once you’ve set up one or more forms, you can view their performance from the statistics page. This displays the number of impressions, conversions, and the conversion rate for each active form on your site.
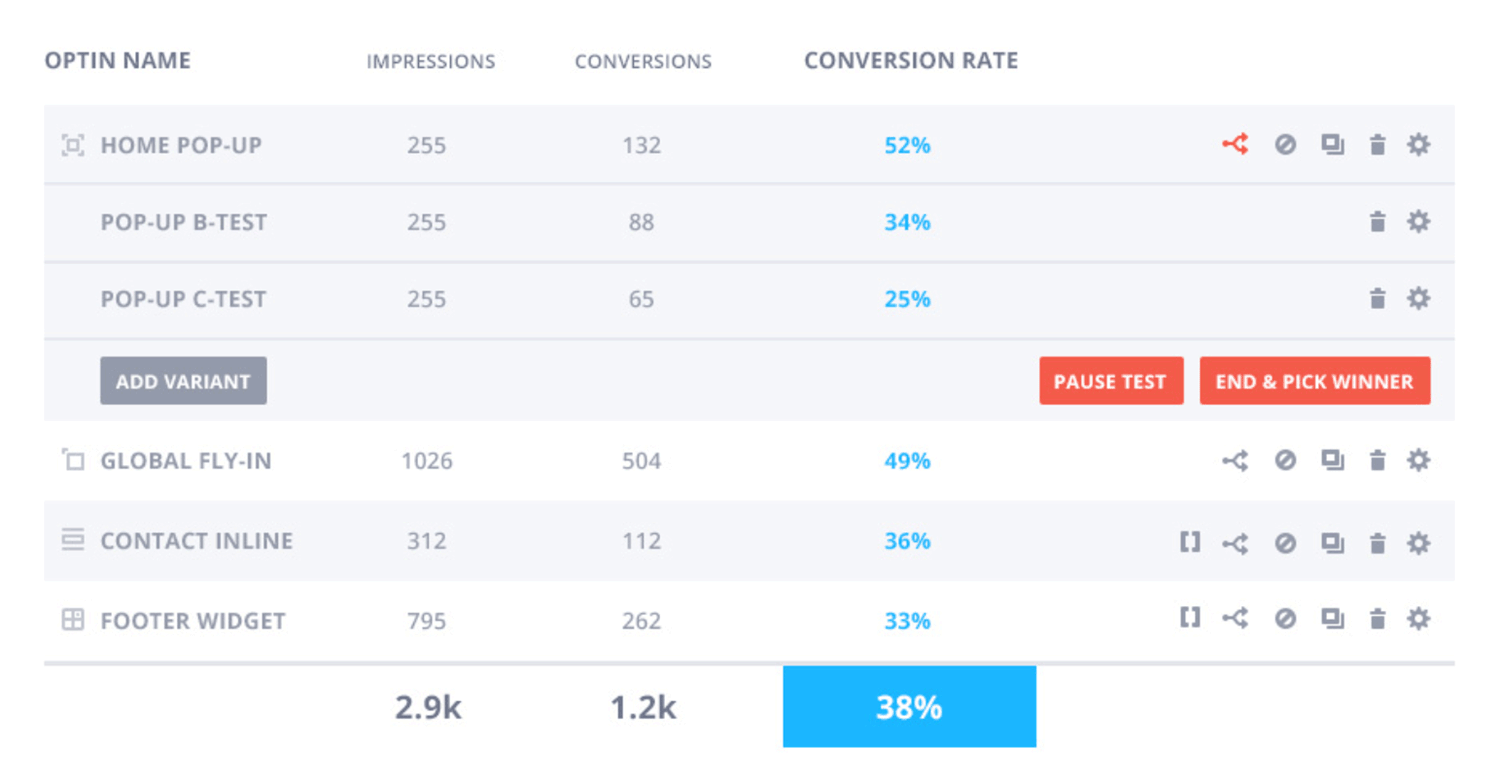
The Bloom statistics make it easy to see which of your forms is the best performer.
You can also view the highest converting pages on your website, and see the number of signups per day.
Form settings can also be imported and exported between sites, making it easy to quickly deploy your tried-and-tested designs and settings to a new project.
Bloom Review: Creating an Email Optin Form
The features of Bloom certainly tick all the right boxes. However, this doesn’t mean much if the plugin isn’t easy to use. So let’s walk through the process of creating a popup email optin form, complete with split testing.
The Bloom Control Panel
As you’d expect, Bloom features a custom-built control panel for creating the forms for your website — however, Elegant Themes has done a particularly good job with this. While using the native WordPress user interface would perhaps be preferable for some, the Bloom control panel doesn’t have a negative impact on usability, and looks fab.
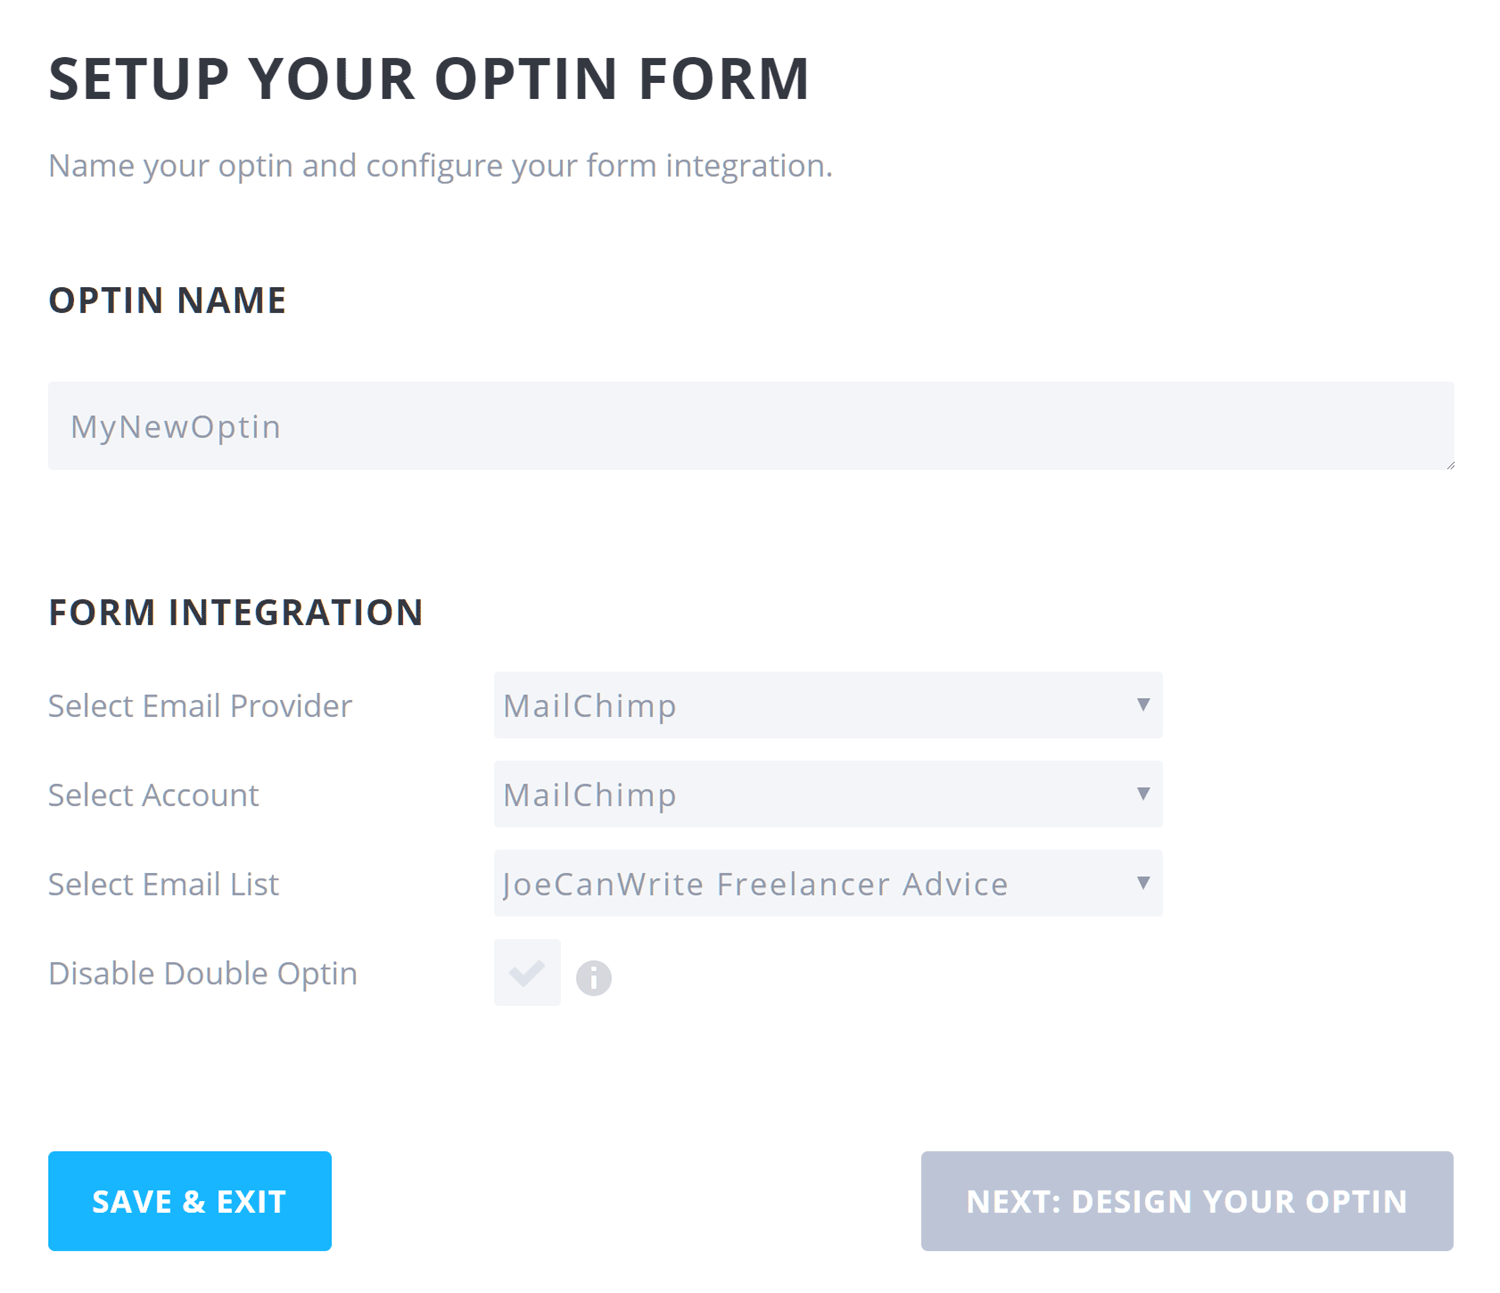
Email Marketing Service Integration
The first step when adding Bloom to your website is to connect the plugin with your email marketing service. Bloom integrates with all the main players, so it’s simply a case of choosing the appropriate option from the drop-down list, and following the on-screen instructions to connect to that service.
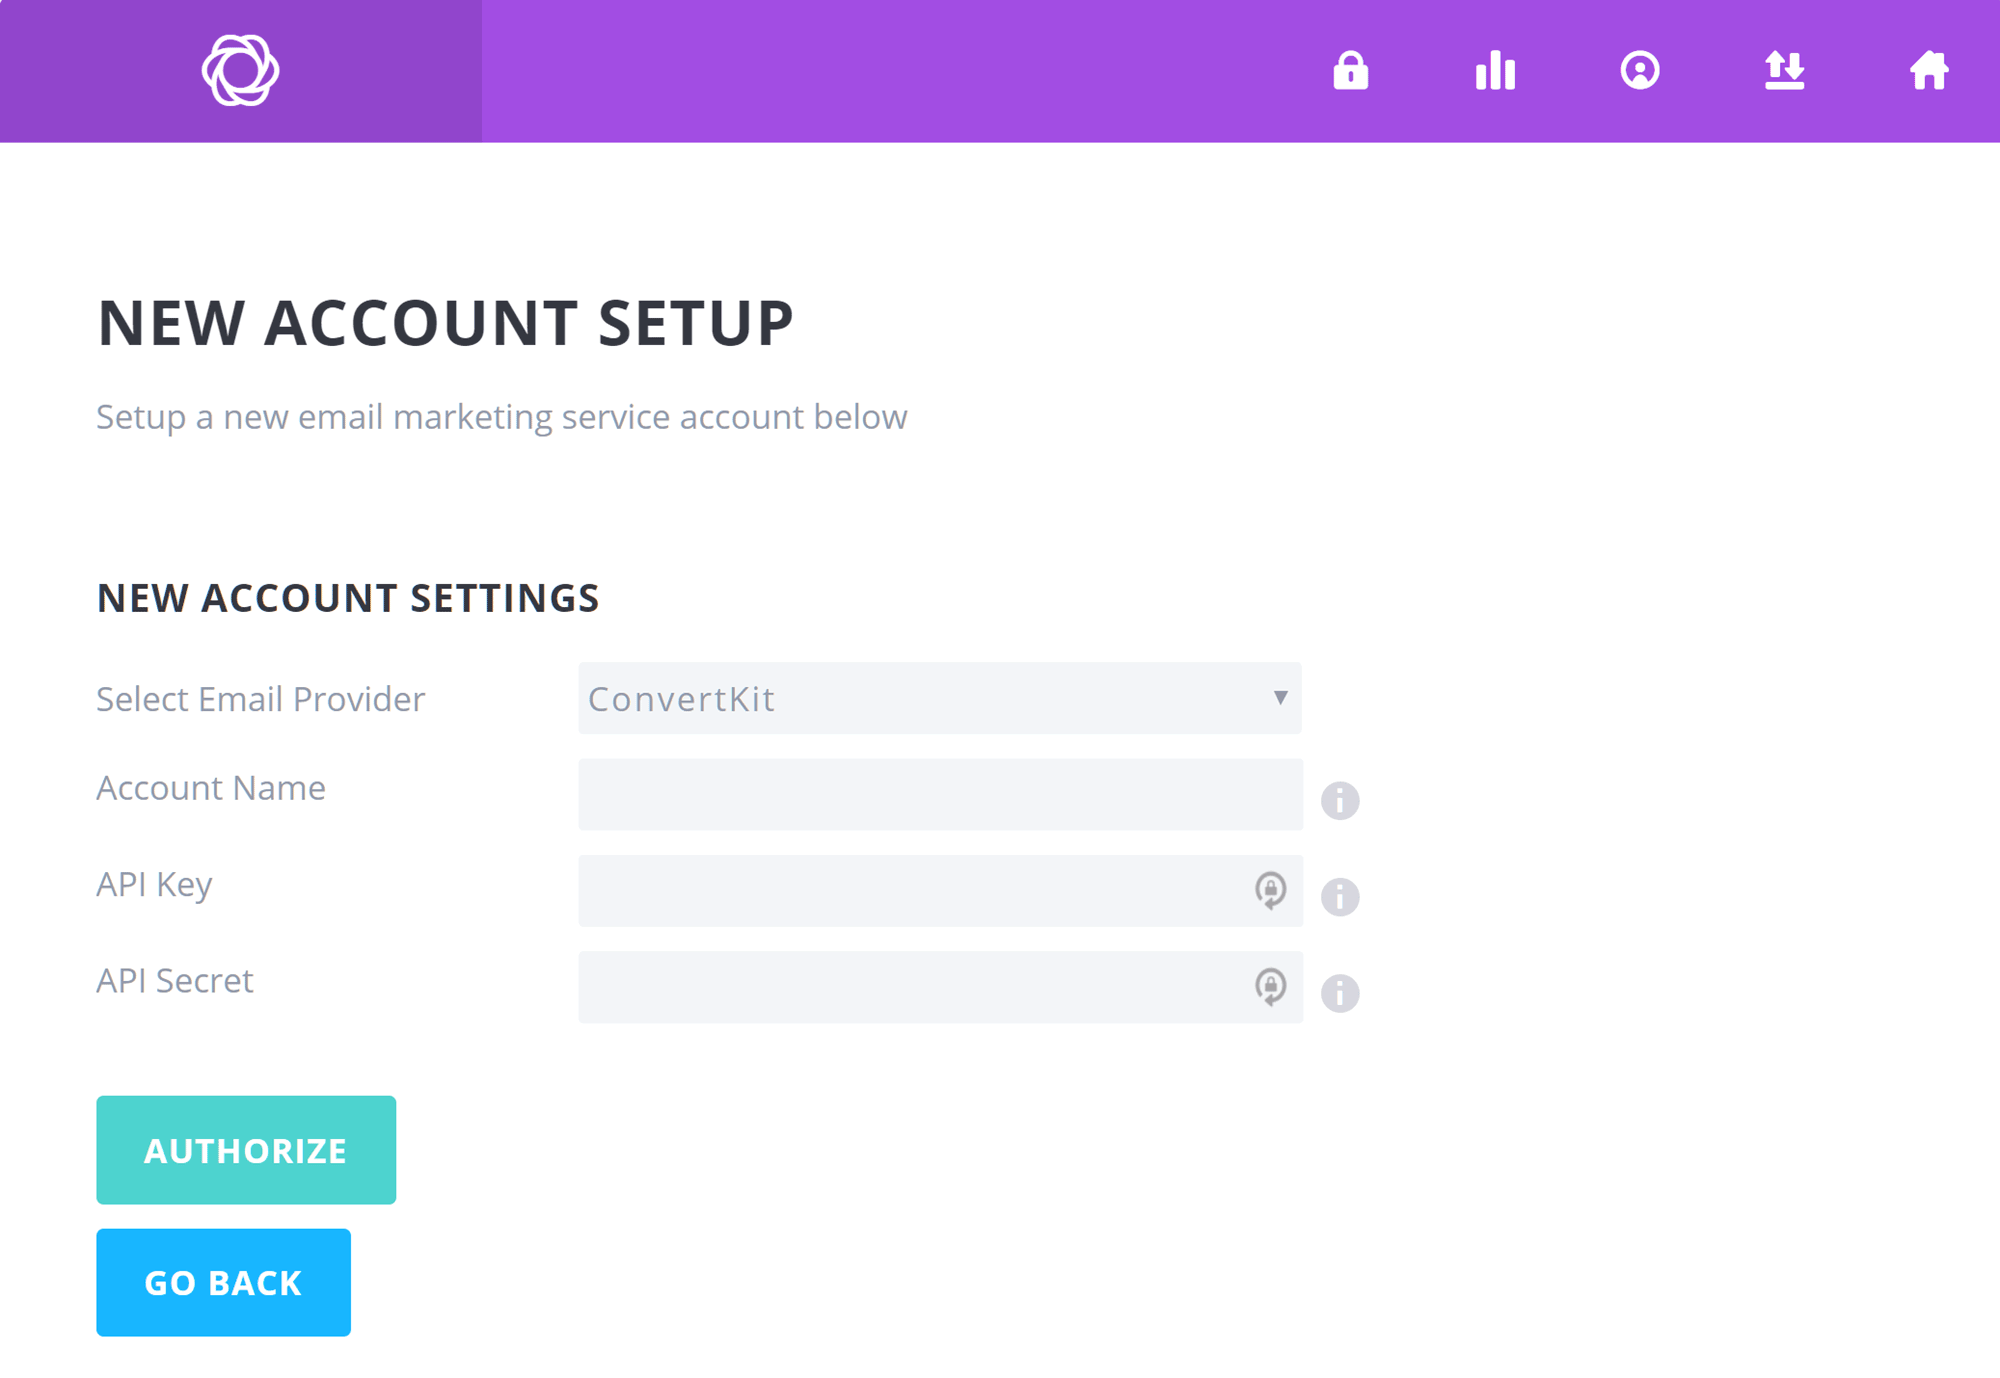
The step by step process makes it easy to create a new optin form with Bloom.
If you need some assistance at any stage of the setup and form creation process, you can click on the help icon to get additional information. Some of the tips also allow you to click on a link, taking you directly to the relevant section of the online documentation.
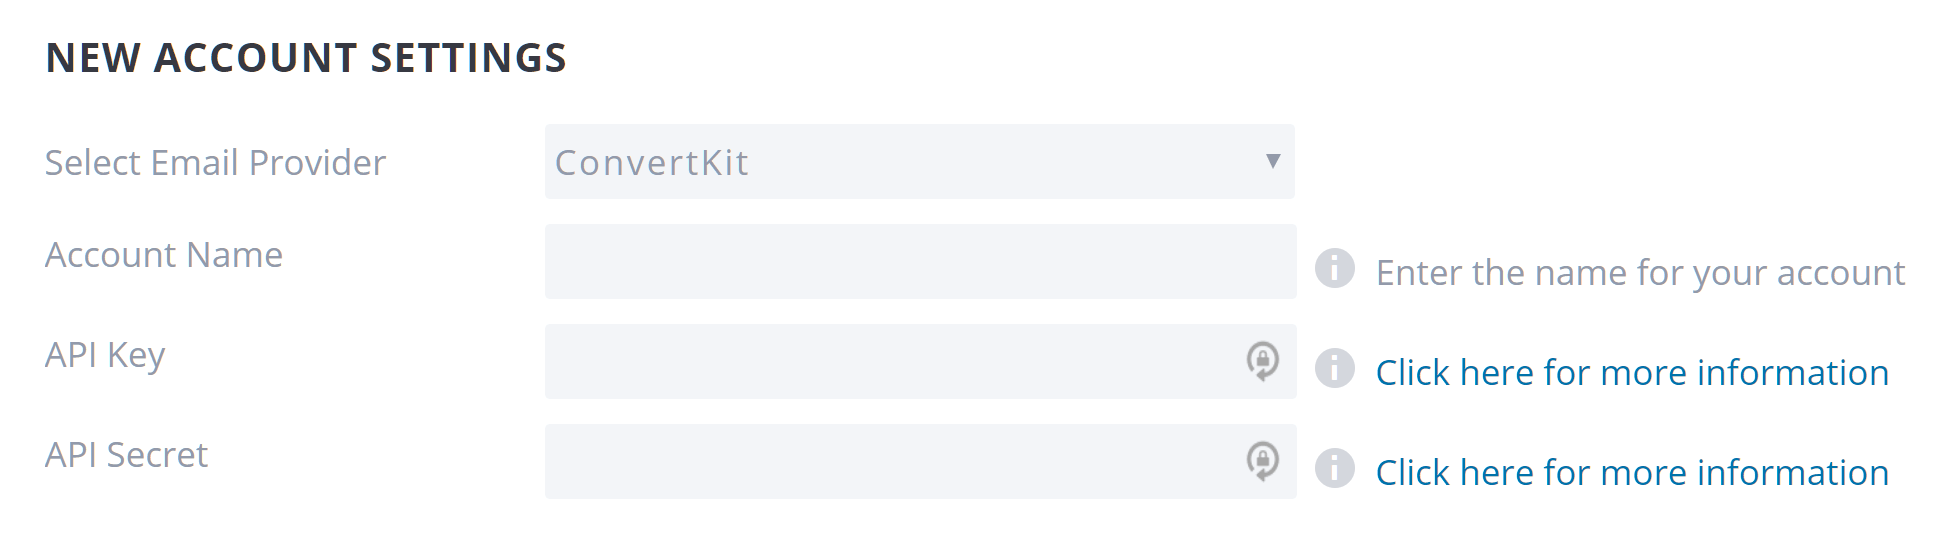
The tool tips and links help you find the required integration information
Choosing a Form Type
Once you’ve authorised the integration with your email marketing service, you can start creating your optin forms. The first step is to choose a form type from the six available options.

Bloom gives you six optin form types to choose from.
Next, you must decide which of your newsletter service integrations to add your subscribers to. These options also let you subscribe your website visitors to different lists, depending on the form they’ve signed up through.
Once you’ve set up the form integration, you can move on to the design.
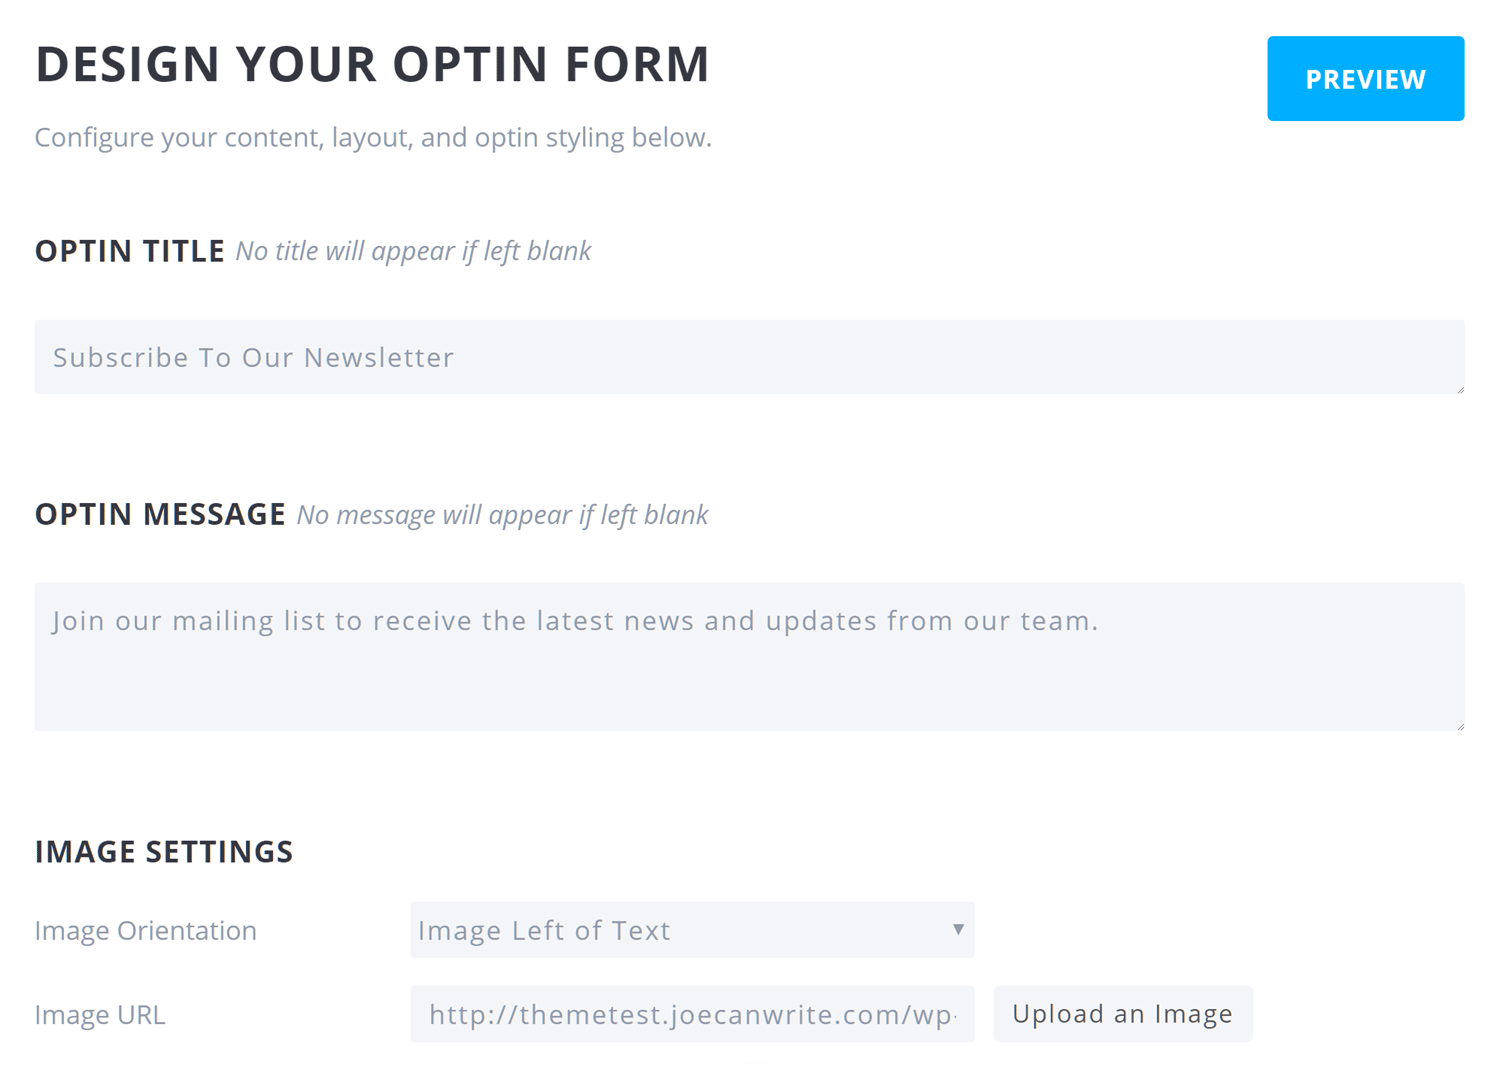
Selecting a Form Template
Once Bloom and your email marketing service are talking to each other, you can move on to the fun task of designing your optin form. Bloom features an impressive number of template designs to choose from.

These are just some of the customizable optin form templates from Bloom
Customising the Form Design
After making a selection, you’ll be able to customise the design and make it your own. The customisation settings cover every aspect of the form, which gives you plenty of scope for personalisation.
Editing the form text and images is easy with Bloom.
The floating preview button makes it very easy to see how your form looks, without the need to go elsewhere.
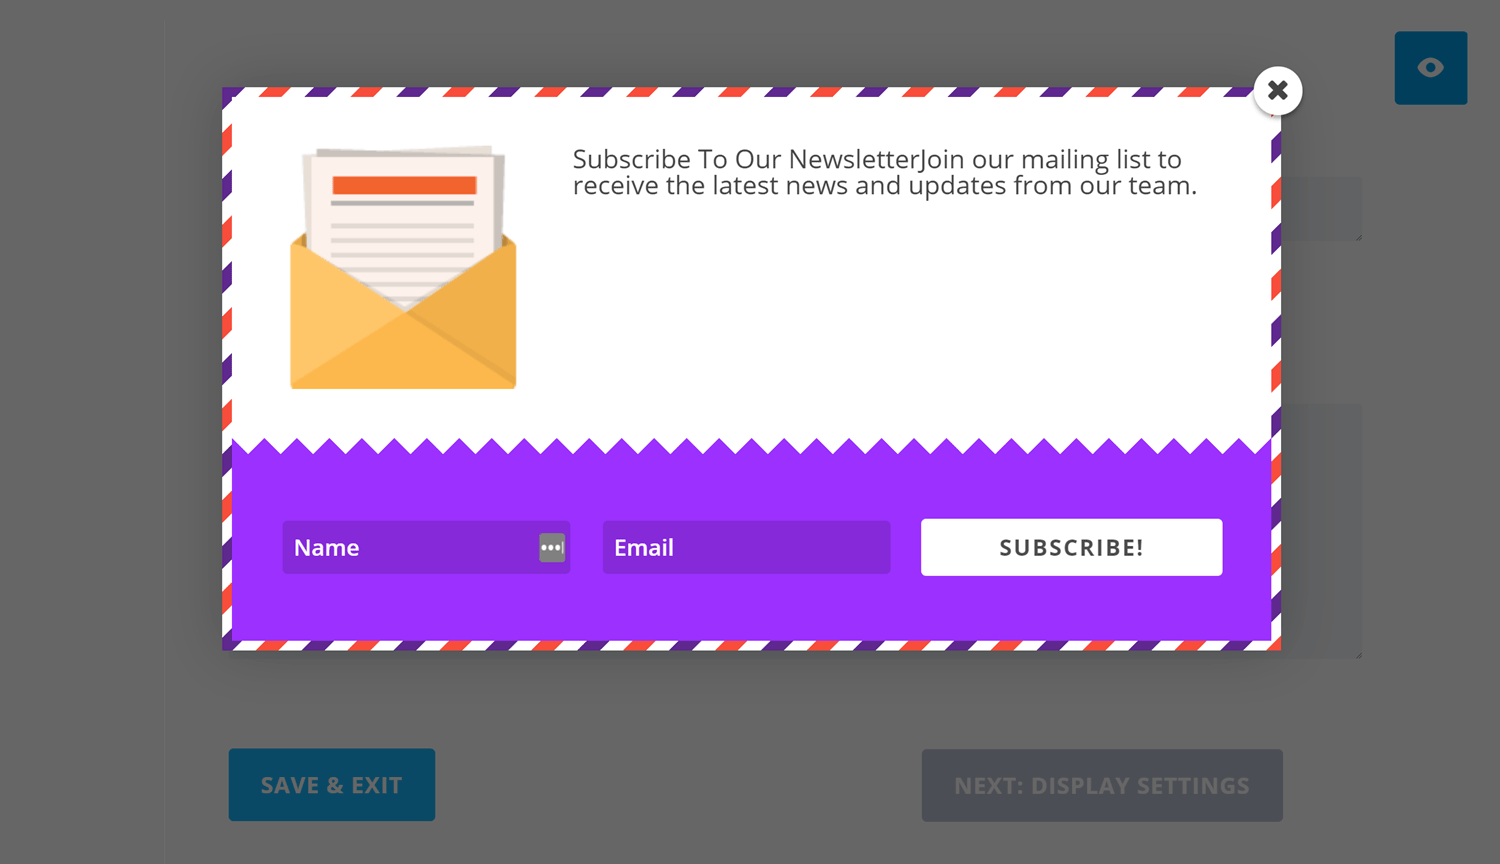
You can preview your form design at any time during the setup process.
Once you’re happy with its appearance, you can move on to configuring the display settings.
Form Display Settings
Depending on the type of form you’ve chosen, you’ll have different options for how it’s displayed. For the popup type, you can set the load-in animation from a range of options. Other settings include the time delay before the form is shown, choosing the triggers for displaying the form, and whether to hide the form on mobile devices.

Bloom has lots of form display controls and settings, including multiple form triggers.
From this screen, you can also define the actual posts and pages of your website the form is displayed on. A new feature of Bloom is the ability to redirect users to a custom URL once they’ve submitted their details into the form. Effective ways to use the success redirect feature includes taking the users to a thank you page where they can access a lead magnet, another page on your site where they can perform other actions such as sharing your content with their followers, or even taking them directly to one of your social media profile pages.
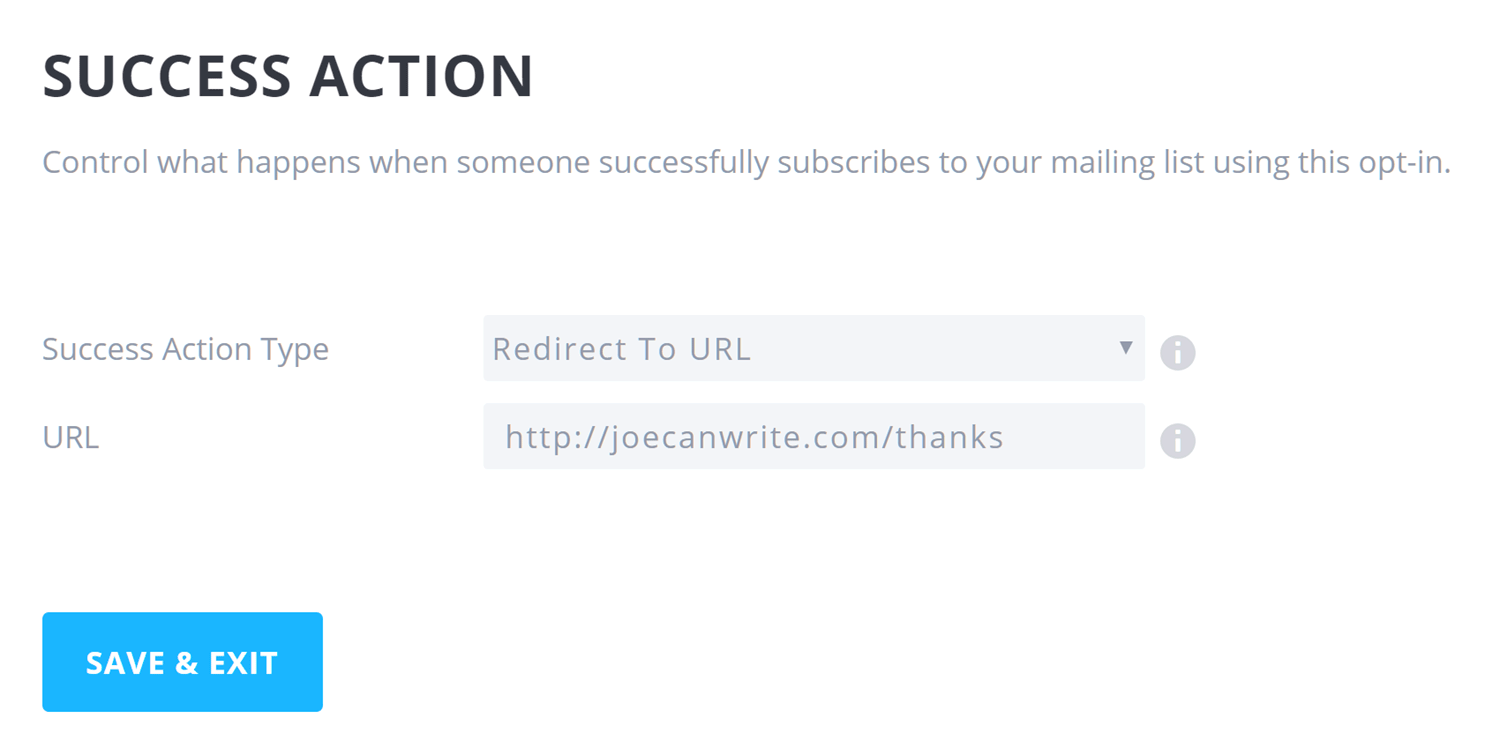
With Bloom, you can now redirect users to a URL after a successful form submission.
Once you’ve finished with the display settings, your form will be shown on your website in accordance with your configuration.
Setting Up Split Testing
Setting up a split testing experiment to find the highest converting design and form settings is very straightforward. After clicking on the A/B testing icon for the form you want to optimise, you can create a variant.
While you can’t choose a different template for your variant, you can customise the individual elements of the form. This allows you to change the colours and button text, and select a different trigger.
You’ll then be able to start the test, or create additional variants to compare design choices with each other. You can check in at any time to view its progress, and, once a winner emerges, end the test.

Form variants can be created at the touch of a button.
All that’s left to do now is sit back and monitor the performance of your forms through the statistics page.
Pricing
Rather than being sold separately, Bloom is only available as part of the Elegant Themes memberships club, which costs $89 to join for one year of access or $249 for lifetime access to all existing and future Elegant Themes products. This might seem a little pricey to some, but it’s worth remembering that it will also give you access to Elegant Theme’s flagship theme, Divi, and all its other plugins and themes (of which there are quite a few). So if you’re starting a new WordPress website or planning to give your existing site a design refresh, the Elegant Themes plugins and themes should provide you with everything you need.
Conclusion and Recommendations
As well as being particularly well designed and easy to use, the Bloom optin form plugin comes packed with features. All the main form types are included, and there’s a solid selection of templates.
The only important missing feature that can be found elsewhere is the exit intent popup form trigger, which can guard against alienating visitors by only showing the popup forms when people are about to hit the exit or back button.
This is a useful feature, so it’s a little surprising not to see it included. That said, the triggers that display a form when the reader reaches the end of a page, has been inactive for a set amount of time, or scrolls through to a certain percentage of a post, aren’t to be overlooked — and will certainly be suitable alternatives for many.
If you’re keen to grow your email list, Bloom is one plugin you’ll definitely do well to consider!
*For those that really can’t do without a ribbon format, something like Thrive Leads might be a better option.
Uses/using Bloom? Thoughts?