Note: This is a post from #frontend@twiliosendgrid. For other engineering posts, head over to the technical blog roll.
Across all of our frontend apps, we had, and still have, the following goal: provide a way to write consistent, debuggable, maintainable, and valuable E2E (end to end) automation tests for our frontend applications and integrate with CICD (continuous integration and continuous deployment).
To reach the state we have today in which hundreds of E2E tests are possibly triggered or running on a schedule across all of our frontend teams across SendGrid, we had to research and experiment with a lot of potential solutions along the way until we accomplished that main goal.
We attempted to roll our own custom Ruby Selenium solution developed by dedicated test engineers called SiteTestUI aka STUI, in which all teams could contribute to one repo and run cross-browser automation tests. It sadly succumbed to slow, flaky tests, false alarms, lack of context between repos and languages, too many hands in one basket, painful debugging experiences, and more time spent on maintenance than providing value.
We then experimented with another promising library in WebdriverIO to write tests in JavaScript colocated with each team’s application repos. While this solved some problems, empowered more team ownership, and allowed us to integrate tests with Buildkite, our CICD provider, we still had flaky tests that were painful to debug and tough to write in addition to dealing with all too similar Selenium bugs and quirks.
We wanted to avoid another STUI 2.0 and started to explore other options. If you would like to read more about our lessons learned and strategies discovered along the way when migrating from STUI to WebdriverIO, check out part 1 of the blog post series.
In this final part two of the blog post series, we will cover our journey from STUI and WebdriverIO to Cypress and how we went through similar migrations in setting up the overall infrastructure, writing organized E2E tests, integrating with our Buildkite pipelines, and scaling to other frontend teams in the organization.
TLDR: We adopted Cypress over STUI and WebdriverIO and we accomplished all of our goals of writing valuable E2E tests to integrate with CICD. Plenty of our work and lessons learned from WebdriverIO and STUI carried over nicely into how we use and integrate Cypress tests today.
Table of Contents
Exploring and Landing on Cypress
Switching from STUI and WebdriverIO to Cypress
Step 1: Installing Dependencies for Cypress
Step 2: Environment Configs and Scripts
First Pass of Environment Configs and Scripts
Evolution of Environment Configs and Scripts
Step 3: Implementing E2E tests locally
Step 4: Dockerizing the tests
Step 5: Integrating with CICD
Step 6: Comparing Cypress vs. WebdriverIO/STUI
Step 7: Scaling to Other Frontend Teams
What we’re looking forward to with Cypress
Adopting Cypress into the Future
Exploring and Landing on Cypress
When we searched for alternatives to WebdriverIO, we saw other Selenium wrappers like Protractor and Nightwatch with a similar feature set to WebdriverIO, but we felt we would most likely run into long setups, flaky tests, and tedious debugging and maintenance down the road.
We thankfully stumbled onto a new E2E testing framework called Cypress, which showcased quick setups, fast and debuggable tests ran in the browser, network layer request stubbing, and most importantly, not using Selenium under the hood.
We marveled at awesome features like video recordings, the Cypress GUI, paid Dashboard Service, and parallelization to try out. We were willing to compromise on cross-browser support in favor of valuable tests passing consistently against Chrome with a repertoire of tools at our disposal to implement, debug, and maintain the tests for our developers and QAs.
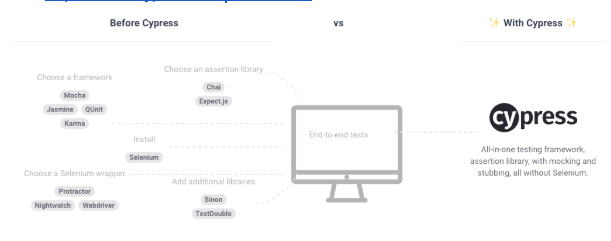
We also appreciated the testing frameworks, assertion libraries, and all the other tools chosen for us to have a more standardized approach to tests across all of our frontend teams. Below, we provided a screenshot of the differences between a solution like WebdriverIO and Cypress and if you would like to see more of the differences between Cypress and Selenium solutions, you can check out their documentation on how it works.

With that in mind, we committed to testing out Cypress as another solution for writing fast, consistent, and debuggable E2E tests to be eventually integrated with Buildkite during CICD. We also deliberately set another goal of comparing Cypress against the previous Selenium-based solutions to ultimately determine by data points if we should keep looking or build our test suites with Cypress going forward. We planned to convert existing WebdriverIO tests and any other high priority tests still in STUI over to Cypress tests and compare our developer experiences, velocity, stability, test run times, and maintenance of the tests.
Switching from STUI and WebdriverIO to Cypress
When switching over from STUI and WebdriverIO to Cypress, we tackled it systematically through the same high-level strategy we used when we attempted our migration from STUI to WebdriverIO in our frontend application repos. For more detail on how we accomplished such steps for WebdriverIO, please refer to part 1of the blog post series. The general steps for transitioning to Cypress involved the following:
- Installing and setting up dependencies to hook up with Cypress
- Establishing environment configs and scripts commands
- Implementing E2E tests that pass locally against different environments
- Dockerizing the tests
- Integrating Dockerized tests with Buildkite, our CICD provider
In order to accomplish our secondary goals, we also added extra steps to compare Cypress with the prior Selenium solutions and to eventually scale Cypress across all the frontend teams in the organization:
6. Comparing Cypress in terms of developer experiences, velocity, and stability of the tests vs. WebdriverIO and STUI
7. Scaling to other frontend teams
Step 1: Installing Dependencies for Cypress
To get up and running quickly with Cypress, all we had to do was `npm install cypress` into our projects and start up Cypress for the first time for it to be automatically laid out with a `cypress.json` configuration file and cypress folder with starter fixtures, tests, and other setup files for commands and plugins. We appreciated how Cypress came bundled with Mocha as the test runner, Chai for assertions, and Chai-jQuery and Sinon-Chai for even more assertions to use and chain off of. We no longer had to spend considerable time to research about what test runner, reporter, assertions, and service libraries to install and use in comparison to when we first started with WebdriverIO or STUI. We immediately ran some of the generated tests with their Cypress GUI and explored the many debugging features at our disposal such as time travel debugging, selector playground, recorded videos, screenshots, command logs, browser developer tools, etc.
We also set it up later with Eslint and TypeScript for extra static type checking and formatting rules to follow when committing new Cypress test code. We initially had some hiccups with TypeScript support and some files needing to be JavaScript files like those centered around the plugins files, but for the most part we were able to type check the majority of our files for our tests, page objects, and commands.
Here is an example folder structure that one of our frontend teams followed to incorporate page objects, plugins, and commands:
Step 2: Environment Configs and Scripts
After quickly installing and setting up Cypress to run locally, we needed a way for our Cypress tests to run with varying settings for each environment and wanted to support the same use cases that our WebdriverIO commands allowed us to do. Here is a list illustrating most of the use cases of how we wanted to execute these tests and why we desired to support them:
- Against a Webpack dev server running on localhost (i.e. http://localhost:8000) and that dev server would be pointed to a certain environment API (i.e. https://testing.api.com or https://staging.api.com) like testing or staging.
Why? Sometimes we need to make changes to our local web app such as adding more specific selectors for our tests to interact with the elements in a more robust way or we were in progress of developing a new feature and needed to adjust and validate the existing automation tests would pass locally against our new code changes. Whenever the application code changed and we did not push up to the deployed environment yet, we used this command to run our tests against our local web app. - Against a deployed app for a certain environment (i.e. https://testing.app.com or https://staging.app.com) like testing or staging
Why? Other times the application code does not change but we may have to alter our test code to fix some flakiness or we feel confident enough to add or delete tests altogether without making any frontend changes. We utilized this command heavily to update or debug tests locally against the deployed app to simulate more closely how our tests run in CICD. - Running in a Docker container against a deployed app for a certain environment like testing or staging
Why? This is meant for CICD so we can trigger E2E tests to be run in a Docker container against for example the staging deployed app and make sure they pass before deploying code to production or in scheduled test runs in a dedicated pipeline. When setting up these commands initially, we performed a lot of trial and error to spin up Docker containers with different environment variable values and test to see the proper tests executed successfully before hooking it up with our CICD provider, Buildkite.
First Pass of Environment Configs and Scripts
When we first experimented with setting up Cypress, we did it in the repo that covers https://app.sendgrid.com, a web app which includes feature pages such as Sender Authentication, Email Activity, and Email Validation, and we inevitably shared our discoveries and learnings with the teams behind our Marketing Campaigns web app, which encompasses the https://mc.sendgrid.com domain. We desired to run our E2E tests against our staging environment and utilized Cypress’s command-line interface and options such as --config or --env to accomplish our use cases.
In order to run the Cypress tests against the web app locally on say http://127.0.0.1:8000 or against the deployed staging app URL, we adjusted the baseUrl config flag in the command and added extra environment variables such as testEnv to help load up certain fixtures or environment specific test data in our Cypress tests. For example, API keys used, users created, and other resources may be different across environments. We utilized testEnv to toggle those fixtures or add special conditional logic if some features were not supported in an environment or test setup differed and we would access the environment through a call like Cypress.env(“testEnv”) in our specs.
We then organized our commands cypress:open:* to represent opening up the Cypress GUI for us to select our tests to run through the UI when we locally developed and cypress:run:* to denote executing tests in headless mode, which was more tailored for running in a Docker container during CICD. What came after open or run would be the environment so our commands would read easily like npm run cypress:open:localhost:staging to open up the GUI and run tests against a local Webpack dev server pointing to staging APIs or npm run cypress:run:staging to run tests in headless mode against the deployed staging app and API. The package.json Cypress scripts came out like this:
Evolution of Environment Configs and Scripts
In another project, we evolved our Cypress commands and configurations to take advantage of some Node logic in the cypress/plugins/index.js file to have a base cypress.json file and separate configuration files that would be read based on an environment variable called configFile to load up a specific configuration file. The loaded configuration files would then be merged with the base file to eventually point against a staging or a mock backend server.
In case you are wondering more about the mock backend server, we developed an Express server with backend endpoints simply returning varying responses of static JSON data and status codes (i.e. 200, 4XX, 5XX) depending on query parameters passed through in the requests. This unblocked the frontend to continue to develop the page flows with actual network calls to the mock backend server with responses emulating what the actual API will look like when it is available in the future. We could also simulate varying levels of success and error responses easily for our different UI states that would be otherwise hard to reproduce in production, and since we would be making deterministic network calls, our Cypress tests would be less flaky in firing off the same network requests and responses every time.
We had a base cypress.json file that included shared properties for general timeouts, project ID to hook up with the Cypress Dashboard Service which we will talk about later, and other settings as shown underneath:
We created a config folder in the cypress folder to hold each of our configuration files such as localhostMock.json to run our local Webpack dev server against a local mock API server or staging.json to run against the deployed staging app and API. These configuration files to be diffed and merged with the base config looked like this:
The CICD configuration files had an even simpler JSON file as we needed to set the environment variables dynamically to account for the varying Docker service frontend base URL and mock server API hosts that we will dig into later.
In our cypress/plugins/index.js file, we added logic to read an environment variable called configFile set from a Cypress command that would eventually read the corresponding file in the config folder and merge it with the base cypress.json such as below:
In order to write sensible Cypress commands with environment variables set for our use cases, we took advantage of a Makefile that resembled the following:
With those commands neatly laid out in a Makefile, we could quickly do things like make cypress_open_staging or make cypress_run_staging in our `package.json` npm scripts.
Before, we used to place some commands in one long line that would be difficult to edit without error. Thankfully, the Makefile helped to spread things out much better with readable interpolation of environment variables into the Cypress commands across multiple lines. We could quickly set or export environment variables like configFile for which environment configuration file to load up, BASE_URL to visit our pages, API_HOST for different backend environments, or SPECS to determine which tests to run before we kick off any of the Makefile commands.
We also used Makefile commands for other lengthy npm scripts and Docker commands as well such as building out our Webpack assets, installing dependencies, or running commands concurrently with others. We would finally then translate some Makefile commands into the package.json scripts section, though this was not necessary if someone wanted to only use the Makefile, and it would look like the following:
We purposefully left out a lot of the Cypress CICD commands since they were not commands that would be used in the day to day development and kept the package.json more streamlined as a result. Most importantly, we could see at a glance right away all the Cypress commands related to the mock server and local Webpack dev server versus the staging environments and which ones are “opening” up the GUI rather than “running” in headless mode.
Step 3: Implementing E2E tests locally
When we started to implement E2E tests with Cypress, we referenced our existing tests from WebdriverIO and STUI to convert over and added newer tests for other high priority features, ranging from simple health checks to complicated happy path flows. Translating the existing page objects and test files from WebdriverIO or STUI to equivalent page objects and specs in Cypress proved to be a breeze. It actually resulted in much cleaner code than before with less explicit waiting for elements and better chainability of assertions and other Cypress commands.
For example, the general steps of the tests remained the same from an end user perspective, so the conversion work involved mapping the WebdriverIO or STUI API to the Cypress API in the following ways:
- A lot of commands essentially appeared and worked similar to the point where we were almost just replacing
$orbrowserwithcyorCypressi.e.visiting a page through$(“.button”).click()tocy.get(“.button”).click(),browser.url()tocy.visit(), or$(“.input”).setValue()tocy.get(“.input”).type() - Using
$or$$usually turned into acy.get(...)orcy.contains(...)i.e.$$(“.multiple-elements-selector”)or$(“.single-element-selector”)turned intocy.get(“.any-element-selector”),cy.contains(“text”), orcy.contains(“.any-selector”) - Removing extraneous
$(“.selector”).waitForVisible(timeoutInMs),$(“.selector”).waitUntil(...), or$(“.selector”).waitForExist()calls in favor of letting Cypress by default handle the retries and retrieving of the elements over and over withcy.get(‘.selector’)andcy.contains(textInElement). If we needed a longer timeout than the default, we would usecy.get(‘.selector’, { timeout: longTimeoutInMs })altogether and then after retrieving the element we would chain the next action command to do something with the element i.e.cy.get(“.selector”).click(). - Custom commands with browser.
addCommand(‘customCommand, () => {})` turned into `Cypress.Commands.add(‘customCommand’, () => {})and doing `cy.customCommand()` - Making network requests for setup or teardown through the API using a library called
node-fetchand wrapping it inbrowser.call(() => return fetch(...))and/orbrowser.waitUntil(...)led to making HTTP requests in a Cypress Node server throughcy.request(endpoint)or a custom plugin we defined and made calls likecy.task(taskToHitAPIOrService). - Before when we had to wait for an important network request to possibly finish without any notable UI changes, we had to sometimes resort to using
browser.pause(timeoutInMs), but with Cypress we improved that with the network stubbing functionality and were able to listen and wait for the specific request to finish withcy.server(),cy.route(“method”, “/endpoint/we/are/waiting/for).as(“endpoint”)`, and `cy.wait(“@endpoint”)before kicking off the action that would trigger the request.
After translating a lot of the WebdriverIO syntax and commands over to Cypress commands, we brought over the same concept of having a base page object for common shared functionality and extended page objects for each page we required for the tests. Here is an example of a base page object with a common open() functionality to be shared across all pages.
An extended page object would add getters for element selectors, implement the open() functionality with its page route, and provide any helper functionality as shown below.
Our actual extended page objects also utilized a simple object map to maintain all of our CSS selectors of elements in one place that we would plug into our React components as data attributes, reference in unit tests, and use as our selectors in Cypress page objects. Also, our page object classes at times varied in taking advantage of the class constructor if say a page object was reused for a bunch of similar looking and functioning pages like our Suppressions pages and we would pass arguments to change up the route or specific properties.
As a side note, teams did not need to use page objects, but we appreciated the consistency of the pattern for keeping page functionality and DOM element selector references together with a standard class object structure to share common functionality across all pages. Other teams preferred creating many different files with little utility functions and without the use of ES6 classes, but the important thing to take away was to provide an organized, predictable way to encapsulate everything and write tests for better developer efficiency and maintainability.
We adhered to the same general testing strategy used with our older WebdriverIO tests with attempting to set up the test as much as possible through the API. We especially wanted to avoid building up our setup state through the UI to not introduce flakiness and time wasted for the parts we did not aim to test. Most tests involved this strategy:
- Setting up or tearing down through the API – If we needed to test creating an entity through the UI, we would make sure to first delete the entity through the API. Regardless of how the previous test run ended up in success or failure, the test needed to be properly set up or torn down through the API to ensure the test behaves in a consistent manner and starts with the right conditions.
- Logging in to a dedicated test user through the API – We created dedicated test users per page or even per automation test so our tests would be isolated and not stomp on each other’s resources when run in parallel. We made the same request as our login page through the API and store the cookie before the test starts so we could visit the authenticated page directly and begin the actual test steps.
- Automating the steps from an end-user perspective – After logging into the user through the API, we visited the page directly and automated the steps an end-user would do to finish a feature flow and verify the user sees and interacts with the right things along the way.
In order to reset the test back to its expected original state, we would login to a dedicated test user through the API with a global cy.login command, set a cookie to keep the user logged in, make the API calls necessary to return the user to the desired starting state through either cy.request(“endpoint”) or cy.task(“pluginAction”) calls, and visit the authenticated page we sought to test directly. Then, we would automate the steps to accomplish a user feature flow as shown in the test layout below.
Remember the custom commands we talked about for logging in, cy.login(), and logging out, cy.logout()? We implemented them easily in Cypress in this way so all of our tests would login to a user through the API in the same way.
In addition, we wanted to automate and verify certain complex flows involving email that we could not do well before with WebdriverIO or STUI. Some examples included exporting Email Activity to a CSV, going through the Send To Coworker flow for Sender Authentication, or exporting Email Validation results to a CSV. Cypress prevents one from accessing multiple superdomains in one test, so navigating to an email client through a UI we do not own was flaky and not an option.
We instead developed Cypress plugins through their cy.task(“pluginAction”) commands to use some libraries within the Cypress Node server to connect to a test email IMAP client/inbox such as SquirrelMail to check for matching emails in an inbox after prompting an action in the UI and for following redirect links from those emails back into our web app domain to verify certain download pages showed up and effectively completing a whole customer flow. We implemented plugins that would wait for emails to arrive in the SquirrelMail inbox given certain subject lines, delete emails, send emails, trigger email events, polling backend services, and doing much more useful setups and teardowns through the API for our tests to use.
To provide more insight into what we actually tested with Cypress, we covered a plethora of high value cases such as these:
- Health checks for all of our pages aka touring the app – We wanted to make sure pages loaded with some content cause sometimes certain backend services or the frontend hosting would be down. We also recommended doing these tests first to build up the mental muscle memory of building out page objects with selectors and helper functions and to get quick, working tests running against an environment.
- CRUD operations on a page – We would reset the tests accordingly through the API always and then test specifically the create, read, update, or delete in the UI. For example, if we tested being able to create a domain authentication through the UI, regardless of how the last test run ended we needed to make sure that the domain we were going to create through the UI was at first deleted through the API before proceeding with the automated UI steps to create the domain and avoid collisions. If we tested being able to delete a suppression through the UI, we made sure to create the suppression through the API first and then proceed with the steps.
- Testing out search filters on a page – We tested out setting a bunch of advanced search filters with Email Activity and visiting the page with query parameters to be sure the filters were auto-populated. We also added data through the API for Email Validation and once again kicked off different search filters and validated the table matched the search filters in that page.
- Different user accesses – At Twilio SendGrid, we have parent accounts that can have teammates with varying scopes or access permissions or subusers underneath them who also have varying degrees of access and behaves somewhat similar to a parent account. Teammates with read only versus admin access for certain pages and subusers would see or not see certain things on a page and that made it easy to automate logging into those types of users and checking what they see or not see in the Cypress tests.
- Different user packages – Our users also can vary in the types of free to paid packages such as Essentials, Pro, and Premier and those packages can see or not see certain things on a page as well. We would log in to users with different packages and verify quickly the features, copy, or pages the users had access to in the Cypress tests.
Step 4: Dockerizing the tests
When executing each Buildkite pipeline step on a new AWS machine in the cloud, we could not simply call npm run cypress:run:staging because those machines do not have Node, browsers, our application code, or any other dependencies to actually run the Cypress tests. When we set up WebdriverIO before, we needed to assemble three separate services in a Docker Compose file to have the proper Selenium, Chrome, and application code services operate together for tests to run.
With Cypress, it was much more straightforward as we only required the Cypress base Docker image, cypress/base, to set up the environment in a Dockerfile and only one service in a docker-compose.yml file with our application code to run the Cypress tests. We will go over one way of doing it as there are other Cypress Docker images to use and other ways to set up the Cypress tests in Docker. We encourage you to look at the Cypress documentation for alternative
To bring up a service with all of our application and test code necessary to run the Cypress tests, we crafted a Dockerfile called Dockerfile.cypress and installed all the node_modules and copied the code over to the image’s working directory in a Node environment. This would be used by our cypress Docker Compose service and we achieved the Dockerfile setup in the following way:
With this Dockerfile.cypress, we can integrate Cypress to run selected specs against a certain environment API and deployed app through one Docker Compose service called cypress. All we had to do was interpolate some environment variables such as SPECS and BASE_URL to run selected Cypress tests against a certain base URL through the npm run cypress:run:cicd:staging command which looks like this, ”cypress:run:cicd:staging”: “cypress run --record --key --config baseUrl=$BASE_URL --env testEnv=staging” .
These environment variables would be set through either the Buildkite pipeline’s settings/configuration files or exported dynamically when triggering Cypress tests to run from our deployment pipeline. An example docker-compose.cypress.yml file looked similar to this:
There are also a couple other things to observe. For example, you can see the VERSION environment variable which allows us to reference a specific tagged Docker image. We will demonstrate later how we tag a Docker image and then pull down the same Docker image for that build to run against the correct code for the Cypress tests.
In addition, you will also notice the BUILDKITE_BUILD_ID passed through, which comes for free along with other Buildkite environment variables for every build we kick off, and the ci-build-id flag. This enables Cypress’s parallelization feature and when we set a certain number of machines allocated for the Cypress tests, it will auto-magically know how to spin up those machines and separate our tests to run across all those machine nodes to optimize and speed up our test run times.
We finally also took advantage of volume mounting and Buildkite’s artifacts feature. We upload the videos and screenshots to be directly accessible through the Buildkite UI “Artifacts” tab in case we run out of our paid allotted test recordings for the month or somehow cannot access the Dashboard Service. Whenever one runs the Cypress “run” command in headless mode, there is output in the cypress/videos and cypress/screenshots folders for one to review locally and we simply mount those folders and upload them to Buildkite for us as a fail-safe.
Step 5: Integrating with CICD
Once we got the Cypress tests to run successfully in a Docker container against different environments, we began to integrate with Buildkite, our CICD provider. Buildkite provided ways to execute steps in a .yml file on our AWS machines with Bash scripts and environment variables set either in the code or through the repo’s Buildkite pipeline settings in the web UI. Buildkite also allowed us to trigger this testing pipeline from our main deploy pipeline with exported environment variables and we would reuse these test steps for other isolated test pipelines that would run on a schedule for our QAs to monitor and look at.
At a high level, our testing Buildkite pipelines for Cypress and also our previous WebdriverIO pipelines shared the following similar steps:
- Set up the Docker images. Build, tag, and push the Docker images required for the tests up to the registry so we can pull it down in a later step.
- Run the tests based on environment variable configurations. Pull down the tagged Docker images for the specific build and execute the proper commands against a deployed environment to run selected test suites from the set environment variables.

Here is an example of a pipeline.cypress.yml file that demonstrates setting up the Docker images in the “Build Cypress Docker Image” step and running the tests in the “Run Cypress tests” step:
One thing to notice is the first step, “Build Cypress Docker Image”, and how it sets up the Docker image for the test. It used the Docker Compose build command to build the cypress service with all of the application test code and tagged it with the latest and ${VERSION} environment variable so we can eventually pull down that same image with the proper tag for this build in a future step. Each step may execute on a different machine in the AWS cloud somewhere, so the tags uniquely identify the image for the specific Buildkite run. After tagging the image, we pushed up the latest and version tagged image up to our private Docker registry to be reused.
In the “Run Cypress tests” step, we pull down the image we built, tagged, and pushed in the first step and start up the Cypress service to execute the tests. Based on environment variables such as SPECS and BASE_URL, we would run specific test files against a certain deployed app environment for this specific Buildkite build. These environment variables would be set through the Buildkite pipeline settings or it would be triggered dynamically from a Bash script that would parse a Buildkite select field to determine which test suites to run and against which environment.
When we select which tests to run during our Buildkite CICD deploy pipeline and trigger a dedicated triggered tests pipeline with certain exported environment variables, we follow the steps in the pipeline.cypress.yml file to make it happen. An example of triggering the tests after deploying some new code to a feature branch environment from the deploy pipeline looks like this:

The triggered tests would run in a separate pipeline and after following the “Build #639” link, it would take us to the build steps for the triggered test run like below:

Reusing the same pipeline.cypress.yml file for our dedicated Cypress Buildkite pipelines running on a schedule, we have builds such as the one running our “P1”, highest priority E2E tests, as shown in the photo underneath:

All we have to do is set the proper environment variables for things such as which specs to run and which backend environment to hit in the Buildkite pipeline’s settings. Then, we can configure a Cron scheduled build, which is also in the pipeline settings, to kick off every certain number of hours and we are good to go. We would then create many other separate pipelines for specific feature pages as needed to run on a schedule in a similar way and we would only vary the Cron schedule and environment variables while once again uploading the same `pipeline.cypress.yml` file to execute.
In each of those “Run Cypress tests” steps, we can see the console output with a link to the recorded test run in the paid Dashboard Service, the central place to manage your team’s test recordings, billing, and other Cypress stats. Following the Dashboard Service link would take us to a results view for developers and QAs to take a look at the console output, screenshots, video recordings, and other metadata if required such as this:

Step 6: Comparing Cypress vs. WebdriverIO/STUI
After diving into our own custom Ruby Selenium solution in STUI, WebdriverIO, and finally Cypress tests, we recorded our tradeoffs between Cypress and Selenium wrapper solutions.
Pros
- It’s not another Selenium wrapper – Our previous solutions came with a lot of Selenium quirks, bugs, and crashes to work around and resolve, whereas Cypress arrived without the same baggage and troubles to deal with in allowing us full access to the browser.
- More resilient selectors – We no longer had to explicitly wait for everything like in WebdriverIO with all the
$(.selector).waitForVisible()calls and now rely oncy.get(...)and cy.contains(...)commands with their default timeout. It will automatically keep on retrying to retrieve the DOM elements and if the test demanded a longer timeout, it is also configurable per command. With less worrying about the waiting logic, our tests became way more readable and easier to chain. - Vastly improved developer experience – Cypress provides a large toolkit with better and more extensive documentation for assertions, commands, and setup. We loved the options of using the Cypress GUI, running in headless mode, executing in the command-line, and chaining more intuitive Cypress commands.
- Significantly better developer efficiency and debugging – When running the Cypress GUI, one has access to all of the browser console to see some helpful output, time travel debug and pause at certain commands in the command log to see before and after screenshots, inspect the DOM with the selector playground, and discern right away at which command the test failed. In WebdriverIO or STUI we struggled with observing the tests run over and over in a browser and then the console errors would not point us toward and would sometimes even lead us astray from where the test really failed in the code. When we opted to run the Cypress tests in headless mode, we got console errors, screenshots, and video recordings. With WebdriverIO we only had some screenshots and confusing console errors. These benefits resulted in us cranking out E2E tests much faster and with less overall time spent wondering why things went wrong. We recorded it took less developers and often around 2 to 3 times less days to write the same level of complicated tests with Cypress than with WebdriverIO or STUI.
- Network stubbing and mocking – With WebdriverIO or STUI, there was no such thing as network stubbing or mocking in comparison to Cypress. Now we can have endpoints return certain values or we can wait for certain endpoints to finish through
cy.server()andcy.route(). - Less time to set up locally – With WebdriverIO or STUI, there was a lot of time spent up front researching which reporters, test runners, assertions, and services to use, but with Cypress, it came bundled with everything and started working after just doing an
npm install cypress. - Less time to set up with Docker – There are a bunch of ways to set up WebdriverIO with Selenium, browser, and application images that took us considerably more time and frustration to figure out in comparison to Cypress’s Docker images to use right out of the gate.
- Parallelization with various CICD providers – We were able to configure our Buildkite pipelines to spin up a certain number of AWS machines to run our Cypress tests in parallel to dramatically speed up the overall test run time and uncover any flakiness in tests using the same resources. The Dashboard Service would also recommend to us the optimal number of machines to spin up in parallel for the best test run times.
- Paid Dashboard Service – When we run our Cypress tests in a Docker container in a Buildkite pipeline during CICD, our tests are recorded and stored for us to look at within the past month through a paid Dashboard Service. We have a parent organization for billing and separate projects for each frontend application to check out console output, screenshots, and recordings of all of our test runs.
- Tests are way more consistent and maintainable – Tests passed way more consistently with Cypress in comparison to WebdriverIO and STUI where the tests kept on failing so much to the point where they were often ignored. Cypress tests failing more often signaled actual issues and bugs to look into or suggested better ways to refactor our tests to be less flaky. With WebdriverIO and STUI, we wasted a lot more time in maintaining those tests to be somewhat useful, whereas with Cypress, we would every now and then adjust the tests in response to changes in the backend services or minor changes in the UI.
- Tests are faster – Builds passed way more consistently and overall test run times would be around 2 to 3 times faster when run serially without parallelization. We used to have overall test runs that would take hours with STUI and around 40 minutes with WebdriverIO, but now with way more tests and with the help of parallelization across many machine nodes, we can run over 200 tests in under 5 minutes.
- Room to grow with added features in the future – With a steady open-source presence and dedicated Cypress team working towards releasing way more features and improvements to the Cypress infrastructure, we viewed Cypress as a safer bet to invest in rather than STUI, which would require us to engineer and solve a lot of the headaches ourselves, and WebdriverIO, which appeared to feel more stagnant in new features added but with the same baggage as other Selenium wrappers.
Cons
- Lack of cross-browser support – As of this writing, we can only run our tests against Chrome. With WebdriverIO, we could run tests against Chrome, Firefox, Safari, and Opera. STUI also provided some cross-browser testing, though in a much limited form since we created a custom in-house solution
- Cannot integrate with some third-party services – With WebdriverIO, we had the option to integrate with services like BrowserStack and Sauce Labs for cross-browser and device testing. However, with Cypress there are no such third-party integrations but there are some plugins with services like Applitools for visual regression testing available. STUI, on the other hand, also had some small integrations with TestRail , but as a compromise, we log out the TestRail links in our Cypress tests so we can refer back to them if we needed to.
- Requires workarounds to test with iframes – There are some issues around handling iframes with Cypress. We ended up creating a global Cypress command to wrap how to deal with retrieving an iframe’s contents as there is no specific API to deal with iframes like how WebdriverIO does.
To summarize our STUI, WebdriverIO, and Cypress comparison, we analyzed the overall developer experience (related to tools, writing tests, debugging, API, documentation, etc.), test run times, test passing rates, and maintenance as displayed in this table:

Following our analysis of the pros and cons of Cypress versus our previous solutions, it was pretty clear Cypress would be our best bet to accomplish our goal of writing fast, valuable, maintainable, and debuggable E2E tests we could integrate with CICD.
Though Cypress lacked features such as cross-browser testing and other integrations with third-party services that we could have had with STUI or WebdriverIO, we most importantly need tests that work more often than not and with the right tools to confidently fix broken ones. If we ever needed cross-browser testing or other integrations we could always still circle back and use our knowledge from our trials and experiences with WebdriverIO and STUI to still run a subset of tests with those frameworks.
We finally presented our findings to the rest of the frontend organization, engineering management, architects, and product. Upon demoing the Cypress test tools and showcasing our results between WebdriverIO/STUI and Cypress, we eventually received approval to standardize and adopt Cypress as our E2E testing library of choice for our frontend teams.
Step 7: Scaling to Other Frontend Teams
After successfully proving that using Cypress was the way to go for our use cases, we then focused on scaling it across all of our frontend teams’ repos. We shared lessons learned and patterns of how to get up and running, how to write consistent, maintainable Cypress tests, and of how to hook those tests up during CICD or in scheduled Cypress Buildkite pipelines.
To promote greater visibility of test runs and gain access to a private monthly history of recordings, we established our own organization to be under one billing method to pay for the Dashboard Service with a certain recorded test run limit and maximum number of users in the organization to suit our needs.
Once we set up an umbrella organization, we invited developers and QAs from different frontend teams and each team would install Cypress, open up the Cypress GUI, and inspect the “Runs” and “Settings” tab to get the “Project ID” to place in their `cypress.json` configuration and “Record Key” to provide in their command options to start recording tests to the Dashboard Service. Finally, upon successfully setting up the project and recording tests to the Dashboard Service for the first time, logging into the Dashboard Service would show that team’s repo under the “Projects” tab like this:

When we clicked a project like “mako”, we then had access to all of the test runs for that team’s repo with quick access to console output, screenshots, and video recordings per test run upon clicking each row as shown below:

For more insights into our integration, we set up many separate dedicated test pipelines to run specific, crucial page tests on a schedule like say every couple hours to once per day. We also added functionality in our main Buildkite CICD deploy pipeline to select and trigger some tests against our feature branch environment and staging environment.
As one could expect, this quickly blew through our allotted recorded test runs for the month, especially since there are multiple teams contributing and triggering tests in various ways. From experience, we recommend being mindful of how many tests are running on a schedule, how frequent those tests are run, and what tests are run during CICD. There may be some redundant test runs and other areas to be more frugal such as dialing back the frequency of scheduled test runs or possibly getting rid of some altogether for triggering tests only during CICD.
The same rule of being frugal applies to adding users as we emphasized providing access to only developers and QAs in the frontend teams who will be using the Dashboard Service heavily rather than upper management and other folks outside of those teams to fill those limited spots.
What we’re looking forward to with Cypress
As we mentioned before, Cypress demonstrated a lot of promise and potential for growth in the open source community and with its dedicated team in charge of delivering more helpful features for us to use with our E2E tests. A lot of the downsides we highlighted are currently being addressed and we look forward to things such as:
- Cross-browser support – This is a big one because a lot of the push back from us adopting Cypress came from its usage of only Chrome in comparison to Selenium-based solutions, which supported browsers such as Firefox, Chrome, and Safari. Thankfully, more reliable, maintainable, and debuggable tests won out for our organization and we hope to boost up our test suites with more cross-browser tests in the future when the Cypress team releases such cross-browser support.
- Network layer rewrite – This is also a huge one as we tend to use the Fetch API heavily in our newer React areas and in older Backbone/Marionette application areas we still used jQuery AJAX and normal XHR-based calls. We can easily stub out or listen for requests in the XHR areas, but had to do some hacky workarounds with fetch polyfills to achieve the same effect. The network layer rewrite is supposed to help alleviate those pains.
- Incremental improvements to the Dashboard Service – We already saw some new UI changes to the Dashboard Service recently and we hope to continue to see it grow with more stat visualizations and breakdowns of useful data. We also use the parallelization feature heavily and check out our failing test recordings in the Dashboard Service often, so any iterative improvements to layout and/or features would be nice to see.
Adopting Cypress into the Future
For our organization, we valued the developer efficiency, debugging, and stability of the Cypress tests when run under the Chrome browser. We achieved consistent, valuable tests with less maintenance down the road and with many tools to develop new tests and fix existing ones.
Overall, the documentation, API, and tools at our disposal far outweighed any cons. After experiencing the Cypress GUI and paid Dashboard Service, we definitely did not want to go back to WebdriverIO or our custom Ruby Selenium solution.
We hooked up our tests with Buildkite and accomplished our goal of providing a way to write consistent, debuggable, maintainable, and valuable E2E automation tests for our frontend applications to integrate with CICD. We proved with evidence to the rest of the frontend teams, engineering higher ups, and product owners of the benefits of adopting Cypress and dropping WebdriverIO and STUI.
Hundreds of tests laters across frontend teams in Twilio SendGrid and we caught many bugs in our staging environment and were able to quickly fix any flaky tests on our side with much more confidence than ever before. Developers and QAs no longer dread the thought of writing E2E tests but now look forward to writing them for every single new feature we release or for every older feature that could use some more coverage.