When you’re running your online store with WooCommerce, getting GA to track the right data can be a bit of a hassle
As a cybernaut (great word, huh?), you probably feel like you don’t need yet another motivational quote in your life – if you’ve spent any time on Instagram recently, you understand where I’m coming from – but as a marketer or entrepreneur, you know these particular words ring true.
To do this “measuring” thing properly, we tend to follow the same recursive loop:
- Set a goal
- Collect data via analytics tools
- Use that data to set a benchmark
- Implement a strategy to achieve the goal
- Track those metrics to measure progress towards the goal
- Find areas for improvement
- Make changes to your strategy
- Rinse and repeat
Sound familiar?
The most common analytics platform used by marketers for step two of that process is Google Analytics (GA). GA is wonderful because it’s comprehensive, powerful and free to use.
But, let’s be real here, when you’re running your online store with WooCommerce, getting GA to track the right data can be, well, a bit of a hassle.

Download our Premium Resource – Implementing e-commerce merchandising best practices
This guide will help you improve your site’s user experience, making it easier for customers to navigate and convert to a sale.
Access the Implementing e-commerce merchandising best practices
Let’s talk about what metrics you want to measure (and why you need GA). Then I’ll show you how to properly set up Google Analytics to work with WooCommerce.
E-commerce metrics you should track in Google Analytics
There’s some debate about which e-commerce metrics are worth your attention, as the “right” metrics can vary depending on your industry and order volume. With that said, from a pure “revenue growth” standpoint, there are a few metrics that are generally useful to track for all stores. After working with countless e-commerce brands, my team and I have found these e-commerce metrics have the biggest impact and significance.
1. Sales conversion rate
How much of your site traffic converts to sales? Sales conversion rate (or just “conversion rate” or CVR) measures the percentage of visitors to your site who end up making a purchase.
Studying conversion rate gives you a better idea of how your efforts (marketing, site design, paid advertising, etc.) translate into sales. You can track your conversion rate site-wide, for individual pages (like a single product page), or for specific campaigns (like an email marketing campaign).
Pro tip
Make note of big changes (like a new marketing campaign, product launch, or event) so you can correlate any increases or dips in your rate to external factors that may have influenced it.
2. Customer acquisition cost (CAC)
Logically, we’d think that the more customers you acquire, the more money you’ll make. However, while we’re increasing revenue via better conversion rates, we need to look at cost, too. If the cost to get a customer is more than what they’ll spend in your store, you’ll find your accounts in the red.
That’s why tracking your customer acquisition costs is so important. CAC is the ratio of total marketing spend to new or first-time customer count. If you spend $500 to get ten new customers, your CAC is $50.
For most e-commerce stores, losing money to gain a new customer should be avoided. However, if there’s a network effect to your product (such as a membership community or social component), this rule can be bent while you’re in growth mode. It’s also sometimes appropriate for startups in winner-take-all markets to lose money on customer acquisition in order to grow faster, but that’s not likely the case for most e-commerce shops.
3. Customer lifetime value (LTV)
LTV projects how much revenue a customer will bring into your business throughout the lifetime of their relationship with your store. If your average customer spends $50, for example, and makes four purchases over two years, your customer LTV is $200.
Figuring out accurate LTV requires a fair amount of historical data, but Google Analytics can project your LTV using other metrics, including revenue per user, sessions per user, and goal completion per user.
Your LTV is important to track in relation to the CAC (CAC:LTV ratio). If you’re spending $50 to acquire a new customer, but your LTV is just $25, that won’t be sustainable for your store.
4. Average order value (AOV)
Do you know, on average, how much a customer will spend each time they buy from you? You may be able to guess which products will be purchased frequently, but knowing the order value of new purchases is a great metric for a store of any size, as it’s one of the easiest metrics to track and influence.

With e-commerce tracking turned on in GA, you can get a detailed view of AOV (and the other metrics I’ve mentioned so far, too).
Increasing AOV is a primary goal for all e-commerce brands. Boosting average order value is an easy way to increase LTV and improve your CAC:LTV ratio. There are a few strategies that we’ve found to work well, but you first need to know your current benchmark before you can take steps toward making it better.
5. Cart abandonment
There are many reasons online shoppers fill their carts with products only to walk away from them right before they’re about to complete a purchase and not all of them are within your control. For many e-commerce companies, this metric can sting a bit because it means you inspired interest in your products, and maybe even did everything right, but the revenue was still lost.
Rather than focus on the negative, you can use this data to your advantage. Tracking data around abandoned carts, like your abandonment rate and where in your funnel customers are dropping off, can help you fix your site and know when and how to trigger remarketing campaigns or abandoned cart emails to help recover that income.
How to set up Google Analytics for WooCommerce
Getting WooCommerce to report data to Google Analytics correctly can be the source of some serious irritation.
One of the easiest ways to get WooCommerce and GA working together seamlessly and effectively as possible is to use the WooCommerce Google Analytics Pro plugin. This integration adds enhanced e-commerce tracking and monitors several events on your store (such as discount usage). There’s also a free version available that does basic e-commerce tracking, though you’ll miss out on tracking some events and checkout behavior funnels.
These plugins streamline the process for sending data from your site to Google Analytics and let you set up almost everything you need to start reporting to GA correctly from inside your WordPress dashboard.
Set up WooCommerce Google Analytics Pro
I’m going to use the Pro version of the plugin for a couple reasons: it adds more detailed tracking data for e-commerce events, and it’s built by my team at SkyVerge, so I’m very familiar.
Once you’ve purchased it, upload the plugin within WordPress by going to Plugins > Add new, then clicking “Activate”.
Now you’re ready to connect your site to GA. Go to WooCommerce > Settings > Integrations and go to the “Google Analytics Pro” section (if it’s not the first integration to show up). This is what you should be looking at:
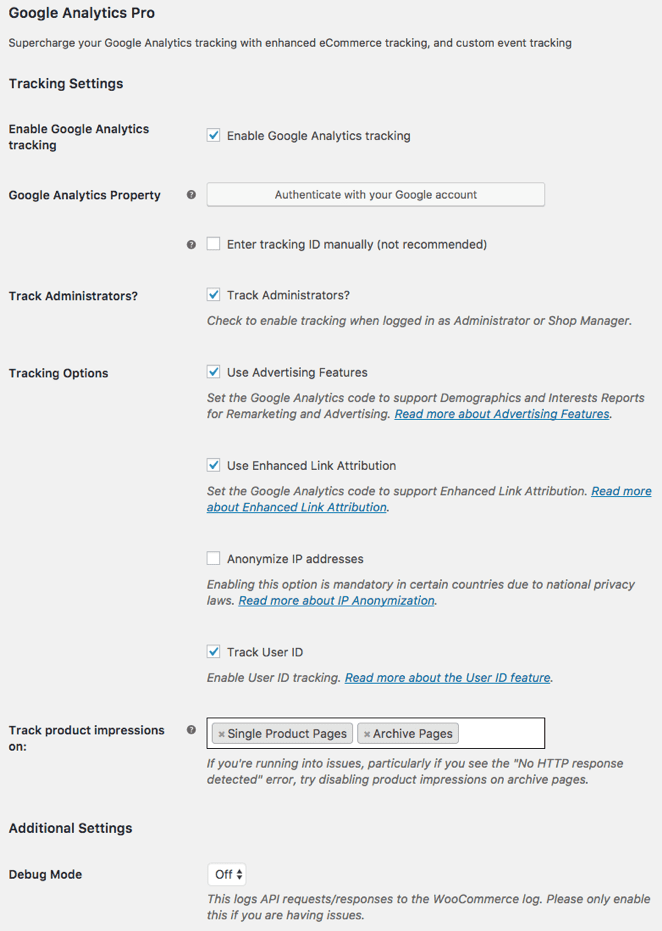
The two most important things to do here are:
- Check the box labeled ‘Enable Google Analytics Tracking’.
- Authenticate your connection by clicking on ‘Authenticate with your Google Account’ (use the Google account that owns your website’s Google Analytics property) and following the steps.
Once you enable Google Analytics tracking, your GA account will automatically switch on a bunch of enhanced e-commerce data tracking features that make calculating and logging the metrics mentioned earlier even easier.
Note: the plugin tracks the Event Names that are listed in the plugin settings by default. If you don’t want to track a certain event, you need to remove the name from the input area and tracking will stop.
![]()
Turning on checkout funnel tracking
With the Enhanced e-commerce feature turned on, Google will automatically turn on a Checkout Behavior Analysis, which is designed to let you see how your users move through your checkout process.
WooCommerce Google Analytics Pro will automatically populate the checkout behavior funnel, and you can see the steps it will use by scrolling down to “Checkout funnel”. As long as the event listed has a name in your plugin settings, it will be included in the funnel.
![]()
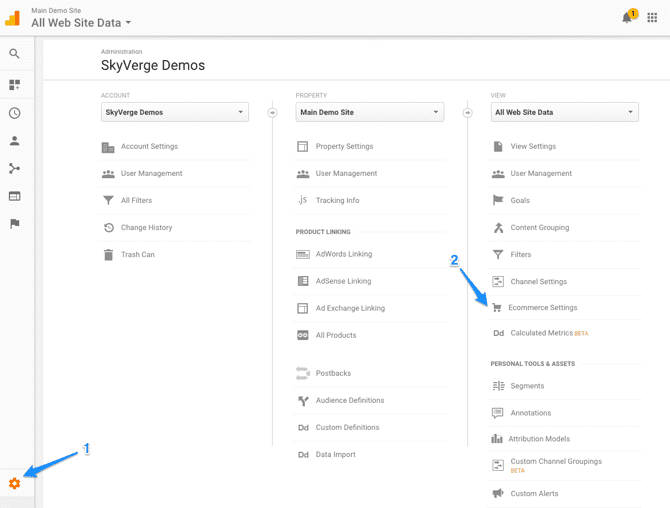
If desired, you can adjust event names, but it’s not possible to customize which events are used or the order in which they happen. You’ll want to create a funnel in your GA account that mirrors the one sent by the plugin. You can do so by going to your GA account settings and then clicking E-commerce Settings.
There you will find the Checkout labeling options and you can change them as needed.
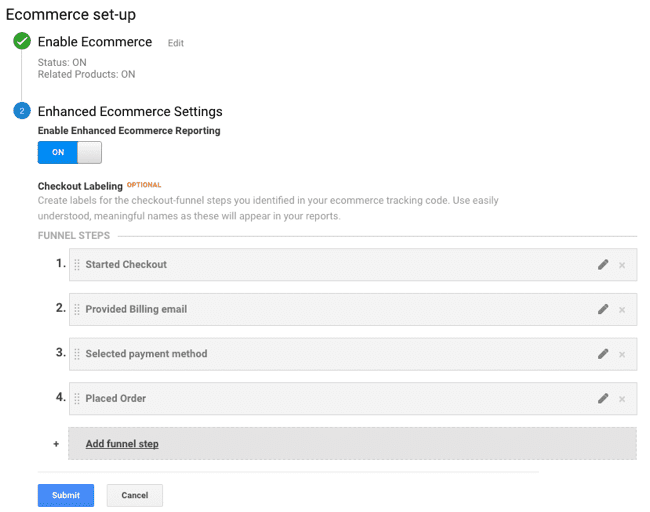
If you’ve removed some events from being tracked in the plugin, you can remove the nonexistent steps in your GA account, too. Just make sure if you remove a step in GA that you disable the option in your plugin settings, as well.
Once you have the right steps enabled in your plugin settings, you’ll need to save the settings to make them stick.
We’re done! Your site is properly connected to Google Analytics to track e-commerce data from WooCommerce.
Monitoring your metrics
To wrap it up, let’s bring this full circle: where do you find these metrics we talked about?
To find your conversion rate as well as your average order value for a given time period, you’ll want to visit Conversion > E-commerce > Overview in your GA account. This overview calculates conversion rate (transactions divided by total visitors) for your selected date range, along with your AOV.
![]()
Tracking customer acquisition cost isn’t as simple, as Google likely doesn’t have the data on your total marketing spend. I’d recommend tracking that budget separately, then using the free New Customer Report plugin for WooCommerce to determine the total of the new customer acquired in your date range to calculate this manually.
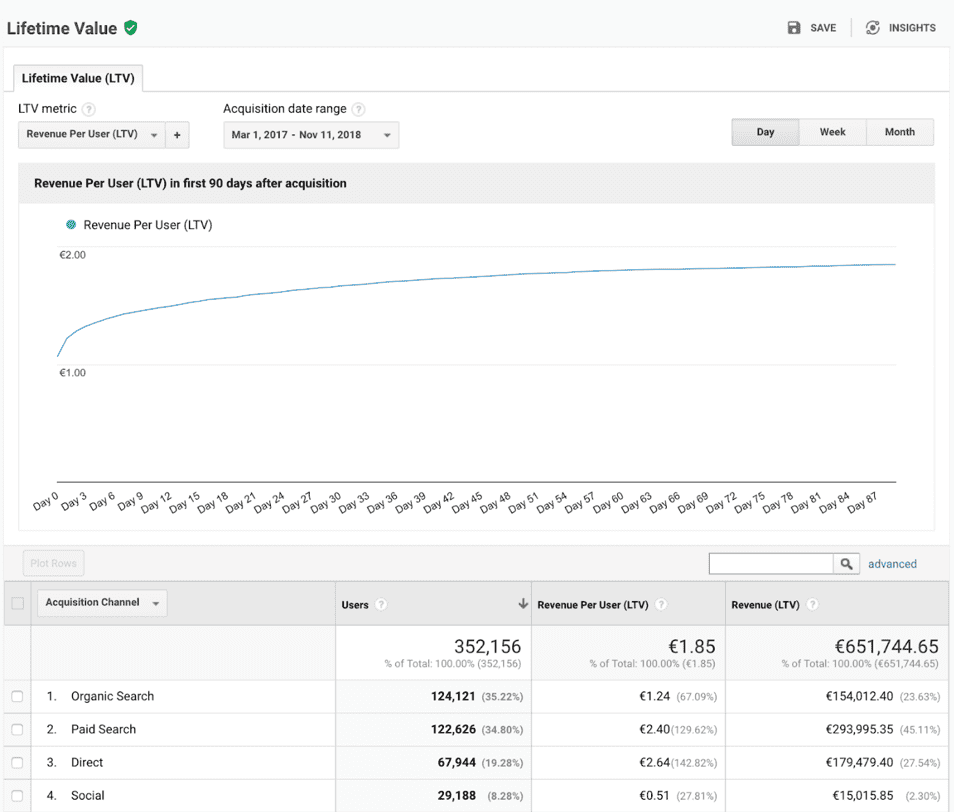
You can get lifetime value from Google Analytics by going to Audience > Lifetime value. However, note that Google will measure LTV (a) only over the last 90 days, as it anonymizes data older than that by default, and (b) for every visitor, not the purchaser. So, this can be useful to determine lifetime value per visitor.
To determine LTV for customers, you’ll likely need to do this outside of WooCommerce and GA. This is something we track on an ongoing basis in Jilt, or you could export orders for a given range and divide total revenue by unique customers (the Customer / Order / Coupon CSV Export plugin is handy for this).
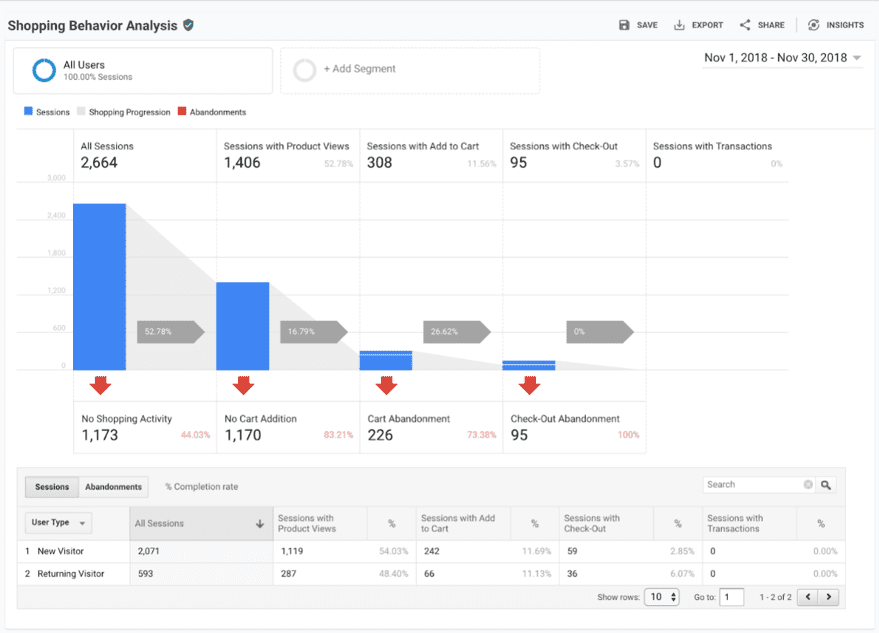
Finally, to track cart abandonment rate, check out the Conversions > E-commerce > Shopping behavior report. This shows you where customers drop off in your shopping funnel, and whether they’ve abandoned on the cart page, or on the checkout page.
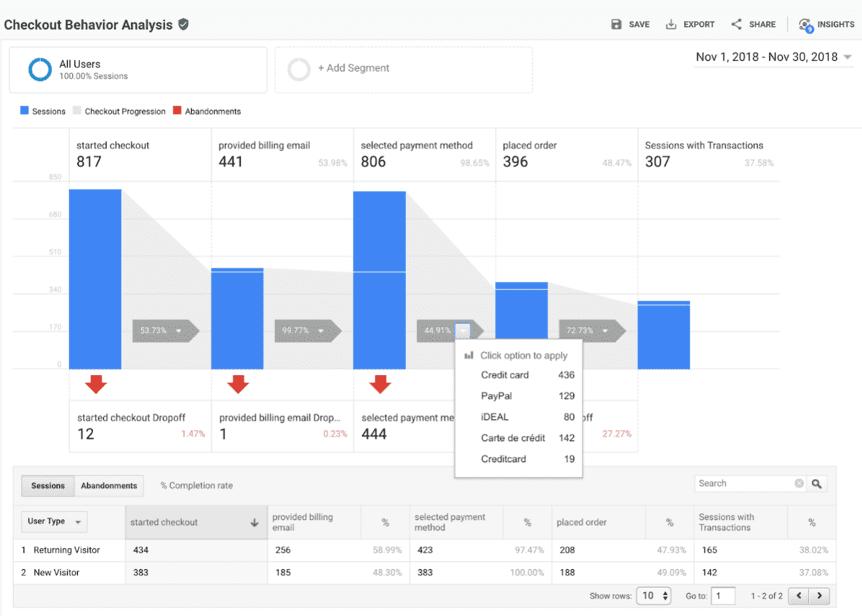
Since you’ve stuck with me this long, here are a couple of bonus reports you’ll find helpful. Don’t forget that you can track checkout behavior in a more detailed way as well from Conversions > E-commerce > Checkout behavior. This is helpful to see your checkout abandonment in greater detail and to see which steps users complete before leaving your checkout page.
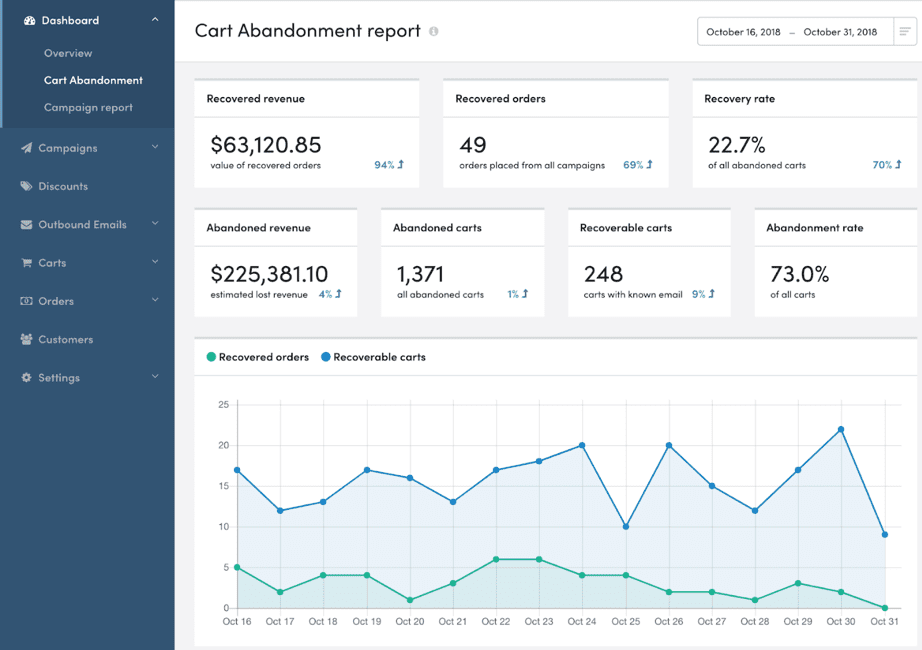
You can also get some of these insights at a glance from our dashboards in Jilt, especially for abandonment rate.
Final thoughts
That’s a wrap! In total, it takes about eight to ten minutes or so to get a new site connected to GA and providing valuable metrics for your store. Understanding those metrics will help you make better decisions about everything from how to spend your marketing budget to which products are selling best to what parts of your website need attention.