

If you are someone who is interested in setting up an online store on your WordPress website, WooCommerce is the simplest and best plugin you can use. As the most popular e-commerce plugin available, WooCommerce created by WooThemes will allow you to create an attractive, customized, and powerful store that you can manage and maintain yourself all right within WordPress.
Why WooCommerce?
There are many special features about WooCommerce that set it apart from other e-commerce plugins. Here are the most important ones:
It’s Free- There are no licensing, hidden, or subscription fees that you pay at any time.
It’s Open Source- WooCommerce has over 350 contributors that regularly develop new features and keep the plugin updated to make sure that it is always working just as you expect it to.
Setup is Fast and Easy- Just follow the instructions and you’ll have your store up and going in a matter of hours.
Huge Choice of Extensions- There are hundreds of extensions available that you can access so you can customize your store exactly how you want it. You can also remove them as you wish.
It’s All in Your Control- Your store won’t be hosted on anyone else’s server, which means you are always the boss and no one can shut you down without your consent. All your data belongs to you at all times.
Seamless Integration- WooCommerce is set up to easily integrate with any theme or design on a WordPress site as well as any service you use. And, your store will be a natural part of your site so your customers don’t have to divert to a separate site.
Full Customization- Many e-commerce plugins have pre-determined settings and constraints for creating a store. WooCommerce allows you to change anything you want at any time including your page display and shipping options.
Payment Collection Options- The plugin comes with a variety of methods to collect payment from your customers. You can choose to allow bank credit cards, electronic bank transfers, PayPal, and even cash. You can also set up your store to work with over 140 region-specific gateways to collect payment such as Amazon Payment, Stripe, and more.
REST API Included- With a REST API, you can access your store’s data at anytime from anywhere so you can modify and grow your store as necessary.
Full Security- WooCommerce has a dedicated team of developers that regularly monitors the internet to detect and patch any viruses or bugs that try to infiltrate your site.
Stability- In 2015, WooCommerce was acquired by Automattic, the same company that owns WordPress.com and supports the WordPress Foundation. Because Automattic owns both, you know neither of them are going anywhere any time soon.
With so many features included in the WooCommerce plugin, it is easy to understand why it has become so popular with WordPress users.
You Can Sell Anything with WooCommerce
Whatever type of business you are in and whatever product you want to sell, you can do with WooCommerce. Here are a few examples of what you can sell:
• Physical products, either simple in nature or with feature options such as colors or size, or a selection from a specific group of items
• Digital downloads such as ebooks, software, calendars, or any content upgrades
• Services you offer
• Affiliate products you are selling
• Appointments or reservations
• Subscriptions, both one-time and recurring
• Memberships
You can literally sell anything with WooCommerce. And, if you’re already familiar with WordPress and how it works, it will be easy for you to set up.
The First Steps to Setting up WooCommerce
If you are a beginner to setting up a WordPress website, there are a few initial steps you need to take before you start creating your online store.
First, pick a hosting service and claim your domain name (your business name). There are many good hosting services available. BlueHost are the number 1 choice for hosting according to WordPress. You could also use a domain name registered elsewhere.
Next, install WordPress through your hosting service’s dashboard or user panel by following the on-screen instructions. If you have any trouble, contact your hosting service’s customer service department.
Here is a more detailed guide to installing WordPress with BlueHost
Design Your Store’s Theme
It is very important to pick the right look, or theme, for your new store. WordPress offers many choices of website themes at very affordable prices, some even free, and all customizable. Yours may be compatible with WooCommerce already, but if you find that your theme isn’t compatible then you will need to change it.
WordPress has free default themes that will work as long as you have a child theme installed with it. A child theme will allow you to customize your theme beyond what the default is designed to do. Plus, it preserves your modifications when you update to your theme.
Regardless if your current theme is compatible or not, it is best to choose a WooCommerce-specific theme if you want your store to be successful. These themes have been optimized to work with WordPress, and they offer the features and functionality your store needs while keeping the creative design options you have in mind.
To find a suitable theme, go to WooCommerce’s website and take a look at what they offer. There are other companies such as ThemeForest that offer many choices of WooCommerce themes, but start with WooCommerce’s site first. They have many to choose from, so you are sure to find one you like. Plus, you can be sure it is compatible. Be aware that they are all premium themes, which means you must pay for them.
Storefront is WooCommerce’s free, default theme. It is a good theme to use if you are just starting out. It is simple and easy to set up. If you decide you want to change your theme later, you can do that.
After you have chosen a theme, install it on your WordPress site and double check that your store’s new URL is correct.
Finding the WooCommerce Plugin
Once you have WordPress and the theme installed, log into the admin page of your site.
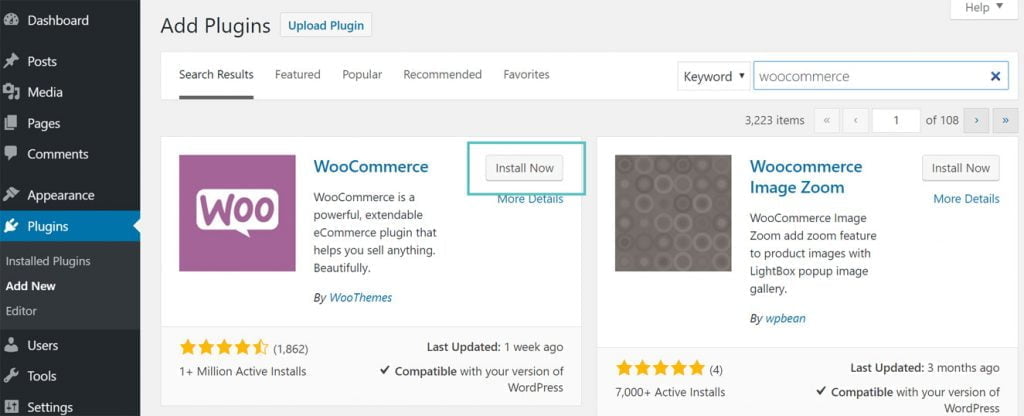
On the left side of the screen, you will see a navigation panel where you manage every aspect of your site. This is your dashboard. Click the Plugins tab then “Add New.” In the upper right corner, type “WooCommerce” in the search box. The WooCommerce plugin should be the first one you see. Click “Install Now.”


Once installation is complete, click “Activate.” A set-up wizard will appear.


Click “Let’s Go!”
Setting Up WooCommerce on Your Site
Setting up the WooCommerce plugin requires three steps before your store can be open for business: Page Setup, Store Locale, and Shipping & Tax, and Payments. Every e-commerce store needs specific pages for your store to both work properly and to make the customer experience easy.
The WooCommerce wizard will walk you through how to set up these pages. You can skip any of the steps at any time, but if it is your first time setting up an online shop, you should go through each step.
Page Setup
The Page Setup step will show you how to create your catalog/shop, shopping cart, checkout form, and a form for returning registered customers (“My Account”) where they can manage their account details and view past orders.
After you have created these pages, you can manage them as needed through your WordPress dashboard under the “Pages” tab. You can also choose which pages you want to appear on your site through the dashboard’s “Appearance>Menus” tabs.
WooCommerce will automatically create these pages for you by adding a short code to each page. Click “Continue” to allow WooCommerce to install and create these pages for you.
Store Locale
Choosing your store’s location is a must so that it works with your country’s currency and units of measure. You can skip this step, but you shouldn’t or else you will have problems with fulfilling orders. Fill in your state and country and the wizard will automatically add the units of measure for you. If you do not see the type of currency you need, you can add your own by clicking on a link. You can also change the weight and dimension units.
Click “Continue.”


Shipping & Tax
You will be able to configure your shipping methods as you like. You can charge by the weight or size, or you can charge a flat rate or even free shipping. WooCommerce also supports drop shipping so you can work with your favorite companies to print labels to ship more professionally and efficiently. You can also choose to ship your products to anywhere, from local areas to worldwide.
Unfortunately, you will need to handle the taxes on your products. It is not the fun part of business, but it is legally necessary. The good news is that WooCommerce will guide you through the amount of taxes to charge based on your business’s location. However, be sure to check with your local authorities anyway to double check that you are charging the correct amount. Local and regional taxes change occasionally, so it is best to keep up on what the current rate is.
WooCommerce will ask you if you are selling physical products, if you will be charging sales tax, and if the tax will be inclusive with the product price or exclusive. Based on which locale you entered in the last step, “Store Locale,” the wizard will automatically configure the tax for you.
Click “Continue.”
Payments
Finally, you will pick the method(s) of payment you will accept from your customers. You may choose from both online and offline payments. The top two options are PayPal (recommended) and Stripe. You can also choose to accept cash, electronic bank transfers, checks, and major credit cards. You can add or change any payment method as needed through your WordPress admin dashboard.
Be aware that WooCommerce only integrates PayPal and Stripe, not Square or other payment collection services, with your online store. However, PayPal is an excellent choice and many customers may already have an account. Note that, whether you choose PayPal or Stripe, you will need to set up separate accounts for these services to use them. You will also need an SSL certificate installed on your site since they accept credit cards directly during checkout.


Choose which methods of payment you will accept by checking the box next to each method. If you decide to use PayPal Standard, you will need to enter the email address PayPal has on file for you to accept payments.
Click “Continue” one more time.
The Ready! Screen
After you have gone through all the steps with the wizard, the Ready screen will ask you if WooCommerce can collect data from your site to help them make improvements to the plugin. By allowing WooCommerce to do this, they will send you a 20% off coupon through the store admin’s email address to say thank-you. If you are okay with WooCommerce collecting your data, click “Allow” to send the data. You can also choose “No Thanks.”
Once that’s done, you will have finished creating a framework for your online store. Now, you have three choices. You can:
1. Click “Learn More” to watch tutorials or read helpful articles and tips.
2. Click on the link that takes you back to your WordPress dashboard if you’re not yet ready to place any products in your store.
3. Click on “Create Your First Product!” if you haven’t done so yet.
Click on the link that takes you back to your dashboard so you can start adding your products.
Accessing WooCommerce From Your WordPress Dashboard
After you have gone through the steps and set up your store, you can access it through the dashboard’s left-side panel by clicking on “WooCommerce.” This is handy for when you need to make changes from time to time.
When you click the WooCommerce tab with your cursor, a menu will appear where you can choose what you want to do. Choose from Orders, Coupons, Reports, Settings, System Status, or Add-ons. Explore each tab in the menu so you become fully familiar with them.
Right under the WooCommerce tab, you will see the “Products” tab. This is where you will go to add new products or modify existing products on your site. You can add or delete products, change a product’s category or tags, or change its attributes.
Choosing and Installing Your Extensions
The extensions, or add-ons, you use with WooCommerce are similar in nature to choosing the plugins you want for your WordPress website. They help you to customize how you want your store to work while building on the WordPress platform.
There are a wide variety of over 300 extensions for you to choose from. You can add additional payment gateways such as Amazon Pay or Authorize.net, choose shipping services like USPS or UPS, or change the structure of your checkout forms. Most extensions cost less than $100, but there are many others you can install for free like Google Analytics, which allows you to track your customers’ spending habits. Research and choose which extensions you want to use and download the corresponding ZIP file to your computer.
To install the extensions, go back to your dashboard and click on “Plugins>Add New.” From there, you will need to upload the ZIP files to your website. The files will install automatically.
For Google Analytics, you can directly upload its integration through the WordPress plugin catalog. Look for the plugin named MonsterInsights.
Adding Products to Your Store
Through your dashboard, find the WooCommerce tab and click “Products,” then ”Add Product.” A screen with a purple button that says “Create Your First Product!” will appear. Click the purple button.
A screen will open that looks exactly like WordPress posts and pages screens. All you need to do is fill in each field. If you are already familiar with WordPress, this step should be fairly easy for you. If you are new to WordPress, here’s what information each field is asking for. WooCommerce will provide helpful tips as you proceed through the fields.


Product Name- What is the name of the product or service you are selling?
Content Box- This is the large, white box in the middle of the page. Here you will type in the description of your product with as much detail as you like. The toolbar across the top allows you to do some creative editing and insert any hyperlinks you feel is necessary.
In the upper left corner of this field you will see a small box that says “Add Media.” This is where you upload the images or videos you want to insert as a part of your product’s description. Media images can be dragged and dropped to exactly where you want them once you have uploaded them onto your site. Make sure they are of the highest quality and correct dimension.
Product Data- This field is where you enter the specific information about your product or service. From the drop-down menu, choose “Simple Product” if it is a single, physical product. “Grouped” products are ones that you put together within a category or collection such as pieces of a living room set.
“External/Affiliate” are products that you are selling through an affiliate, third-party link. “Variable Product” is where you list the different versions of a product, such as colors and sizes, so your customer can choose which option they want.
You can also choose “Virtual” if you are selling a service or “Downloadable” if it is a digital product such as an ebook.
On the left side of the Product Data field, you will see a column of tabs to enter additional information:
• General- Set your pricing and tax structure.
• Inventory- This is where you enter the beginning number of products you have available to sell and allow WooCommerce to keep track of stock levels for you.
• Shipping- Determine the weight, dimensions, and shipping costs. The information you need to enter will depend on which, if any, extensions you enabled on your site.
• Linked Products- If you want to cross-sell or upsell other items your customers might like, you will enter links to those products here.
• Attributes- If your product has a variety of versions such as size, shape, and color, you will put those attributes here.
• Advanced- You will find additional, optional settings here.
Product Short Description- This is where you enter a summarized product description, usually less than 100 words, that your customer will see when they click on your product through the catalog.
On the right side of your screen, you will see four additional boxes for you to enter information about your product(s).
Product Categories- Group similar products together under a general heading like “Boys Pants.”
Product Tags- Put keywords here that will help you organize your products within your database.
Product Image- Upload an image of your specific product here. Be sure it is of the highest quality possible and of the correct dimension. You can edit the dimension through the Settings page.
Product Gallery- If you want to display additional images of your product, such as from a different angle or to show accessories, upload those images here.
Once you have all the settings and information entered to your liking, you can click:
• “Save Draft” to save your work and come back to it later
• “Preview” to view what your product will look like to the public
• “Publish.”
Clicking “Save Draft” will allow you to go back and check that everything is set up correctly. Be sure to double check your product image sizes. You can make edits through the Product Image tab in Settings. You can change your category images, individual product images (the featured image on the page your customer clicks), and product thumbnails (the images that appear under each product’s feature image on the product’s page, such as to show the variety of colors available).
You may want to enable Lightbox too while you are there. Lightbox allows your customer to zoom in on your product’s images without leaving the page.
After you have double checked everything, you can preview what your product page will look like from the customer’s point of view. This is a great way to make sure that everything is just as you want it before you publish the page.
When you are ready, click “Publish” to add your first product to your site and make it viewable to the public. Continue going through each field for each product you want to sell and enter the applicable information.
Your dashboard will create a list of everything you have done. If you need to edit any product settings, simply click on the product’s name to access its data.
Permalinks
Permalinks is short for “permanent links.” Having the correct permalinks for each product is important so your store will have an archive of each of your products to display, and so your store will operate with its best efficiency. Good permalinks also help with your Google rankings.
To check your permalinks, go to “WooCommerce>Settings>Products.” If you want to change your product URLs and customize them later, this is the page where you want to go.
By default, you will see that the shop page is called “Shop” (you can change the name later by going to “Pages>All Pages” on your dashboard or you can leave it). Under the Shop Page field, you will see in italics, “The base page can also be used in your product permalinks.” Click on that to check your permalinks.
Your product permalinks can be set to the default setting if your product category and product tags boxes at the top of the page are structured as “product-category” and “product-tag,” respectively. The default setting will prevent your website from being confused between an item being a product or a blog article.
If you want your customers to see your product display as soon as they visit your store, you can make it your home page by going to your dashboard’s “Settings>Reading” tab.
If Something Goes Wrong
As any website owner knows, things can go wrong when you least expect it. WooCommerce took care of this by adding a “System Status” tab. This is where all the technical information about your site is recorded so you can detect anomalies.
If something goes completely wrong and you need to reset your entire store or fix something that happened during the setup process, you can go to the “Tools” tab under “WooCommerce>Settings.”
Hopefully, nothing will go wrong and you won’t need these tabs. But in case it does, it is good to know where you can go to try to fix it.
You’re All Set!
Setting up an online store can seem a little overwhelming at first. Thankfully, WooCommerce and WordPress make it easy for you and your new business to get started. And, it can all be done usually within an afternoon. Simply follow the steps in this guide and you’ll be up and running in no time.