
It’s every blogger’s worst nightmare.
Your latest post gets shared by a big-name blogger, and you start getting lots of traffic. Hurrah!
But then someone sends you an email (or worse, leaves a comment) pointing out a glaring mistake in the first paragraph.
Mistakes can knock your reader’s confidence in you. A study in the UK a few years ago suggested that spelling mistakes might be costing businesses millions of dollars.
Of course, editing isn’t just about fixing typos and spelling mistakes. It’s also about shaping your post so it’s easy for readers to engage with. Even if your post is free of grammatical and spelling mistakes, you’ll still lose readers if it takes forever to get to the point, or switches between topics too much .
Perhaps you’ve struggled to edit your posts effectively in the past. You may have spent hours tweaking them, only to feel the result wasn’t much better than what you started with. Or maybe you think it simply takes too long.
In this post, I’ll explain how to create a simple checklist to help you edit – just like we do here at Problogger.
Our Editing Process at ProBlogger
Every post we publish goes through the same streamlined editing process.
Several members of the ProBlogger team write content (mainly Darren and me), and we also publish posts from our subject matter experts. This means we need a clear, step-by-step editing process that makes it easy for everyone to collaborate. and ensures all posts follow our style guide.
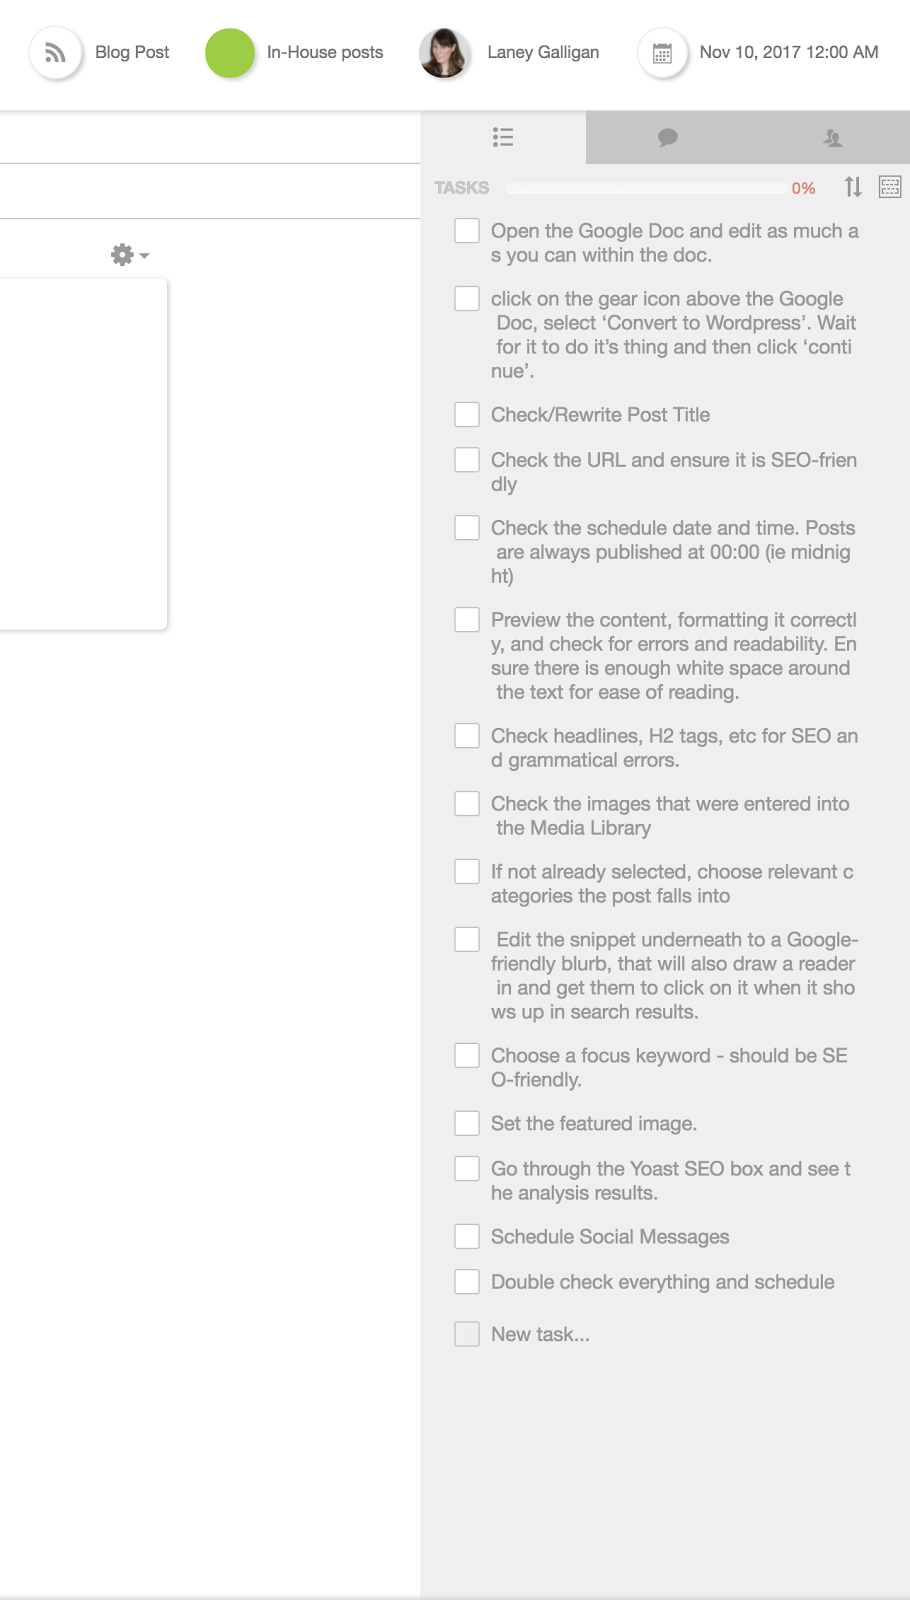
Part of our process is this checklist template, which we apply to every post in CoSchedule.
Even if you’re the only person who ever writes for your blog, it still helps to have a clear editing process.
Also think about where you edit. If you’re working with outside parties (e.g. guest posters or companies/agencies providing sponsored content), you may want to use Google Docs like we do. You can collaborate with the author as you edit, and hand the post on to someone else who may be handling formatting and uploading.
If it’s just you, it’s still important to have a self-editing process. It could mean clearly separating your roles as “writer” and “editor” so you’re not trying to edit as you write.
I also recommend coming up with a checklist you can use again and again so you never have to worry about missing a crucial step when editing a post. Here’s how.
Creating Your Own Editing Checklist
You probably already have a process you work through when editing, whether you realise it or not. Open a blank document and type out the typical steps you go through. For instance, maybe you always add the formatting (subheadings, bold text, lists, etc.) when you edit, rather than while you’re drafting.
Now, see if anything is missing from your checklist. Here are some important things to include:
#1: Introduction
Make sure your introduction has a hook, ideally in the very first line. What will the reader gain from this post? Give them a clear reason to keep reading.
Avoid overly long introductions. You’ll lose readers when they’ve barely started on your post. One trick to try is to remove the first paragraph or two of your post entirely. Does it work just as well (or even better) without them?
Further reading: 10 Tips for Opening Your Next Blog Post, Darren Rowse
#2: Subheadings
Unless your post is very short, add subheadings to break it into sections. This helps all your readers. Those who skim for information can quickly find the relevant parts of your post, while those who read every word won’t feel lost in a sea of text.
You should format subheadings by using a heading tag. Make sure the hierarchy is correct (i.e don’t skip from H1 to H3). This is something we always check for here at ProBlogger.
Further reading: How to Use Subheadings to Add Structure to Your Blog Posts , Darren Rowse with Ali Luke
#3: Visual Breaks
Create white space in your post wherever possible. If you can put something into a bulleted list, do it. We also use the blockquote format to highlight key parts of a post. It gives the content more space, and makes it look more attractive.
Images can also create useful breaks in your post. They’re particularly useful if you’re giving instructions on how to do something, because you can show readers how it should look at each step.
Don’t be afraid to use one-sentence (or even one-word) paragraphs. They can be tremendously powerful. Smart Blogger and Copyblogger both make great use of them in their posts.
Further reading: How to Write a Great Paragraph, James Chartrand
#4: Extraneous Material
Delete anything that isn’t relevant to your post, no matter how witty, clever, or well-written it is. If you can’t bear to lose it completely, copy it into a ‘snippet’ file. You might be able to use it in a future post. (A great tip from Bill Harper who edits our posts.)
If your post includes a lot of detail to get beginners up to speed (or to give experienced readers extra food for thought), consider linking to that information in other posts (yours or someone else’s) instead. That way, you can give those who need more help (or want to go deeper) the information they need without everyone else getting bogged down in your post.
This doesn’t mean you can’t write long posts. Some topics require more space to cover all the details. Just make sure every paragraph is necessary.
Further reading: ProBlogger FAQ: How Long Should Posts Be?, Darren Rowse
#5: Conclusion
Make sure your post has a conclusion. Some bloggers have a tendency to end their posts abruptly – especially if they’ve written a list post. Remember, the last few lines of your post are an opportunity to leave your readers with a good impression. You can also give them a call to action, such as leaving a comment, sharing your post, or even buying your product.
Like introductions, conclusions don’t need to be long to be effective. But they do need to be there.
Further reading: 7 Powerful Ways to End Your Next Blog Post, Ali Luke
#6: Complex Sentences, Phrases and Words
Read your post out loud. Another great tip from Bill (that I don’t have the patience to do myself). Are any of your sentences too long? (You shouldn’t need to take a breath mid-way.) Are some a bit of a tongue-twister? Listen to how your writing sounds, and split up or rewrite any sentences you struggle with.
Look for words and phrases you can replace with simpler ones. For instance, don’t say “obtain” when “get” works just as well.
Further reading: Shorter, simpler words: Guide to concise writing, KingCounty.gov
#7: Links to Other Posts
Linking to other posts on your blog is always a good idea. And not just for the potential search engine benefits. It also helps new readers dig more deeply into your body of work, and increases the chances they’ll stick around.
As you edit, look for opportunities to include a link to a post in your archives. Consider linking to other blogs too. It shows readers that you read and research in your niche, and can be a great way to build a strong relationship with fellow bloggers.
Further reading: Why Interlinking Your Blog Posts is a Must (and Not Just For SEO), Daniel Vassiliou
#8: Before Publication
You may want to include this step as part of your editing checklist, or create a separate checklist for ‘uploading’ or ‘publishing’ blog posts. (It’s particularly useful if you work with a virtual assistant.)
Depending on your theme, and how you like to format your posts, it might include things like:
- Ensuring the post is assigned a category and, if you use them, tags
- Including a featured image for your post
- Adding a “read more” link (so only the first part of your post appears on the front page of your blog)
- Scheduling your post to appear at a future date
Further reading: Categories vs Tags – SEO Best Practices for Sorting your Content
While content isn’t the only thing you need for a successful blog, it’s crucial that your posts are as good as you can make them. That means careful editing. And if you use a consistent process like we do here at ProBlogger, you’ll always be able to edit quickly and effectively.
Di we miss any items that you have in your checklist? Share them with us in the comments below.
Image credit: Joanna Kosinska