 If you run a blog or website you’ve probably heard about SSL certificates and the idea of moving your domain from the old http:// to the secure https:// version. It’s a very important topic.
In fact, this is something that will affect the security, performance and even the search engine rankings of your blog.
Today we’ve got a huge post filled with information about how to get an SSL certificate and HTTPS for your blog, including why people are moving, what Google has been saying about it, and even a detailed checklist on how to get it done.
This is a pretty complicated topic and so I’ve gone into lots of detail to try and make it as pain-free as possible. Have a read and jump in the comments if you’re still unsure.
Note: You’re going to want to press Control + D on a PC or Command D on a Mac so as to bookmark this article for future reference.
What is SSL all about?
The first thing we should do is take a quick look at some of the more technical aspects behind this topic in case you are already finding yourself a little bit confused. So, what exactly is SSL?
SSL stands for Secure Sockets Layer and is the technology now used to create an encrypted link between a web server and a browser. This allows all the data passed between the web server and the browser to remain private.
The idea is that, when you’re shopping or submitting your details into a form on a website, you want to know that the website is secure in the sense that it’s actually the website you think it is and not something else.
Without getting overly technical, HTTP (Hypertext Transfer Protocol) is how information gets transmitted and received across the internet and HTTPS is just the secure version of it. It’s a little more tricky than that, but it’s basically all you need.
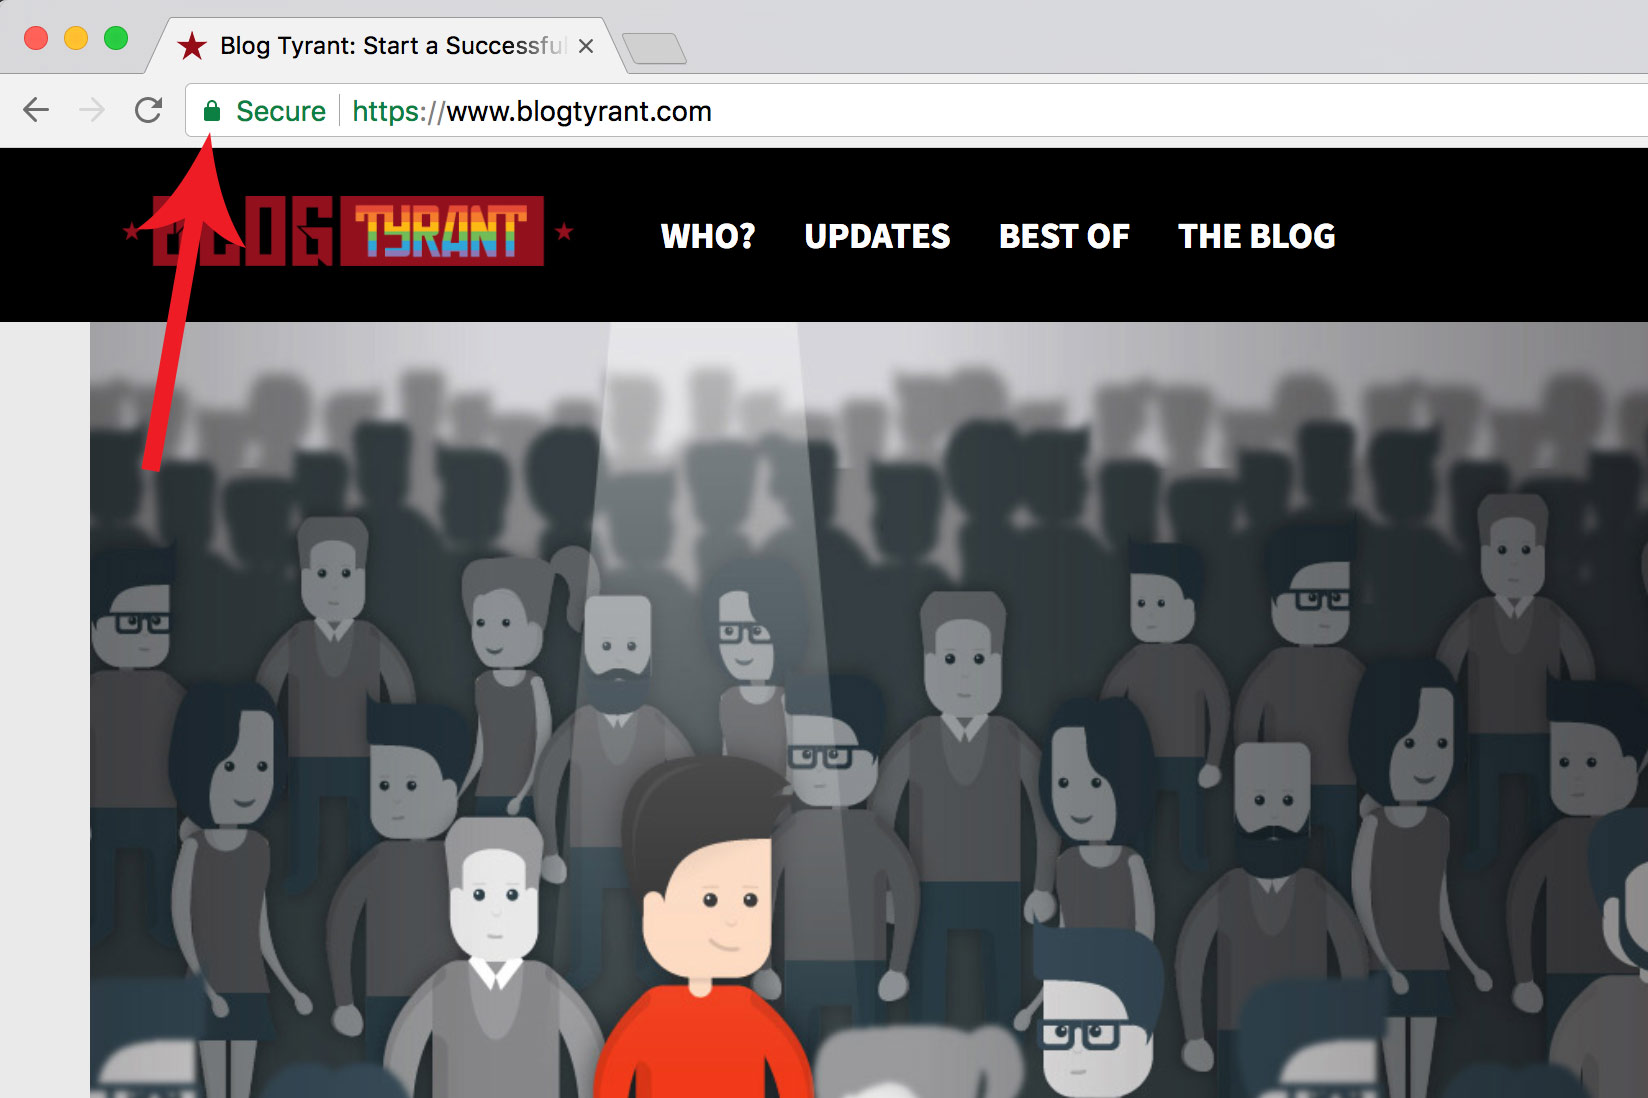
When a site has a secure SSL certificate (and is set up properly) you’ll see a little padlock up in the navigation bar, and the URL will have https:// at the start instead of just http:// without the “s”.
But how does the “handshake” work?
The technology behind SSL is quite complicated, but to your visitors everything will just look normal and the website will function as it always has, except that now there will be a little padlock up the top.
It essentially works in five key stages to establish a secure “SSL handshake” between your web server and the browser (Firefox, Chrome, Safari, etc.) that your visitor is using.
To do this, it needs three different types of keys known as the public, private, and the session keys which all talk to each other to establish that secure session we all want. Here’s a quick summary:
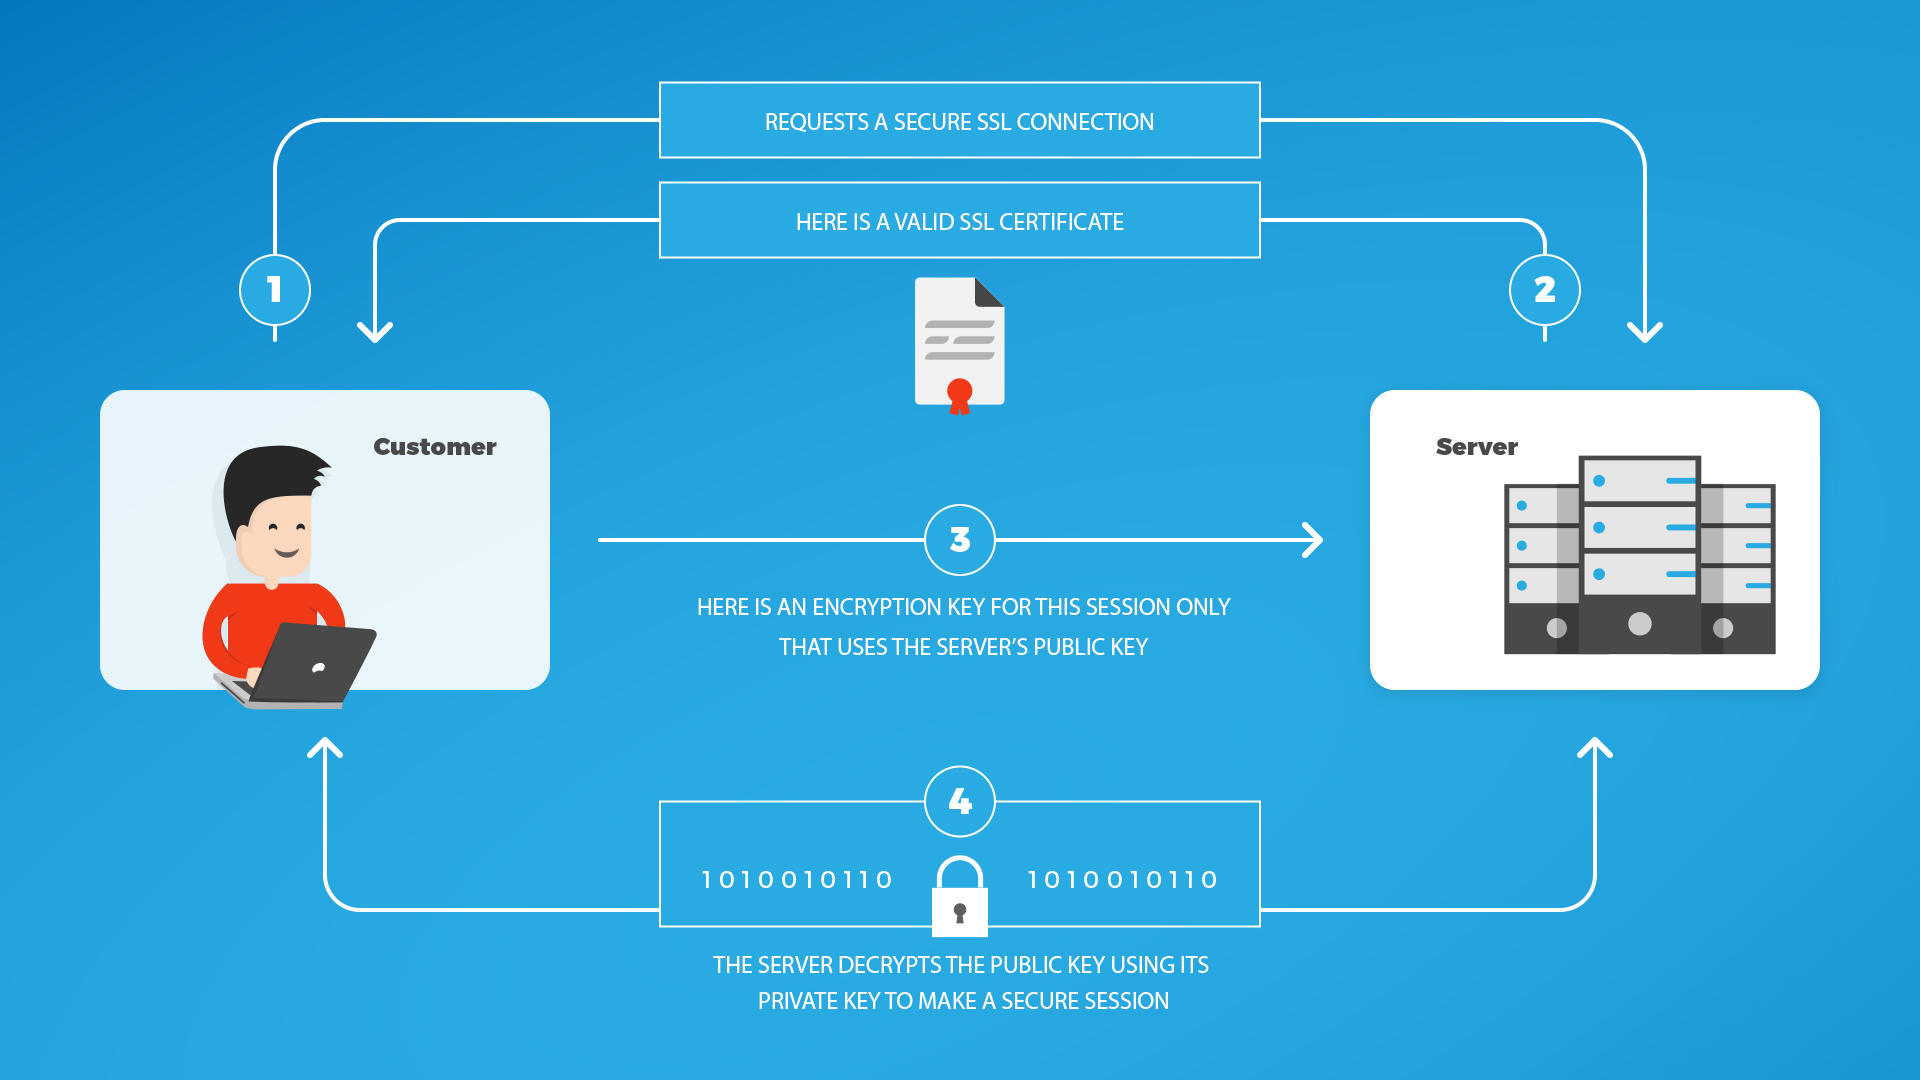
For those big old geeks in the audience, here is a little bit more detail to explain the basics of how it all works:
- Your new reader visits your secure https website and their browser asks that the server identify itself.
- Your server sends a copy of its SSL Certificate which includes the server’s public key.
- Their browser then checks the certificate against a list of trusted ones and makes sure it’s valid and up to date, etc.
- If the browser is happy with the certificate, it creates a one-time session key with the public key from above.
- Your server then decrypts the session key using its private key to allow the secure session to start.
Once that session has begun, everything that is transmitted between the browser and the secure server is encrypted meaning that it is generally safe from people who are trying to spy on or steal that data as it gets sent through forms, carts, and so on.
But remember, while https is important it will not make your website secure by itself as Tony Perez says in his article:
It will continue to be a critical piece to ensuring information in transit is protected from attackers, but that’s the extent of the secureness it’ll offer your website. We do have to start talking about encryption at rest, in addition to encryption in transit. If we look at the number of data breaches, HTTPS did little to stop the exfiltration of data.
Now let’s get into the details on how you can actually implement this on your website or blog, and the resources, tools and different bits and pieces you’ll need to make it happen.
Why are people moving to HTTPS secure domains?
We should be pretty clear, getting an SSL certificate and moving to an HTTPS domain is not really a beginner task and it can involve some really complicated steps if you have a big or multi-faceted site.
And when it comes to important moves like this one, it’s a good idea to know why you are doing it and what the implications will be for you, your visitors, and the Internet landscape in general.
While there are larger implications for things like web security, the main reason bloggers have been switching is because Google has indicated that sites without SSL certificates will rank lower on search results if they come up against an equally valuable site which has an SSL certificate.
This all heated up to a new level in August 2017 when Google sent out an email to all webmasters saying that Chrome would show a security warning on any pages with forms that aren’t HTTPS enabled.
That means any page with an email opt-in form, contact form, shopping cart, etc. will get a warning for any customer on Chrome saying that it might not be secure. Obviously this has huge implications for anyone trying to run a business.
How to set up SSL/HTTPS on your website or blog
You’re probably wondering about how you can actually go ahead and set this up on your blog. As mentioned, it’s a tricky issue that can have some complications.

I reached out to the incredible team from Kickpoint (who helped me with Blog Tyrant’s migration) to get their insights on the process and they were kind enough to put together an extensive checklist for bloggers and webmasters to use when they are about to dive in to this process.
They’ve broken down the process into three stages starting with the pre-migration stage of things to prepare before you begin:
- Consider a staging site. This should be the first thing you put into place. Why? A staging site gives you room to try out your changes in a safe environment before you commit to them live.
- Make a backup. It’s not possible to take too many backups — you never know when you’ll need to roll back a change in a hurry. You should have a current copy of all your key site files and a full export of your database.
- Crawl your links. This will tell you whether you’ve got broken links (404s) that need fixing, plus any links that redirect (301s). Fix as many of these as you can.
- Take the Before picture. Use Google Analytics and Google Search Console to generate organic traffic reports for your most recent three months.
- Check your site files for absolute (hard-coded) links. As soon as you update your site to https, these will become redirects. Fix what you can now, and flag the rest for during launch. If you’re linking to resources like Google Fonts or jQuery, ensure the URLs use https.
- Check your pages and posts for content from external resources. This information will be in the crawl you did earlier. If the links don’t use https, update that now.
- Check your redirects. If your site has any 301 redirects set up, prepare them for the URL change.
- Check your canonical URLs. These show up in a <meta> tag in your site’s header. Check whether these will update automatically when you change to https, and if not, ensure you know how to update them during the migration.
- Check your robots.txt. Make sure it’s not disallowing anything important, and prepare a copy linking to your sitemap with an https address.
- Check your sitemap. Depending on your setup, you’ll either have to prepare a copy that uses https yourself, or you’ll be using a plugin that auto-generates the sitemap for you.
- Check Google Search Console https domains. You should have a Google Search Console property set up for every version of your site’s domain (both www and non-www, plus now http and https).
Now you are ready to go and there are some things to watch out for while you are in the migration stage of the process:
- Take another backup of your site. Take a copy of your database plus all your site files. Don’t be tempted to skip this step, and take as many as you need throughout the process.
- Request and install your SSL certificate. What this involves will vary based on your hosting situation. Follow the directions in your host’s documentation. You’ll need a certificate (or certificates) that covers all variants of your site’s url.
- Apply your site changes live. Now is the time to apply any updates you made to your theme files, robots.txt and any other files to your live site. This includes your 301 redirect updates.
- Set up your https redirect. This will ensure visitors to your site are given the https version of your site no matter what.
- Test your https redirects. Try out all the versions of your URL (non-www, www, with https, without https, with a / at the end, without a / at the end) and make sure they’re all directing to the same canonical version of the URL.
- Rewrite your internal URLs. Ensure none of the internal links on your site are using anything other than https:// in the URL. This prevents unnecessary 301 redirects as visitors browse your site.
- Crawl, crawl, crawl. As with backups, crawl your links throughout the migration process. By the time you’re done, none your site’s internal links should be using http:// in the address.
- Check the status of your SSL certificate. Plug your site’s address into a service like SSL Test. You’re looking for the test to come back Trusted, and ideally with an A rating.
- Annotate your migration in Google Analytics. Use the Annotation feature to make note of your migration right on the report graphs.
At this point you should be all done, and now we have a final list of step of things to watch out for in the post-migration stage to ensure everything is working well:
- Make sure all of your pages show the green lock icon. If not, you have a ‘mixed content’ error. Use a service like SSL Check to check your site for anything loading from an insecure URL, and fix these items on all affected pages.
- Make one more crawl. Verify there are no more insecure internal links, and you don’t have any outstanding 301s or 404s.
- Update Google Search Console. Make sure the https versions of your URL are verified, their settings match the http versions, and the robots.txt is showing correctly. Submit your sitemap.
- Update Google Tag Manager. If you’re using tags or triggers, you might have some set up with full URLs. Update all of those to https.
- Update your ads, affiliates, and any third-party extensions. Point these to your https address going forward.
- Monitor your site traffic. Watch for big traffic drops. Use Google Analytics’ custom alerts to stay on top of any traffic changes, or set up a rank drop alert in a platform like STAT.
- Monitor the crawl status of your https URL. Keep an eye on its indexation status, visibility, and watch for any errors on both the http and https site versions.
At the end of all this if you’re feeling a little overwhelmed by the process and you have a complicated site, I really would recommend engaging a firm like Kickpoint to help you out with it, if your host won’t do it. It’s not cheap, but when it comes to a big business move like this it is a good idea to get it right.
Some resources to help you migrate to https
I’d like to finish off this post by going through some tips and resources that might help you with the process of migrating your blog or website to a secure domain.
Again, this is a pretty big topic and can seem very overwhelming if it’s something you are not familiar with. It is, however, something that we are all going to need to do sooner or later so it’s probably good to start looking at the options.
What are your thoughts?
Have you moved your blog over to a SSL domain? I’d love to know your experience or any tips that you might have to help people who are about to do it. Alternatively, if you’re thinking about doing it soon, are there any issues you’re worried or confused about?
Please leave a comment below and let us know.