Starting a website may seem overwhelming at first, especially for a beginner. Luckily platforms like WordPress make it easy for virtually anybody to start up, design and manage a website.
Whether you’re a seasoned veteran or completely new to the world of web hosting, I’ll show you just how easy it is to start your own site using two of the top website building services, WordPress and BlueHost.
A few useful terms
To make things simple, we’re going to define a list of terms that will help the rest of this article make sense.
Content management system (CMS): Also known as a website building platform, a content management system allows you to build web pages and manage content. WordPress is an example of a CMS.
Web host: A web host is the service that connects your site to the internet. Think of it as the place where your website lives. You’ll also purchase your domain name from your web host provider. BlueHost is one of the most popular web hosts on the internet today, and we’ll be using them for all of our examples.
Domain name: Your domain name is the URL that people will type in (or click on) to reach your site. For example, your business website’s domain could be “www.YourBusinessName.com“.
Why WordPress?
When it comes to building and customizing a website, virtually no platform can outperform WordPress. Even absolute beginners can build beautiful websites without in-depth knowledge of site building and coding. Here are just a few of the reasons I recommend WordPress.
It’s free
First and foremost: it’s completely free. You’ll have to pay for a domain name and web hosting (more on that later), but WordPress itself is free to download and use.
User friendly, even for newbies
The intuitive, user-friendly interface makes it a breeze for you to publish posts and upload content. You don’t need coding or HTML knowledge to get your site going or to maintain it over time.
Easy to design and customize
You don’t have to be a graphic designer to build a beautiful website with WordPress. Choose from thousands of available themes (many of which are 100% free) to give yourself a solid starting point.
From there, you’ll have virtually endless customization options, from changing colors and fonts to installing plugins. Most of the customization can be done easily without you needing to learn complicated programming language.
Versatile
Whether you want to run a small personal blog or start up a large e-commerce site, WordPress is up to the task. Plugins can be used to turn your site into almost anything you envision. You can install contact forms, calendars, subscription forms and more with just a few clicks.
Mobile-friendly
With over half of internet consumers visiting from mobile devices, it’s imperative that your site run smoothly on smartphones and tablets. WordPress makes this easy, since most of their themes are automatically optimized for mobile. That means you don’t have to worry about complicated programming and coding to optimize your site for mobile use.
Tons of support
A whopping 74.6 million websites use WordPress as their main content management system (CSM). This means there’s a huge community and a wealth of knowledge out there for you if you get stuck. Tons of free tutorials and forums are right at your fingertips with a quick internet search.
6 Steps to Starting your Site
Now that we’ve taken a look at some of WordPress’s features, we’ll talk about how to get started. For the sake of this article, I’ll assume that you already have a concept picked out and are ready to make your site a reality.
The next steps are fairly simple, and we’ll look through them each in detail.
1. Come up with a domain name
Before you start building your site on WordPress, you need to choose and register a domain name.
Choose something that is straightforward and simple that describes your services or business. If you’re writing a personal blog, it can just be your name, or any clever blog name you choose. Avoid long or difficult-to-spell words, and use a basic extension like .com, .net or .org.
Once you’ve come up with your domain name, you’ll need to purchase it and secure a web host. I’ll go into that in the next step.
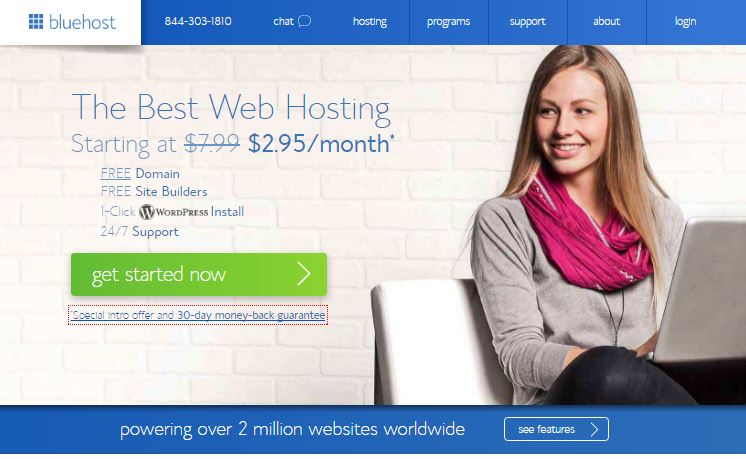
2. Pick a web host
Next up, you’ll need to link your domain name to a web host to make your website go live. I recommend BlueHost (review) for their fast, dependable hosting, seamless integration with WordPress and affordable pricing.
BlueHost is WordPress’s #1 recommended web host provider. They were established in 1996 and have been working in cooperation with WordPress since 2005. Best of all, they offer affordable hosting plans starting at just $2.95/month with a free domain name included.
Getting set up on BlueHost is easy. Once you’ve gone to www.bluehost.com, select the green “get started now” button and select a plan.

Their Basic plan is perfect for getting started, and for just $2.95/month it includes all of the following:
- A free domain name
- Fast, reliable web hosting
- 24/7 customer support
- One-click WordPress install
- 1 website with 50 GB storage
- 5 email accounts with 100 MB storage each
- Unmetered bandwidth
- 30-day money back guarantee
Once you’ve selected your plan, it will prompt you to enter the domain name you came up with in the previous step.
Provided it’s available, you’re now ready to enter your payment information and finalize the process.

There are additional features available for an added monthly fee, like Site Backup Pro and Search Engine Jumpstart.
 You can add these if you’d like, but they’re not necessary. You can always go back and add these additional features later on if you decide you need them.
Sign up today with BlueHost and get a free domain name
3. Install WordPress
Now that you own a shiny new domain name, it’s time to start building your site. After you signed up for BlueHost, you should have received an email giving you the details you need to log into your control panel.
From the control panel (BlueHost calls this the cPanel), you can manage all of the aspects of your web hosting account, including email and support. This is also where you’ll install WordPress.
Click on the WordPress icon labelled “Install WordPress.” From here, you will be asked to choose your domain name. Select the one you will be using from the dropdown menu and click “Next.” On the next page, you will fill in your site name and select a username and password. Once you’ve done that, click “Install” and BlueHost will do the rest of the work for you! It will take a few minutes for the installation to be completed; you’ll receive an email notification once it’s finished.

4. Choose a theme and customize
Now that the boring stuff is finished, it’s time for the fun part: customizing your site. WordPress has thousands of themes to choose from, some free and some paid.
Your site will automatically start off with the default WordPress theme Twenty Seventeen. (As you might guess, this theme is updated annually in accordance with the year.) It’s a simple, clean theme, but you’ll probably want to choose your own to make your site stand out.
To access themes, you’ll need to log in to your WordPress Dashboard. You can find that by going to http://YourSiteName.com/wp-admin. From there, type in the username and password you selected in step 3.
This will take you to your Dashboard, where you can do anything from customize your site to publish content. There are a lot of buttons and options here, but for now we’ll just focus on choosing a theme.
From the main dashboard, you’ll see a sidebar on the left. About halfway down this sidebar, click on “Appearance – Themes.” From the Themes page, you will be able to preview, customize and install themes.
Select “Add new” to add a new theme to your site. Thousands of themes will be available to you instantly. You can filter your search by layout, subject, style and more. You can also search for keywords.
To start out, I suggest browsing through the free themes; there are a surprising amount of clean, professional themes available absolutely free.
Once you’ve found a theme you like, you can click “Preview” to see what it will look like on your site. Previewing a few different themes before you choose one will help you to narrow down what you like and what works for your site.
Clicking “Install” will add the theme to your site. Then simply click “Activate” and your site will be updated automatically.
Changing your theme won’t add or delete content, so you can change your theme at any time without losing posts or pages.
5. Add pages and content
Once you’ve installed your favorite theme, it’s time to start building your website. From your Dashboard, you’ll have the option to add pages and posts, which will form the bulk of your website.
Pages
A page is usually used for static (unchanging) content. Think of an About page or a Contact page. Depending on what your site is going to be used for, you can have a number of pages. A few common ones are:
- About: Used to tell visitors about yourself and/or your website/business
- Services: A page listing your services, commonly used for businesses
- Contact: Includes all relevant contact and location information
To add a page to your site, go back to your Dashboard and find the “Pages” button on the same left-hand sidebar I used earlier. Click “Pages – New” and you’ll be brought to a screen with text boxes where you can add your page title and content.
The editing software here is much like something you might find in Microsoft Word or other word processing software. You can edit fonts, add quotes, insert images and videos, and link to external content all with the click of a few buttons.
Near the bottom of the page, you will also have the option to add a page excerpt. These excerpts are displayed in place of the full post in search engines and archives.
Once you’ve completed your page content, click “Save Draft” and “Preview” to see what it will look like when it goes live. If you’re satisfied, click “Publish” and your content will go live.
Posts
If you’re planning to have a blog on your page, you’ll want to use posts. Unlike a page, which is self-contained, posts are single entries that make up a larger section of your site. Many businesses use blog posts to bring in new visitors and engage readers. Another benefit of posts is the ability to sort them using categories and tags, which make it easy to find posts.
To start a post, go to your Dashboard and click “Posts – Add New”. From here, you will find a text editor just like the one you used when you made a page. After you write your content, you’ll have to choose a category for your post.
Every post you make is required to be put into a category. A category is used for a broad grouping of topics. For example, if you are starting a personal blog, you might have categories like “Travel” or “Love Life.”
To the right of the text box where you wrote your content, you’ll see a side bar for Categories. By default, you start out with one category: “Uncategorized.” To add a new one, click on “Add New Category”; feel free to add as many as you’d like. You can also place a single post into multiple categories.
Where a category relates to broad topics, tags are used to pinpoint specific keywords in your post. For example, if you are blogging about a trip to Paris, you might put it in the “Travel” category and use tags like Paris, France, Eiffel Tower, croissants, etc.
On top of making it easier to organize your posts, using categories and tags properly will boost SEO and drive more traffic to your site.
6. Extras
Now that you’ve taken care of the basics and gotten your site up and running, you have the option to add in some extras that will set it apart from the rest of the crowd. These extra features make it easy to customize your site to suit your needs perfectly.
Plugins
There’s a saying in the WordPress community: “There’s a plugin for that.” From adding photo galleries and submission forms to integrating an online store, you can find a plugin for virtually anything you need on your site.
A plugin is a piece of PHP-coded information that can be integrated seamlessly into your site without you knowing a single pit of coding language. They can add features and extend your site’s functionality with a few clicks.
With a seemingly endless amount of plugins available to you, it can be tempting to start installing them left and right. However, it’s important to check out the reviews before installing plugins, as poorly-created ones can actually do more harm than good. Always make sure any plugin you choose is compatible with the most updated version of WordPress.
To install plugins, start at your Dashboard and click “Plugins – Add New” and you’ll be brought to a page with a huge amount of plugins. You can search for keywords or browse the featured plugins.
Once you find a plugin you want to add to your site, simply click “Install” and you’re done!
Menus
At the top of most websites you’ll find some sort of navigation menu, and your WordPress site is no different. Adding pages to your menu makes it easier for visitors to navigate your site and actually helps you to steer them where you want them to go.
Think of the pages that you want people to see and add these to your menu. For businesses, Services and Contact should always be included. If you’re writing a personal blog and want your readers to get to know you, make sure your About page is easy to find by listing it in the menu.
To add pages to your menu, go to “Appearance – Menus” from your Dashboard. On the next screen, you’ll see a box listing all of your pages with checkboxes next to them. Click the checkbox of any page you want to be listed on your main menu, then click “Save Menu” to save your changes.
Disabling and enabling comments
By default, comments will be enabled on posts that you make. While this is usually fine for personal blogs, many businesses prefer not to allow comments. If you decide you’d like to disable commenting, you can do so by going to “Settings – Discussion” from your main Dashboard. On the next screen, under the first subheading, uncheck the box next to “Allow people to post comments on new articles.”
This will update your default settings so that any new post you write will have comments disabled. If you decide you’d like to allow comments on a certain post, you can override this default setting while you’re writing the post. To do so, click on the “Screen Options” button from the Add New Post page. A box will pop up with a variety of options; click the box next to Discussion to allow comments on this post without changing your site’s default comment settings.
Sidebars and widgets
For easier site navigation, many themes include a sidebar that contains information like a navigation menu, post archives, social media icons and any other information you’d like to highlight on your site.
To edit your site’s sidebar, go to “Appearance – widgets” from your Dashboard. From here, you’ll see a number of little boxes containing different widgets, which are just small pieces of content that you can use to customize your site. Simply drag and drop any widgets you’d like to display into the Sidebar area on the right side of the screen, and you’re done!
Static front page
By default, your home page will appear like a blog with your most recent post at the top. This is alright for personal blogs or websites that want to keep the blog as the focal point, but many businesses prefer to have a home page that doesn’t change, known as a static front page.
The first step is to create your home page by going to “Pages – Add New” and adding content as desired. Save this page as something like “Home” or “Index.”
If you won’t be using a blog on your site, skip this step and go to the next paragraph. If you will be using a blog, create a new page and name it Blog. Leave the rest of the content on this screen blank, as it won’t be used. Save and publish this page (don’t worry if this seems like a silly step; you’ll use it in the next paragraph.)
Next, from your dashboard click on “Settings – Reading” and look at the first section labeled Front Page Displays.Select the static page option and use the dropdown menu next to Front Page to choose the page you’ve created. If you’ll be using a blog, use the next dropdown menu next to Posts Page to select the blank page you made, labeled Blog.
Scroll to the bottom and click save, and you’re finished!
Title and tagline
Your site title is displayed at the top of your site, usually on every page. If your site is a personal blog, you can come up with a catchy name or just use your own name. For business sites, you’ll want to use your full business name.
Your tagline follows your title in a smaller font and gives site visitors an idea of what your site is about. For instance, if you are making a business website for XYZ Branding, your title should read “XYZ Branding,” followed by a tagline listing your services, like “Creative branding and marketing solutions for professionals.”
Feel free to be as creative as you want with your title and tagline!
And you’re finished!
In 6 simple steps, you can take your website from conception to reality. WordPress and BlueHost make it easy to create a professional, beautifully designed website at a fraction of the cost of hiring a web designer.