Managing your ad campaigns can be incredibly tedious.
You probably don’t need me to tell you that though, because you’re looking at them every day.
You’re also making the same changes on a monthly, weekly, and even a daily basis.
And it’s not like you can just quit AdWords either.
Google has reported that businesses make an average of $2 in revenue for every $1 they spend on AdWords.
That makes it a vital part of your digital toolkit, and an even bigger part of your ROI.
The problem is that the work is never done. And it never will be either.
Luckily, you have options just below the surface of default settings in AdWords that can help lessen the amount of time you spend tinkering with your campaigns.
Adwords gives you the option to automate some of the more tedious elements of your campaign.
Because your only option shouldn’t be to hire the work out.
Many small businesses simply can’t afford to do that.
They also can’t afford to go take a marketing class to learn “secrets” they’ll never use.
The good news is that you can save time in the future by automating the processes you’re already doing manually.
I’m going to show you how to optimize your automated AdWords campaigns.
Automation is critical
Let’s start with the basics.
I already mentioned that the average AdWords spend doubles your revenue, but what else should you be looking for?
The trouble with traditional PPC campaigns is that the effective ones often require constant babysitting to see results.
And the repetitive process of adjusting, activating, or deactivating ads can take up too much of your time.
That’s why automation is so important.
It kicks in when the time is right, which means you don’t have to constantly monitor the ad to get the result you want.
So your biggest objective, quantitatively, is to create an ad with an amazing landing page that maximizes your click-through rate, or CTR.
Depending on your niche, a “good” CTR can be anywhere from 2 percent – 25 percent, or even higher.
More to the point, failing to optimize your ads means your competitors are edging you out.
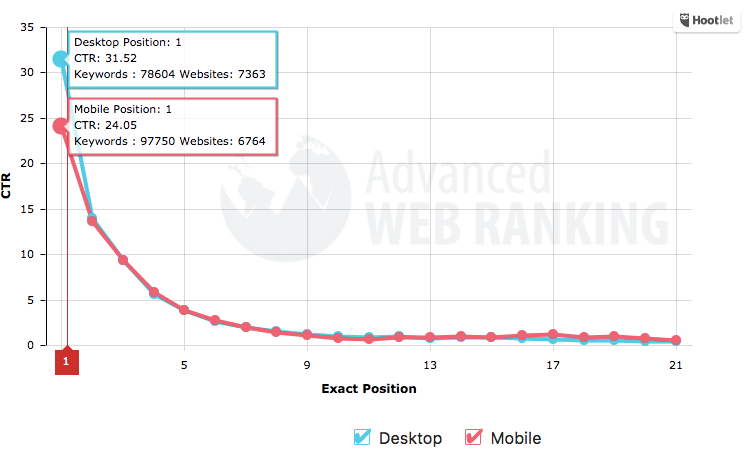
In fact, Smart Insights found that being at the top of SERPs increases your CTR by 31.52%.
Which means if you can get a search results page that looks like this:
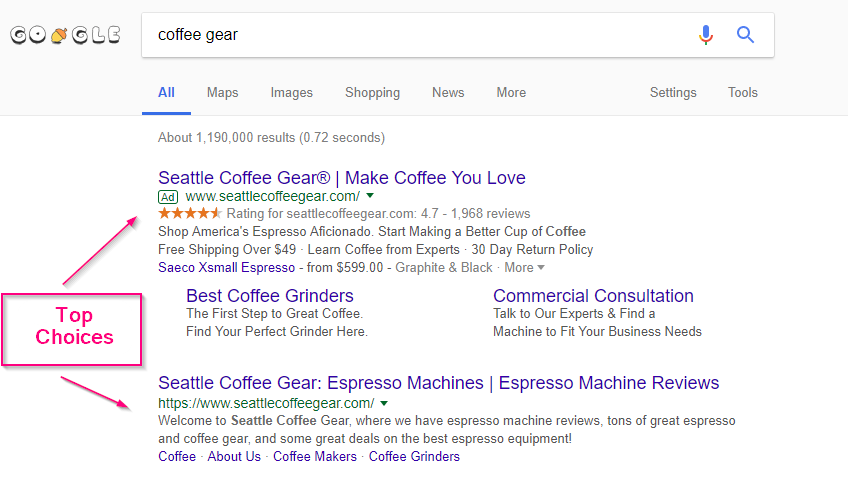
You’re not only cashing in on SEO; you’re doubling down with your ad campaign.
You stand a better chance of getting a higher CTR, which means more leads and more sales.
And this is where automated rules can save the day.
Automated rules are actions you can have AdWords perform automatically across your campaigns.
Running these rules requires you to set which conditions have to be met for the rule to trigger.
Keep in mind that automation is just a process that allows you to take the campaigns you’re already running and spend less time on them.
If you don’t have the right practices already in place, you’ll just be automating bad habits.
Lack of routine, not knowing what to look for, when to look for it, and why to look for it means you’re unable to fix problems when they arise.
You’re throwing your (or your client’s) money away.
And since you’re reading a blog article about PPC, it’s pretty obvious you want different results.
With these automations, you’ll have the ability to skip the routine tasks to focus on strategy and growth instead.
So let’s get started with the backend and move down to individual ads.
1. Optimize your campaign first
One of the fundamental concepts of PPC is setting the right overarching parameters for your ads.
Missing the mark on a technical detail can sink your campaign before it even starts, leaving you with the assumption that tasks are automated when nothing is happening.
For example, the effectiveness of segmentation and targeting of your ad are directly tied to basic elements like copy and coloring.
That doesn’t even touch on the landing page you use.
All this means your automation starts well before you ever log into your AdWords accounts.
You have to begin by knowing your targets and the results you want, and then constructing compelling copy, images, and link your ad to a useful landing page.
So let’s walk through what this looks.
Let’s say we want to run a display campaign via AdWords.
You’ll fire up your dashboard, go to your campaign, and be met with a page that looks like this:

As you can see, I’ve highlighted the options to select.
This will run a display campaign with the goal of acquiring leads.
You also want to make sure you select a standard display campaign so that you can choose your settings and targeting.
You’ll also need to input your website URL.
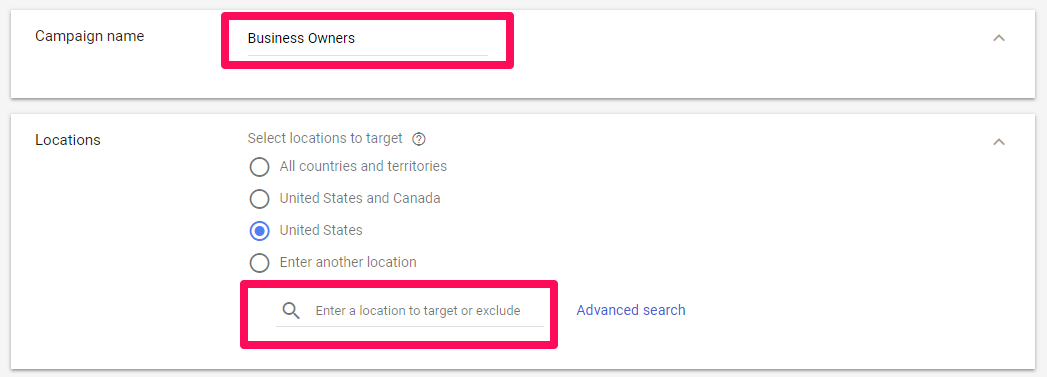
Then input your campaign name and targeting information.
For this example, I’ll call it Business Owners and target Seattle, WA.
Next, you’ll need to decide on bidding.
What you choose for this depends on your objective, but since we’re talking about automation, I’m going to opt for the “Automatically maximize clicks” option.
This will automatically set your ad to bid for the lowest possible cost-per-click (CPC).
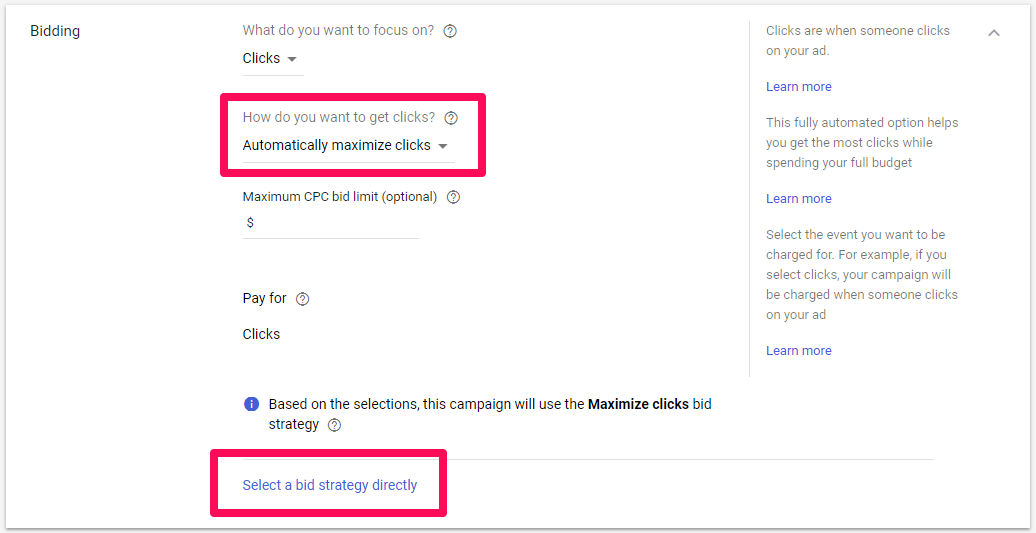
If you choose to select a different bid strategy, here are your options:
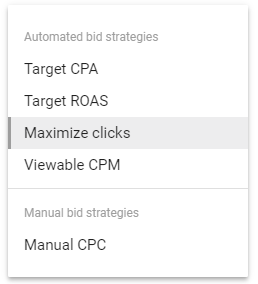
As you can see, there are four automated options or a manual bid setting. Leave that be for now.
You’ve successfully set up automation for your campaign now. Next on the list is your ad groups.
2. Now get the ad groups right
At this point, you’re ready to set the targeting parameters for your ad.
Koozai recommends breaking down and targeting your ads to these general categories before you start to make changes in AdWords:
- Location
- Device
- Income
- Interest Categories
- Gender
- Age
Once you’ve determined where to target your ads, it’s time to set them up.
Start with audiences, which provides a breakdown of online actions and interests. You can see here I’m keeping with the business owner theme.

Next, move on to demographics.
For this particular ad group, let’s say I want to target male and female business owners who are between the ages of 20 and 35.
They’ll be in the top 30% of household income with no children.

Now select your keywords, topical targeting, and the last big piece: automated targeting.
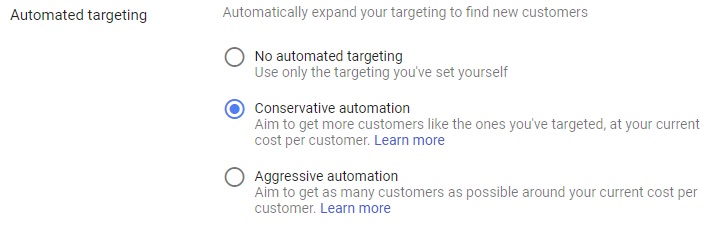
Automated targeting a great tool for letting Google AdWords display your ad to customers similar to the ones you’ve targeted.
You can either opt out of automated targeting, which limits your audience to only the parameters you’ve selected.
Or, you can choose between conservative and aggressive automation strategies.
Conservative automation will keep your audience very narrow, but will still put your add in front of similar demographics.
This a great option for businesses that want more conversions and are okay with getting clicks that are a bit outside their optimal audience.
Aggressive automation widens your audience even more and places your ad in front of a wider but still similar group of people.
Use this setting when you want way more conversions and are okay picking through some potentially low-quality leads.
But if you’d rather keep the ad group tight, then select no automated targeting.
Whichever one you pick is determined by your goals and how prepared your sales team is to handle less-than-ideal leads.
3. Set individual ad performance parameters
Now that you’ve set up your campaign and ad group, it’s time to dive into some individual automation elements.
Keep exposure equal
Google’s default setting is to prefer your best performing ads.
While this might sound like a good thing, it can skew your A/B testing results and will favor one ad over others.
To combat this, you want to ensure that your ads are set to “rotate indefinitely” so that each has an equal chance to perform.
This makes sure that one ad doesn’t get shown more often than others, which could skew your conversion rates.
Normally, you’d be forced to go into your AdWords dashboard and manually stop an over-shown ad, and that will affect the results of your A/B testing.
You’ll find this option under your settings tab in the individual ad group. It will look like this:
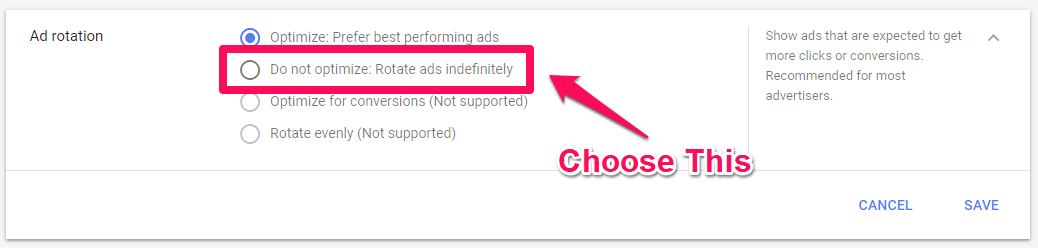
Once you’ve selected and saved the settings to rotate indefinitely, you won’t be saddled with the repetitive task of deactivating overperformers to get the results you want.
Pick the right device
There are so many devices to choose from these days it can make your head spin. Contrary to what you might think, advertising universally across all devices isn’t always a good idea.
I worked with a client once who was advertising on mobile, desktop, and tablets at first.
After a month, we sat down and parsed through the data. Tablets only had three clicks.
Compared to the 244 clicks from desktop, it was clear that tablets were a waste of time.

But don’t just take that advice and run with it.
It’s also worth considering that 33% of all Google search clicks are generated through mobile.
So just because one company isn’t met with success on a mobile platform doesn’t mean you’ll have the same results.
The same is true for the opposite sentiment as well.
Which means if you’re opting out of advertising on mobile, you should probably reconsider.
One former Google employee who’s now working as an SEO specialist recommends deciding whether you want to be viewed in apps or not.
You may be spending money advertising to kids who use mobile apps but wouldn’t ever touch your product.
The only way you’ll know for certain is if you try, but if your age demographic isn’t on the lower end of the spectrum, then an in-app ad might not suit you.
Pause or play?
Another automation miracle at the ad group level revolves around timing.
Wordstream recommends doing some hardcore data analysis before you get to the business of setting up times though.
For example, they found that they weren’t getting many clicks on the weekend, but the CTR was higher, and the cost per click was lower:
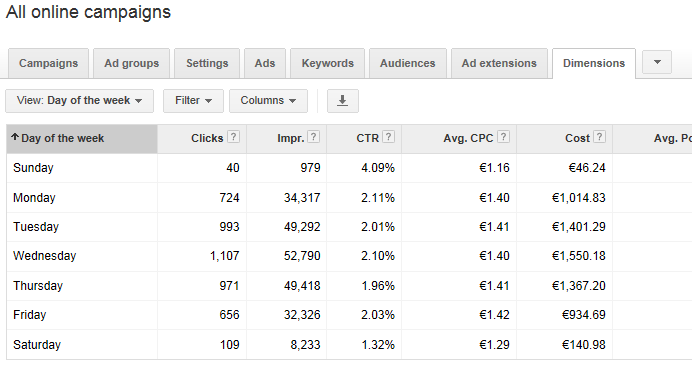
They used this information to take action accordingly.
Namely, optimizing ad budget and the timing allotment so that these ads could perform even better.
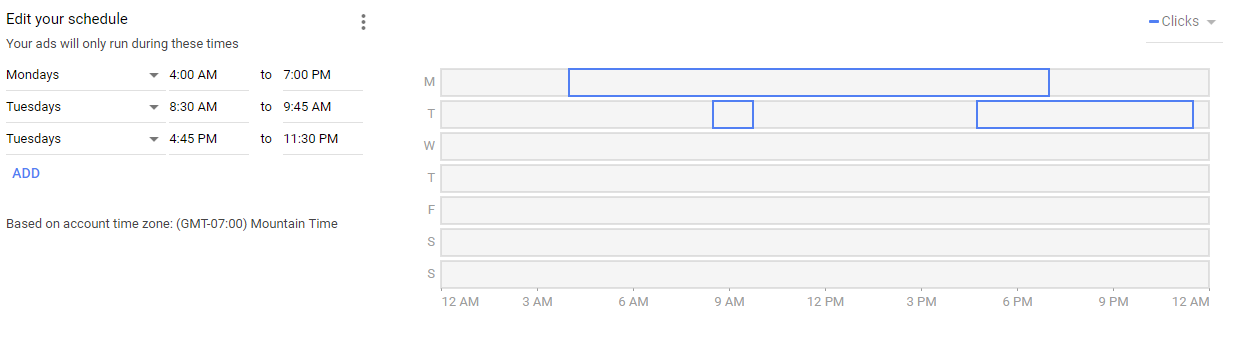
Don’t just rely on the default settings.
They’ll have your ads running 24/7, and you’ll burn through your budget.
The more specific you are, the better your results will be.
You can see here that I’ve set an example ad for certain times on Monday and Tuesday only:
And consider the types of ads you’re running.
You don’t need a Thanksgiving-themed advertisement to be running in the middle of summer.
Or a late-night all-nighter themed ad in the middle of the afternoon.
That’s just a waste of money and will spread confusion around your brand.
Time your ads appropriately.
Make sure you’re set to track
Analytics is everything in PPC.
Every action you take is based on data. Whether it’s increasing a bid or narrowing your audience, you want to know the analytics that back up your decision making.
Which means you need to make sure you’re actually connected to your tracking system before you miss out on valuable insight.
Make sure AdWords is connected to your Analytics.
Failing to do so would result in being unable to gather any reliable and usable feedback on your ads.

Make sure all of your ads are approved
Finally, you want to make sure your ads are approved.
To keep front page content appropriate for everyone, Google reviews every ad to ensure it complies with the AdWords advertising policies.
It usually takes less than a business day.
The review starts automatically when you create your ad.
Once it passes, you’ll be able to see the status change from “Under Review” to “Eligible.”

Sometimes an ad will come back “Disapproved” which means it won’t be shown to anyone.
Google will typically flag these and notify you.
Usually, this isn’t too much of a problem, but you may run across the status “With Issues.”
That typically means you’ve put content in the ad that can run, but only under certain instances.
You’ll probably find that ad performing less effectively if you’re not catering to an adult-only audience.
4. Fine-tune all the time
Even though you’ve automated your ads, that doesn’t mean your work is done.
So let’s focus on optimizing all these moving parts you’ve automated.
Refinement is an ongoing process that usually falls into two key categories: Keywords and A/B testing.
I want to start with keywords.
While keywords are usually the first step that most people think of, having this as a final check will help you make sure you’ve truly found the right keywords.
Then you can further optimize AdWords.
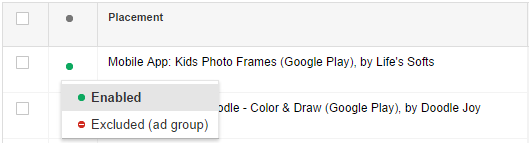
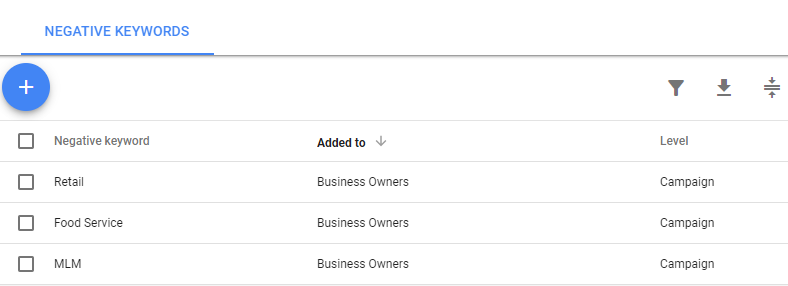
Your goal here is to find and remove (or replace) your low-quality keywords and even dial in your negative keywords (words you don’t want your ad to appear under).
This ensures that only people who will truly benefit from your ad see it and click on it.
As you can see here, I’ve decided that I don’t want any search terms related to retail service, food service, or multi-level marketing to display my ad.
This is just an example, but you can see the implications for not having your ad display for something you wouldn’t want to be associated with.
You’ll also want to take time to prune keywords by quality score.
Quality score is, as it implies, more of a qualitative analysis than the typical quantitative analytics you see in PPC.
It attempts to analyze the behavior of your ads and the people who click on them.
You can find your keyword quality score under the Keywords section of your Google AdWords dashboard.
You’ll have to select the Modify Columns tab that looks like this:

Scroll down until you see the Quality Score tab.
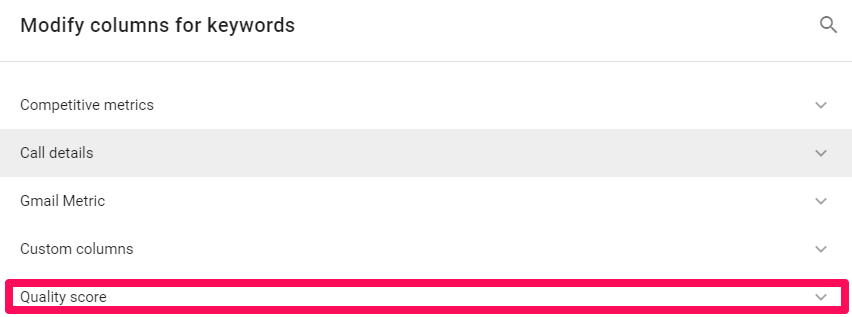
Click on it, and then select for your Quality Score to appear.
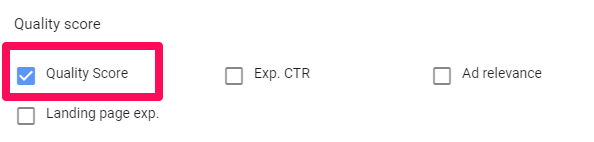
You’ll now be able to go back to your Keywords dashboard and scroll over until you see your Quality Score for each ad.
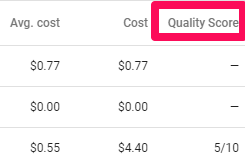
A low-quality score could mean that your ad isn’t effective. And that means Google will show it less and you’ll get fewer conversions.
High scores get better conversions at a lower cost-per-click.
You should always aim to improve this metric, and I recommend finding out what a good quality score for your industry is.
Anything less is likely a waste of time and money.
Once you fine-tune your keywords, you also want to conduct some serious A/B testing to help refine your ad’s performance.
A/B testing helps you narrow down the elements of your ads that perform better than others, which lets you find more ways to optimize your conversions.
You can test the copy, the image, the headline, and even the keywords.
As you can see in the example below, there can be two versions of the same ad that look vastly different:

This video from QuickSprout gives a quick rundown on how you can effectively split test in Google AdWords.
For example, if you want to test a headline, you’ll need to start by creating multiple variations to test their performance.
CrazyEgg shared 11 different ways this was accomplished by different brands.
Here’s one from a company called Logo Design:
They used numbers, ASCII characters, had a great offer and used a powerful CTA all in one little ad.
And their keyword, “logo design,” is strategically inserted to help generate more clicks.
It’s even bolded within the headline.
The possibilities for optimization and testing are endless.
5. Put yourself on a regimented schedule
Klientboost recommends building regular routines to help with checking and optimizing automation.
Your goal here is to make sure that you’re spending your time and your client’s money wisely, which will always require close attention to detail.
Falling behind or mismanaging your automation can still get you into trouble.
So how does it work? Follow this schedule:
1. Daily
Is anything broken? Are your ads running, and are the analytics looking in good health?
How are your budget trends?
Are any of your ads overspending, or only spending at certain times of day? That could point to an error.
Are your bids correct?
Are you paying too much for one ad? This could be removing budget from other areas that need it.
2. Weekly
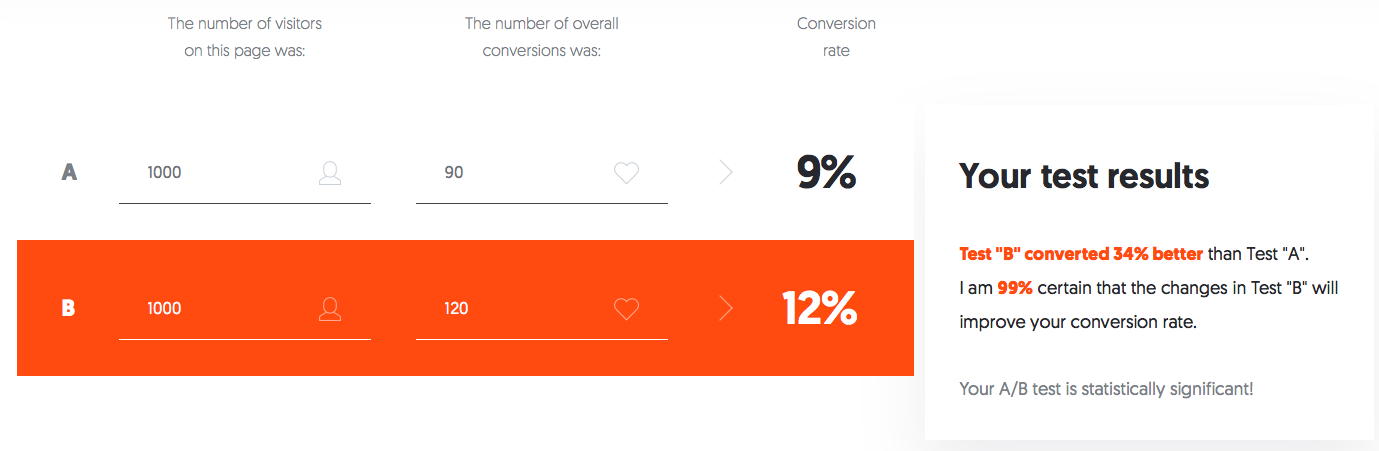
Check if your overall trends are on-target. Are you getting good click-through rates and ROI for your ads?
Review A/B testing. Make sure you’re not spending money blindly and are A/B testing like I mentioned.
Using a tool like my A/B test significance calculator will help you know if you have statistically-significant data. Just put in the data for each variant and my calculator will tell you if you have enough data to draw conclusions.
3. Monthly
Review the data you’ve collected to see if there are any necessary changes.
Make changes as needed.
In general, are you getting results?
If not, look for ways to improve your ads or get results with other mediums.
Make these checks a part of your routine.
It’s not nearly as time-consuming as manually setting ads is, so this shouldn’t be too difficult a transition for you.
Schedule it in your phone, planner, email, or whatever you use to stay on track.
Conclusion
If you’re spending all of your time setting budgets and fiddling with bidding in your AdWords campaigns, you’re doing it wrong.
You have the power to automate the most tedious parts of your tasks and focus on the elements that yield results instead.
And it doesn’t have to be difficult. You already have all the tools you need.
Optimize your ads methodically.
Start with the campaign itself by setting the right approach from the start. Maximize for clicks, conversions, or whatever suits your goals.
Then work through your ad groups.
Set the target audience with laser accuracy by choosing the proper demographics, optimizing for specific devices, and pinpointing the right location.
Round out your approach by setting the right rules for individual ads. Make sure each is getting the right amount of exposure for accurate A/B testing.
Set appropriate time limits and ensure your ads haven’t been disqualified.
Then take time at the end of setting up your automation to fine-tune your keywords and conduct A/B tests to optimize ad performance.
Neglecting this step is like buying a supercar and putting standard fuel in it.
Finally, implement good habits to help you check your results.
You may not succeed on the first attempt, but with patience and diligence you’ll start to see your PPC campaigns begin to flourish.
And at the very least, you’ll have more time on your hands.
What strategies do you use to optimize your automated AdWord campaigns?
About the Author: Neil Patel is the cofounder of Neil Patel Digital.