
July 25, 2021
WebPageTest and Technical SEO
This article is an instructional guide to help you accurately test load time using WebPageTest.org. It is a supporting tutorial that is part of the MobileMoxie Technical SEO Article Series. In May 2021, Google released one of their biggest algorithm updates after the roll-out of Mobile-First Indexing, announcing that load time and user engagement would soon become more important ranking factors. They have also pre-announce the Experience Update that has been delayed, but will now start rolling out in July of 2021. These changes to the Google search algorithm increase the need for technical tools that provide detailed feedback on page load time and on-page technical problems overall.
While Lighthouse is a great tool, sometimes it doesn’t give you everything you need. At MobileMoxie, we believe that WebPageTest.org is one of the most undervalued tools in the SEO industry. The tool provides detailed information about the health of your pages and helps analyze things like round trip requests, asset errors, redirects, caching concerns, security information, and more. Developed by Patrick Meenan, the open-source tool was acquired in 2020 by Catchpoint. It was recently updated, but has been providing free and valuable load time analysis for years. In this article, we will review how to set up WebPage Test for SEO testing and highlight important settings and results in the tool.
NOTE: MobileMoxie does not have any partnership with WebPageTest; we just love the tool!
How to Set up a Web Page Testing
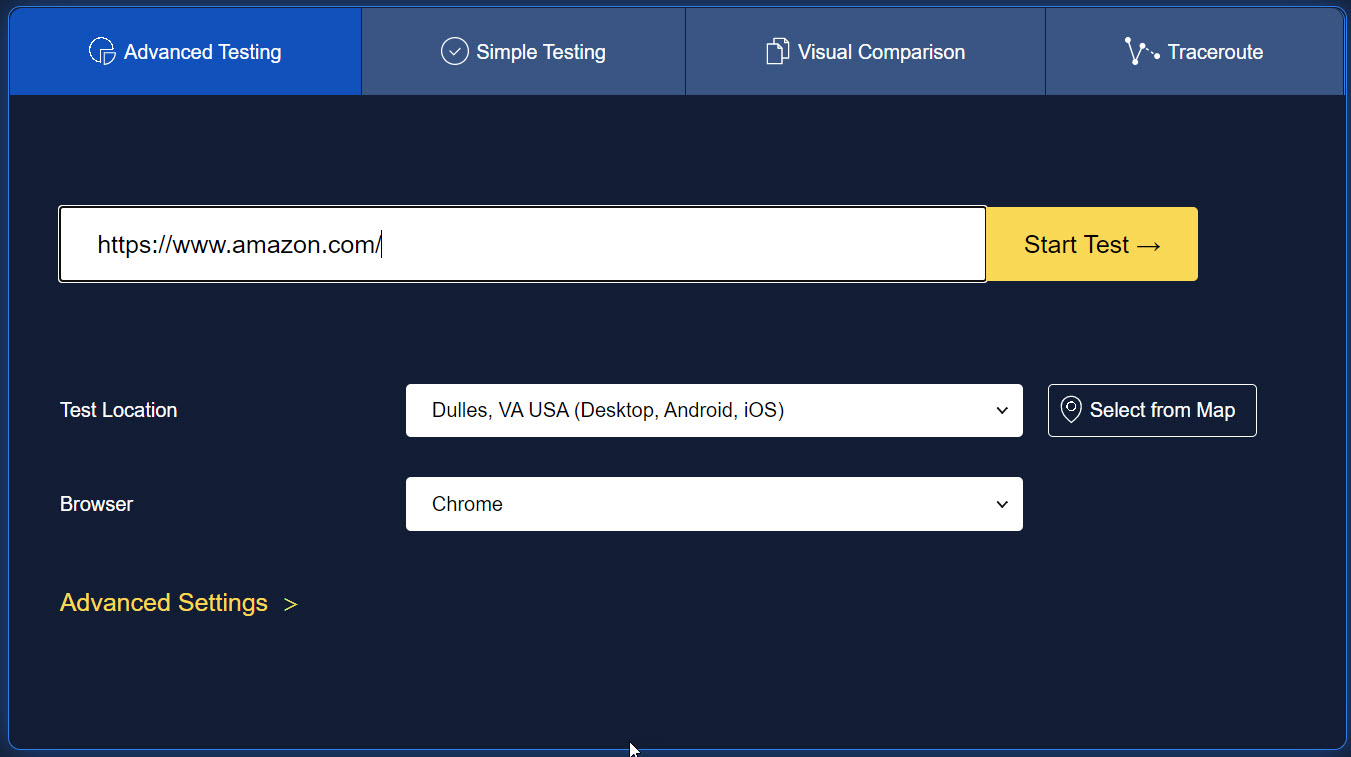
- Basic Test Set-Up: Access the tool at webpagetest.org, select the page URL you want to test, the geographic location you want to test from, and browser for the test. The example below shows the standard settings MobileMoxie used in a test for SEO evaluation. You should always change the location to reflect your business needs or use California which is where Googlebot is often crawling from.

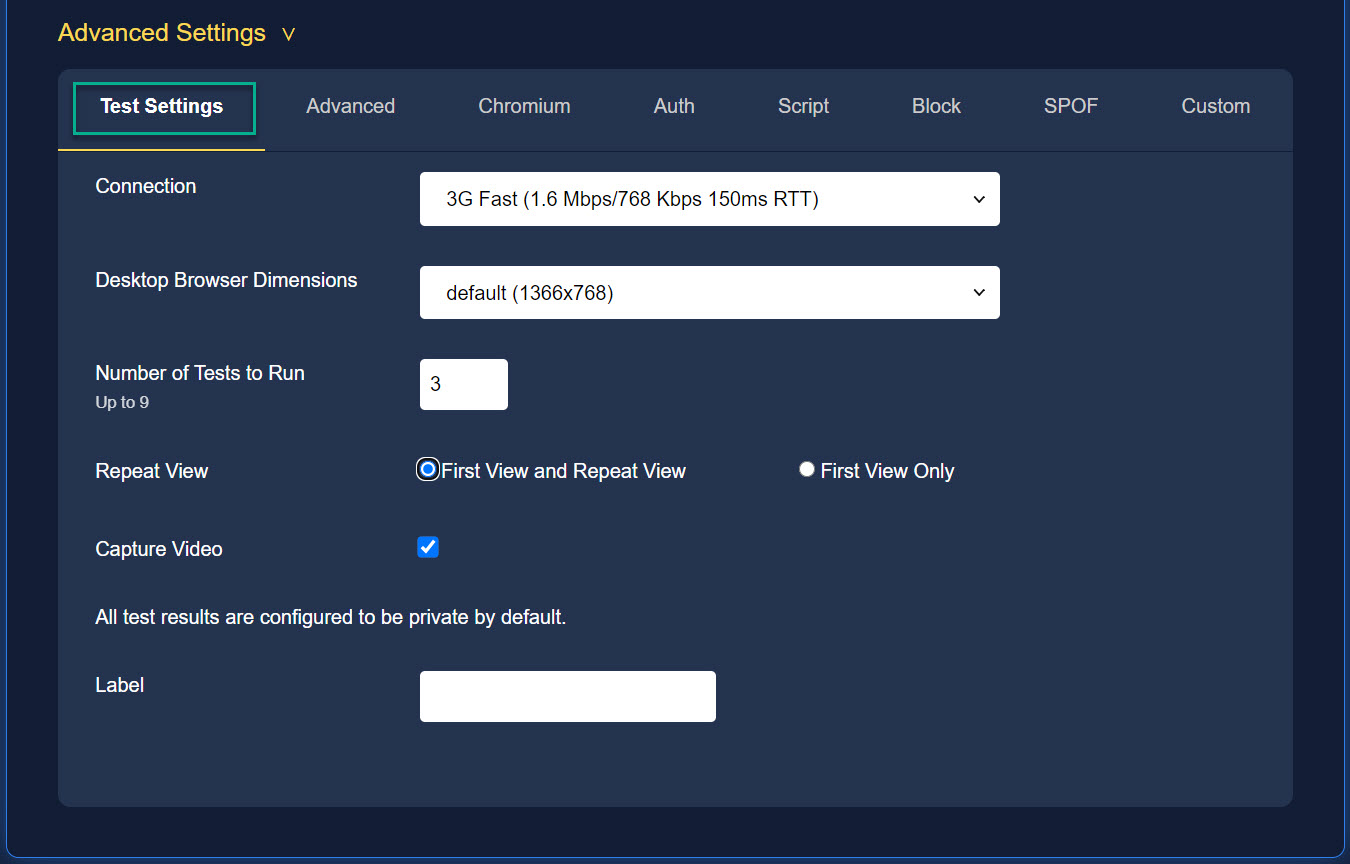
- Test Settings: Expand the Advanced Settings menu to continue the test setup. Under ‘Test Settings’, select the desired connection speed that you want to simulate and the number of times you want to run the test, then click on the radio button for ‘First and Repeat View’. MobileMoxie recommends always running 3 tests and testing at least one mobile and one desktop connection to compare the results. We use 3G or 3G Fast and Cable, and set them up in two different tabs, so that you can run the test at roughly the same time. This will allow you to accurately compare differences between mobile and desktop load time. We also recommend always testing First and Repeat Views. Googlebot cares mostly about the First View because that is what it gets when it crawls a site but knowing about the Repeat View will help you troubleshoot and improve the user experience (UX) on the page for users who have visited the page before, or have other locally cached copies of site assets.

- Advanced: Once you have completed the Advanced Settings, click on the Advanced Tab, just under the Advanced Settings expander. In this tab, you can include or remove some of the capabilities of the tool if they are not needed in your evaluation. As a default, the tool tests until the page is fully loaded and executes JavaScript, as well as SSL Certificate validation. If these are not a concern you can limit the test. A sample of our normal test settings is included below. As a consultancy, MobileMoxie always records the video in case clients want to see them, but you do not have to include this if you do not need it.

- Chromium: Now click on the Chromium tab next to the Advanced tab. These settings allow you to test and measure your page performance with specific Chrome capabilities enabled, such as:
- The ability to capture the Lighthouse report, which uses a ‘3G Fast Connection’ independent of test settings.
- The capacity to emulate a specific phone – We try to pick the most common device our website users might be using. In this case we are using an iPhone X, but older phones are also available, and we sometimes test with those as well.
- You can also have your test capture a Dev Tools Timeline, get the v8 Runtime Stats, a Chrome Trace and a network log. We enable these just in case questions or objections get complicated and we need more data later, in conversations with the DEV Team.
- If you are selectively serving any elements of your pages, you also have the ability to request the page with a specific user agent string, including the two main GoogleBots:
- GoogleBot Mobile: Mozilla/5.0 (Linux; Android 6.0.1; Nexus 5X Build/MMB29P) AppleWebKit/537.36 (KHTML, like Gecko) Chrome/W.X.Y.Z‡ Mobile Safari/537.36 (compatible; Googlebot/2.1; +http://www.google.com/bot.html)
- (Google has switched to crawling with a bot that will keep pace with the releases of Chrome – called an EverGreen bot, so this could change.)
- GoogleBot Desktop: Mozilla/5.0 (compatible; Googlebot/2.1; +http://www.google.com/bot.html) OR Mozilla/5.0 AppleWebKit/537.36 (KHTML, like Gecko; compatible; Googlebot/2.1; +http://www.google.com/bot.html) Chrome/W.X.Y.Z‡ Safari/537.36
- (Please note that Google has said that they will be crawling and indexing almost exclusively with GoogleBot Mobile (Smartphone) so testing with this user agent string may not be representative of current SEO guidance from Google.)
- (Please note that Google has said that they will be crawling and indexing almost exclusively with GoogleBot Mobile (Smartphone) so testing with this user agent string may not be representative of current SEO guidance from Google.)
- GoogleBot Mobile: Mozilla/5.0 (Linux; Android 6.0.1; Nexus 5X Build/MMB29P) AppleWebKit/537.36 (KHTML, like Gecko) Chrome/W.X.Y.Z‡ Mobile Safari/537.36 (compatible; Googlebot/2.1; +http://www.google.com/bot.html)
- We don’t enable data reduction or any special treatment for images, since these would not apply to GoogleBot or GoogleBot Mobile.

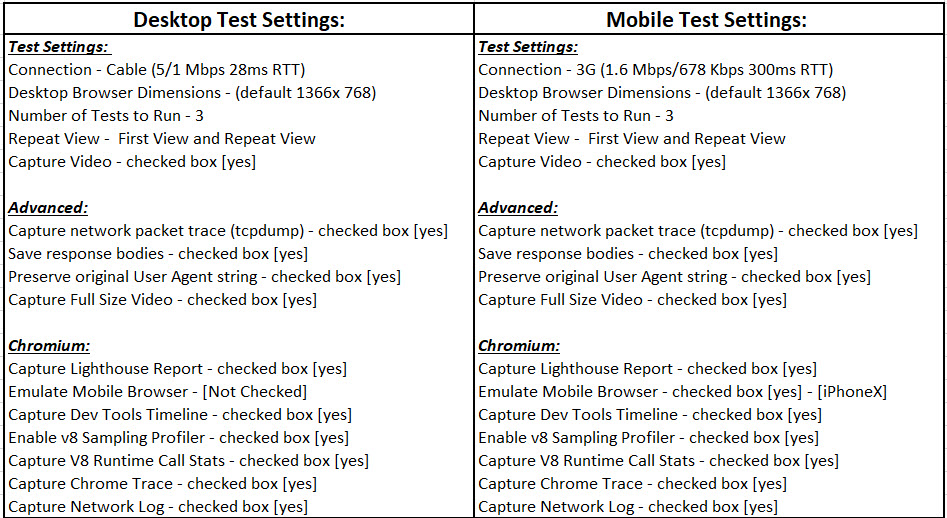
- Review all Settings: Remember, you are setting up two tests, in two different tabs, to run at about the same time. A summary of the recommended settings for both tests (in an SEO context) are in the table below:

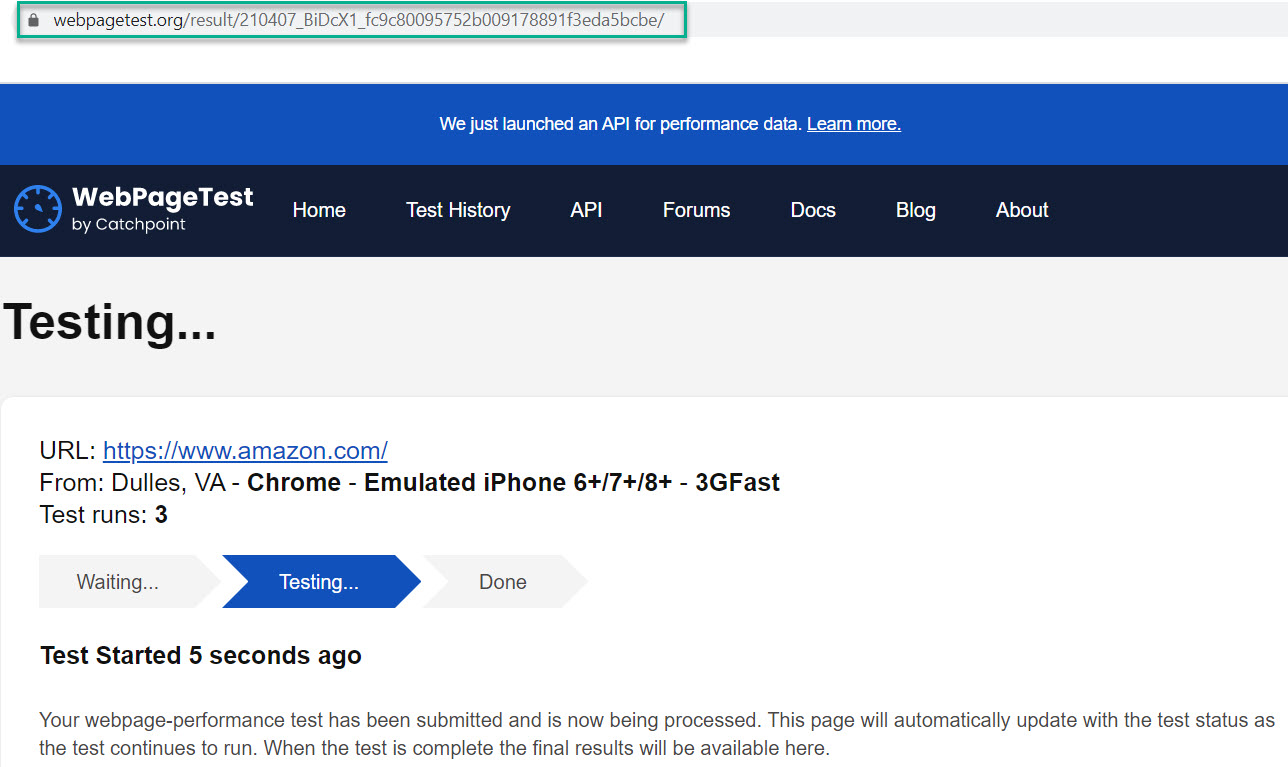
- Testing: Click on ‘Start Test’ in both tabs. Once the test begins, the tool will provide details about the progress of the test, or if there is a queue, details about your position in the queue behind other tests. You may have to wait a few minutes if there are a large number of other tests waiting to be run. (The best way to avoid the queue is to pick less popular locations or test at less popular times of day – outside of normal business hours.)
An important detail here is that at this point the tool has already created a static URL for your test. You can copy this URL and use it to review the results at any time. We normally just pop these urls into a spreadsheet, and review the results later, when all of the tests are done. Remember to start both tests, and save both links, so that you will be able to compare them later, without having to wait for another test to run.
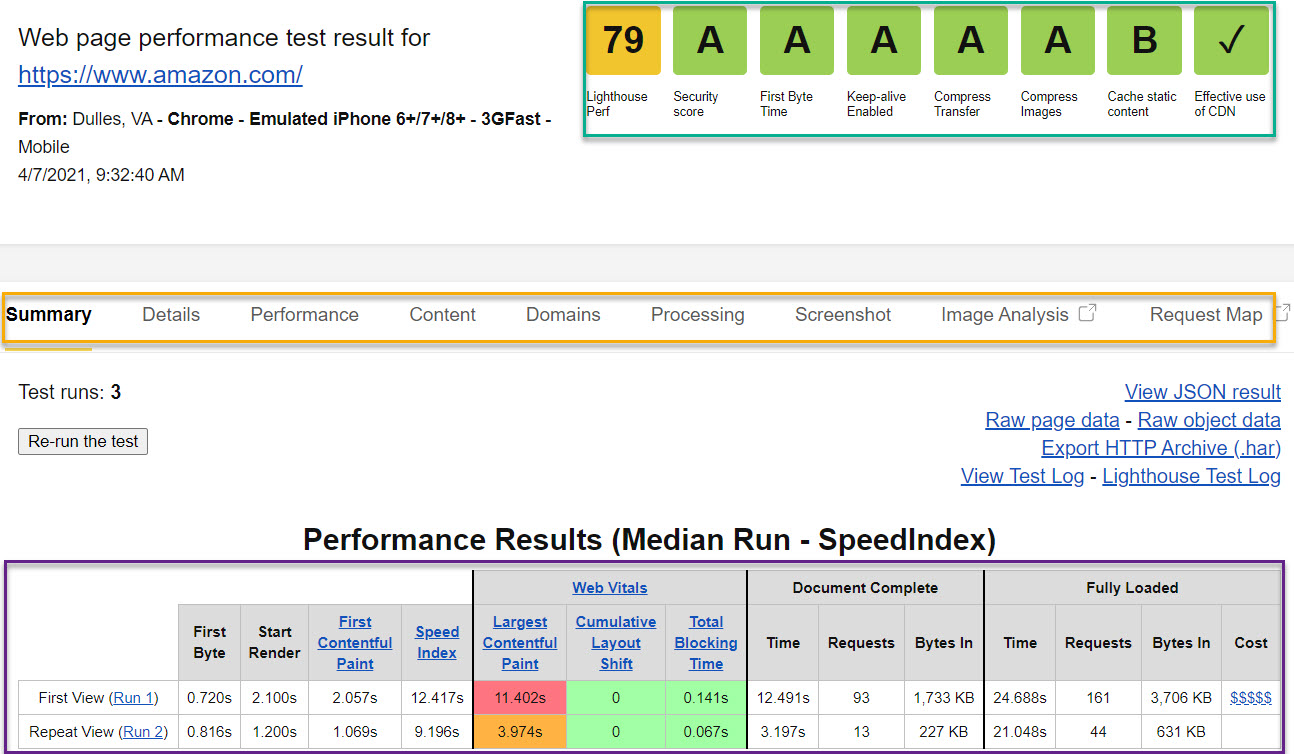
- Results: For our example we used the Amazon homepage. Here is a link to the original test. The tool returns scores from A to F for Security, First Byte Time, Keep-alive Enabled, Compress Transfer, Compress Images, and Cache Static Content, as well as Lighthouse Performance Score and Effective use of CDN (yes or no), (all marked in green in the image below) . The scores are clickable and by clicking on each score you will be able to access more details about successes and opportunities for the page.
Additionally, you will see data in the purple box below from Core Web Vitals as well as KPIs for Document Complete load time and Fully Loaded load time. These are great data points to use as a baseline to track improvements.
Finally, the tool provides extensive details about the entire page health. These are spread across the different tabs in the WebPageTest navigation (marked in yellow). You can copy and paste this information into a spreadsheet for comparison of the mobile and desktop results, or just keep the two tabs open and click back and forth between them. We will go into more details about information in these tabs in subsequent tutorials.


Conclusion
This was a basic tutorial for setting up a load time analysis in WebPage Test, and comparing mobile and desktop load times. This information can help you know what to fix for better performance in Mobile-First Indexing and Core Web Vitals. WebPage Test is one of the most extensive technical SEO tools on the market that can be used for free, to help with SEO. It provides detailed information on page assets and load time, as well as other technical concerns. MobileMoxie has created this article series about Technical SEO (full list included below) and it includes many tutorials that leverage WebPage Test data. Reviewing these other metrics will help your company and/or your clients improve critical technical issues which negatively impact SEO.
Full List of Technical SEO Articles:
- How to Discover & Manage Round Trip Requests
- How Matching Mobile vs. Desktop Page Assets can Improve Your SEO
- How to Identify Unused CSS or JavaScript on a Page
- How to Optimize Robot Instructions for Technical SEO
- How to Use Sitemaps to Help SEO