

Do you want to achieve financial independence? The internet offers a slew of opportunities that can help you.
You can build an authoritative niche blog, earn commissions through affiliate marketing, sell online courses, and more.
The chances of success? Probably not as high as you hope – unless you have your eyes set on eCommerce.
Here are a few reasons why:
- According to Statista, retail eCommerce sales will hit $4.5 trillion by 2021.
- Around 71% of consumers believe that online stores can give them better deals than brick-and-mortar establishments.
- 67% of millennials and 56% of Gen X now prefer shopping online.
- 57% of shoppers are now willing to make purchases from foreign sellers.
Impressed? You should be, but despite the growing optimisim around eCommerce, it’s understandable to have some doubts on whether or not it’s the right opportunity for you.
You may not have any idea on what to sell, lack any experience whatsoever in business, or are simply too scared of failures to take your first step.
Whatever your problems are, funding shouldn’t be one of them. And that’s why we’re here – to discuss the best ways an aspiring entrepreneur can build an eCommerce business on a shoestring budget.
A word about drop shipping
Before anything else, you need to learn about drop shipping and how it differs from traditional wholesale.
Unlike wholesale retailing, drop shipping is a business model wherein you don’t have to take physical possession of the goods as a seller. Rather, the manufacturer takes care of delivering orders once a sale has been made through your online outlet.
This means you don’t have to invest in a warehouse or purchase goods in advance. It may sound like a magic bullet for the cost-conscious, but you need to observe a few precautions when searching for dropship suppliers:
- Avoid Suppliers that Charge a Monthly Fee – Requesting for subscription fees is a red flag that may indicate that the supplier is in deep financial trouble. Of course, it’s also a huge inconvenience for eCommerce startups that are trying to save.
- Ask if They Consider First-Time Sellers – Some suppliers refuse to work with first-time business owners for various reasons. To improve your chances of approval, make sure you prepare the necessary business requirements, such as your EIN (Employer Identification Number), tax ID, and so forth.
- Ask About Their Processing Time – One of the risks in drop shipping is putting your brand’s image in the hands of an external entity. As a rule of thumb, make sure the supplier is capable of delivering orders in around 1-2 weeks or less.
- Learn Their Returns Policies – Even though you’re not directly involved with product shipment, your brand is still accountable for returns and refunds. Make sure you have a solid grasp on how these things are handled by your supplier.
- Look for a Contact Number – If the supplier can’t provide a contact number, then it’s already too much of a risk. Remember, a reputable drop shipper should be willing to answer all their sellers’ questions via phone call.
Now that we have got those out of the way, it’s time to focus on building your first-ever eCommerce store.
Validating your product’s profitability
A lot of new entrepreneurs make the mistake of investing too much money on an unprofitable product idea, but they’re not entirely to blame.
If you look at directories like Alibaba and SalesHoo, you can’t help but notice the vast selection of goods you can sell in your eCommerce store.
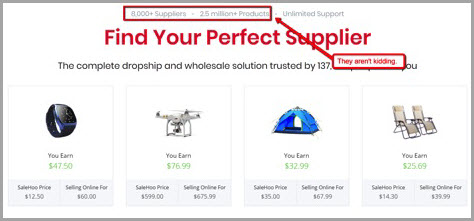
On the plus side, this means you’re certain to find products that fit your desired niche. However, it also means you could be looking at hours upon hours of research to find the perfect product to sell.
As a result, it’s easy to grow impatient and just settle for something that looks promising in terms of ROI and demand. Sure, some products may look good on paper, but you shouldn’t immediately assume they’ll sell well.
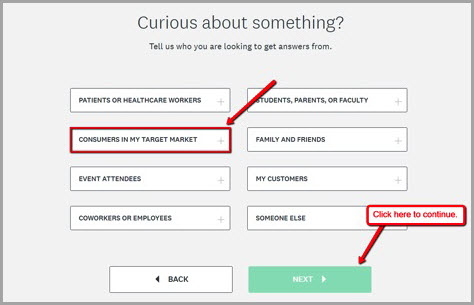
What you need to do is to validate your product idea by asking your target consumers directly. A simple solution is to use Survey Monkey and pick “Consumers in My Target Market” during your first login.
Upon creating a new survey, you can start from scratch by specifying your own questions or use a template pre-made for product research and testing purposes:
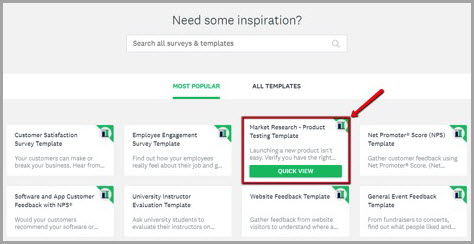
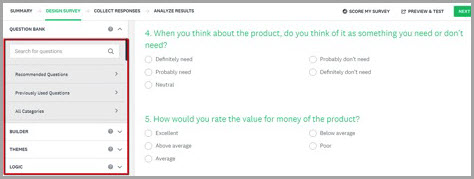
Don’t worry – you can still modify or increase the number of questions included in the template. Survey Monkey’s intuitive interface makes it easy to find everything you need from the left menu:
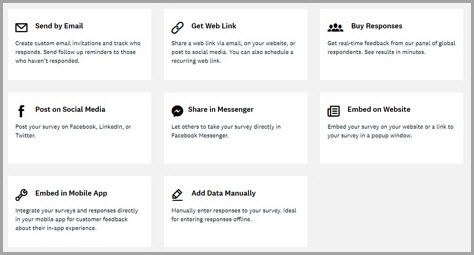
When you’re satisfied with your survey questions, click “Next” to pick your response collection method:
It may take weeks – if not months – before your survey generates enough insights to validate a product, but that’s still way better than spending days and hundreds of dollars on something that won’t sell.
Pick an eCommerce platform
Thanks to modern eCommerce platforms, it should be manageable for a single person to build an online store from scratch. But then again, nothing is a one-size-fits-all solution in business.
To help you decide which platform is best-suited for your needs, here’s an Infographic by Lodlois which has a side-by-side comparison of the top eCommerce platforms known today:

Image Source: Lodlois
For the sake of this guide, we’ll use Shopify as an example since it is the biggest and most flexible platform in terms of cost and functionality. It has a straightforward registration process that requires you to pick a store name right off the bat.
If you still haven’t thought of a good name for your online store, don’t sweat it too much – you can always change your store name later.
Creating your Shopify account
The next steps involve configuring your Shopify experience by answering a couple of questions. Take note that other platforms implement a similar setup process to make sure you easily find the most relevant features.
That said, make sure to answer as honestly as you can:
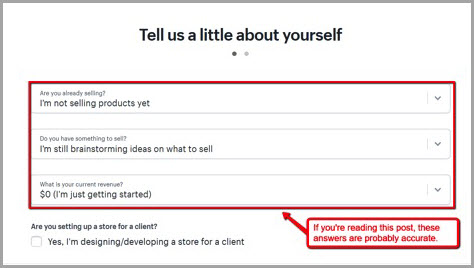
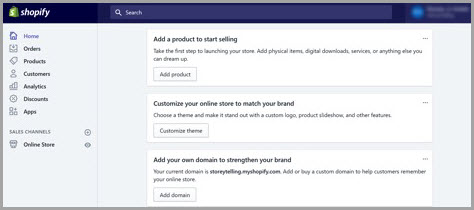
Finally, fill in the personal information that you’d like to use with Shopify. When done, you’ll be taken to the main interface where you can add products, customize your store, and perform a handful of other tasks for your newly-founded eCommerce business.
Customizing your theme
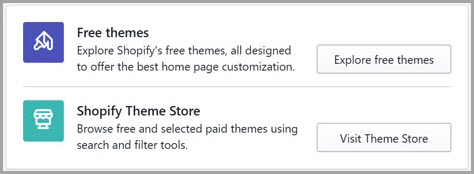
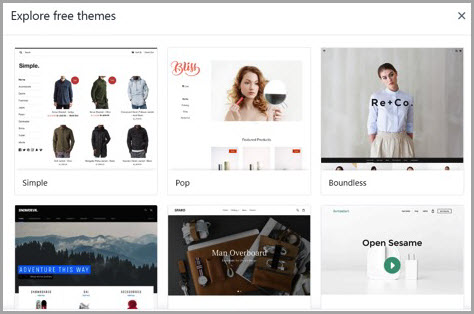
One of the advantages of using an eCommerce platform like Shopify is that you can easily set up a visually-appealing store within minutes. Simply click “Customize theme” from the home section and pick from the free theme repository or purchase one from the paid marketplace:
At first, you don’t have to worry about making major changes to your online store’s appearance. Every available theme you can use – free or paid – is already pre-configured for user experience; products are highlighted above the fold, the site loads fast, and the navigation should be fluid and responsive.
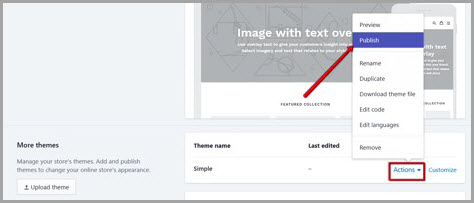
After adding a theme, be sure to use it as the active theme by clicking the “Actions” dropdown menu and selecting “Publish”.
Eventually, modifying your online store’s look to align with your brand is important. But for now, you can keep things the way they are as you get the rest of your store ready for launch.
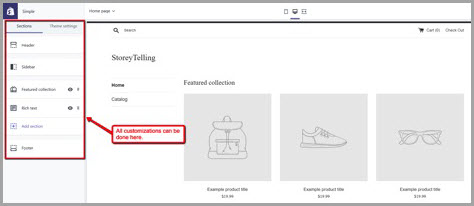
In any case, you can click “Customize” to start personalizing your online store using the Shopify theme editor, which features a CMS-like interface.
Adding products
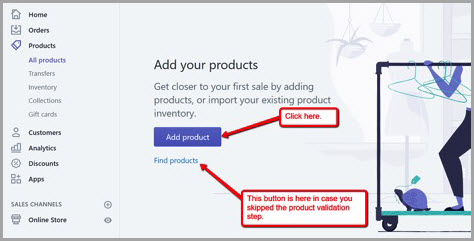
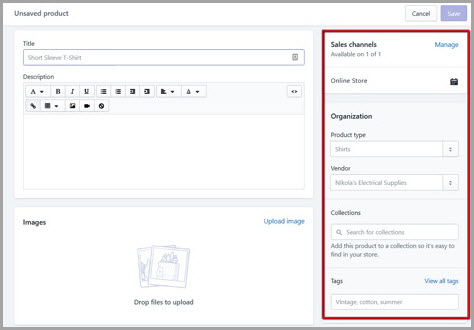
Upon finding and publishing a theme you’d like to work with, you can now start adding products to your catalog. Just head to the “Products” tab from the main menu and click the big blue “Add product” button.
Product categorization is another of the strong points of Shopify. On the “Add product” page, you can organize each item by product type, vendor, collections, and tags.
The good news is, you probably won’t even have to fumble about these settings with drop shipping. Upon striking a deal, your supplier should provide you with a CSV file, which can be imported straight into your product catalog – sometimes with the applicable categories intact.
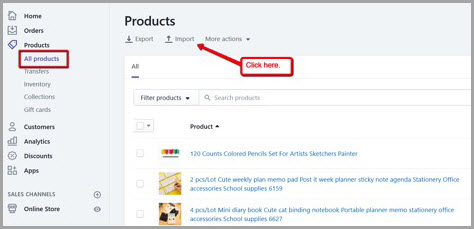
To do this, go to the “Products” section and click “Import”:
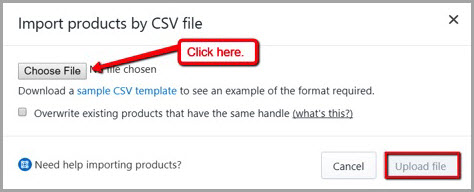
Next, click “Choose File” and locate the CSV file sent to you by your supplier. Click “Upload file” to proceed with the import.
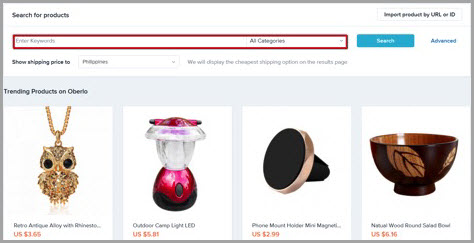
Alternatively, you can import drop shippable items straight from Oberlo – Shopify’s official drop shipping partner – by clicking “Find products” from the initial menu.
Oberlo offers a simple search feature that lets you browse for products in your niche using keywords and categories:
While it significantly cuts the time it takes for you to build your online catalog, it also eliminates the flexibility of choosing your own products from marketplaces like SalesHoo and Alibaba. Products supplied through Oberlo also have a small markup, which can be an issue for new stores that need to make every penny count.
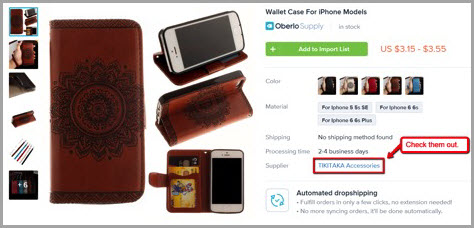
But if you’re willing to make the trade-off, just don’t forget to validate your featured collection and verify that the supplier is a trustworthy business. You should be able to find the supplier’s name by clicking through to the product page:
Another way to quickly populate your product lineup is to use an app called Importify, which works the same as Oberlo. The only difference is that you get to import products from a broader range of marketplaces like Aliexpress, Amazon, Alibaba, Etsy, and so on.
Importify can be installed via the Shopify app store, which can be easily accessed from the main menu. However, it requires a minimum fee of $14.95 per month for the basic plan.
Configuring payment methods
Now that your catalog is ready, your online store needs one more thing before it can be operational – your payment methods.
Below are some of the payment methods currently supported by Shopify:
- PayPal Express Checkout
- BitPay
- PayDollar
- Coinbase
- GoCoin
- Lay-Buy
- All Major Credit Cards
- Manual Payments (Bank Deposit, Cash on Delivery, etc.)
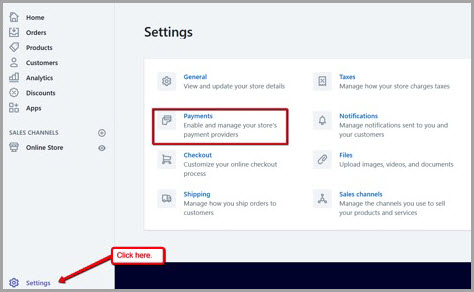
The settings for your payment methods can be found from the “Settings” page:
That’s it! Assuming you’ve already activated your Shopify plan, then you’re now able to sell and receive payments from your very first eCommerce store.
At this point, you spent around $100 for the necessary business requirements, the Importify app (optional), and the Shopify plan. You may also have burnt an hour or two in setting up your digital storefront, excluding the time you invested in product research and supplier negotiations.
What comes next are perhaps the most gruelling aspects of eCommerce drop shipping: marketing your brand and generating sales.
Although these topics are large enough to warrant their own full-length guides, that doesn’t mean we can’t give you a few tips to get the ball rolling:
Build a mailing list
As a new eCommerce business, you need to accept the fact that the majority of your prospective customers won’t convert on their first visit.
They simply don’t know you well enough to hand over their hard-earned cash. So, rather than forcing a sale down their throats, a better approach is to capture them as email subscribers.
MailChimp is one of the best free tools you can use for this purpose. It can help you with anything, from creating registration forms to setting up automated follow-ups to shopping cart abandoners.
Consolidate your data
If you want your eCommerce store to strive, then you need to make decisions and optimizations that are guided by data.
Cyfe is a business dashboard software that can aggregate data from every area of your online business.
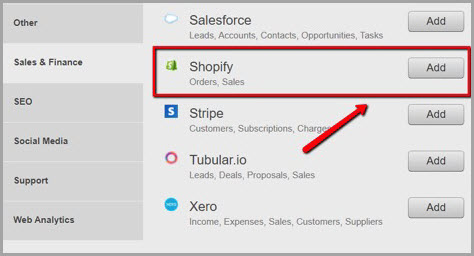
To set up your custom Cyfe dashboard, you need to add “Widgets” that integrate with other services you use. For example, if you’re a Shopify store owner, simply look for the Shopify widget to start tracking key performance indicators such as sales and revenue.
Cyfe also recently rolled out “mashup” widgets, which allow you to visualize metrics from multiple sources in one graph. This will allow you to connect the dots and determine how certain data affects your bottom line.
For example, you can create a mashup widget that shows if the recent spike in Facebook likes actually increased sales. With so many challenges with marketing attribution nowadays, this simple solution is most welcome.
Build a social presence
The quickest way to earn your customers’ trust is to connect with them on a personal level.
By creating official business pages on popular social networks, you not only expose your brand to your target audience – you can also leverage your presence as an actual selling outlet.
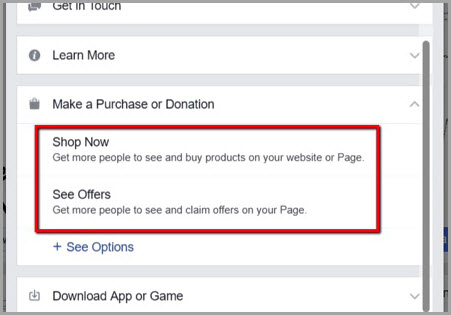
Facebook, for example, allows you to insert “Shop Now” buttons to your business page:
As your social presence grows, the more feedback and reviews your products get. In turn, you can use the social proof to convince more prospects and close more sales.
Final words
A word of advice to new online store owners: don’t quit your 9-to-5 job yet. Ideally, drop shipping is a full-time commitment, but it’ll probably take months before it becomes sustainable.
In the meantime, here are a few learning resources that can help your eCommerce business gain momentum:
Guest Author: Vikas Agrawal is a start-up Investor & co-founder of the Infographic design agency Infobrandz that offers creative and premium visual content solutions to medium to large companies. Content created by Infobrandz are loved, shared & can be found all over the internet on high authority platforms like HuffingtonPost, Businessinsider, Forbes , Tech.co & EliteDaily.