Whenever you receive an email, the first thing you look up to is the sender’s name (or email address). This gives you a clue regarding the importance of mail and maybe the contents as well. But apart from the mail’s content and sender’s address, there are many more hidden features, which hardly anyone looks upto. This is because most of the email clients hide this option to make way for a simple and clearer UI. And among various different types of information, one contains the sender’s IP Address. To trace emails back to its source, we will also be using an IP address.
An IP address is an Internet Protocol address assigned to each of the devices connected over the internet. But the address is not in plain English text but in numerical format. For example, 192.168.0.1 is an IP address (although a reserved one). Using this IP Address, you will be able to identify the sender’s location very precisely. So the next time you receive a spam email, you may very well know who exactly is sending these emails. Let us begin with the guide on how to trace emails back to its source. Moreover, don’t forget to check out these 7 secret Gmail tips and tricks.
Trace Emails back to their Source
- Open the Gmail web version on your desktop or PC.
- Head over to the desired email of which you wish to trace its source and open it.
- Now you will have to view the “Original mail“, i.e. the mail with all the hidden pieces of information visible. Different browsers have slightly different methods of accessing this option. In this guide, we have used the Chrome browser to trace emails back to its source. You may try this with any of the email clients having the ability to “show original email”. Here is how you could access this option in different browsers:

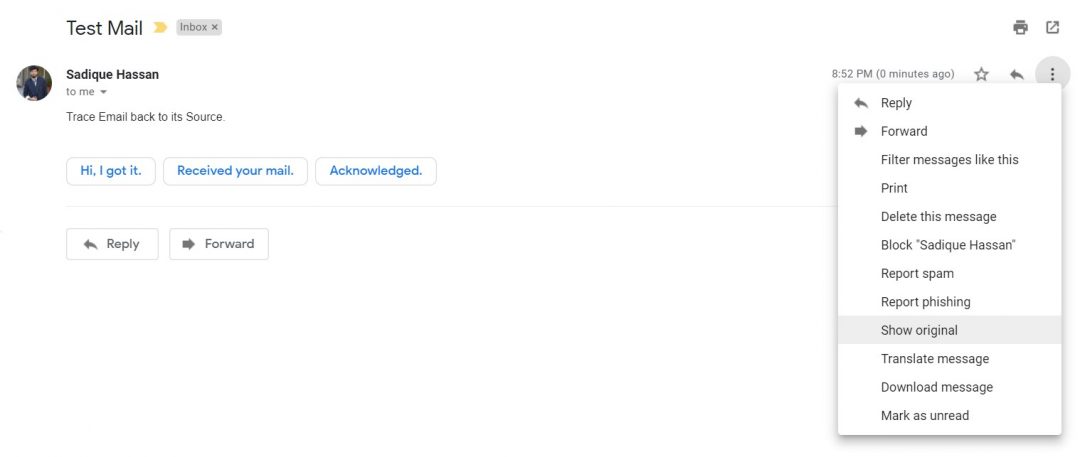
- For Google Chrome, click on three vertical dots present at the extreme right side of the mail (right of Reply icon). Then from the long list of options, select the Show original option.
- If you are using Outlook, navigate to File > Properties > Internet header.
- For the users of Apple Mail, go to View > message > Raw source.
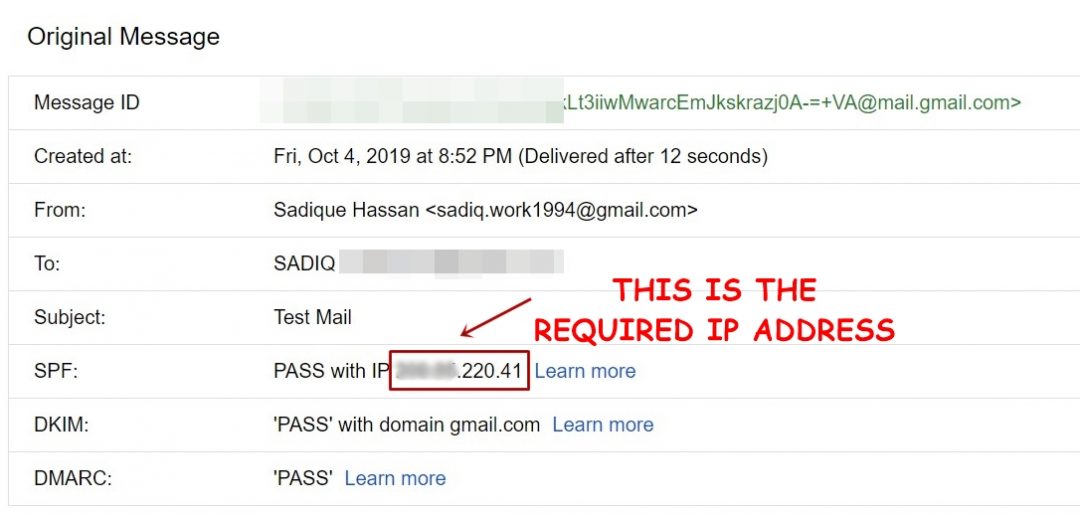
- Once you click on Show original, you will be taken to a new page with tons of information. Using the information given on this page, we will be tracing the email back to its original source. Moreover, if you have ever deleted an email by mistake, then have a look at How to Recover Permanently Deleted Emails in Gmail.
- At the top of the page, you will see a section with Message-ID, Created at, From, etc. You need to look for the SPF section. This is what Google has to say regarding SPF:
“Spammers might send emails that appear to come from your domain. This is called spoofing. You can add a Sender Policy Framework (SPF) record to your domain host to help your recipients know where emails from your domain should be coming from and that they aren’t spoofed.”
- Under the SPF section, you will have the intended IP address. Just copy this IP address.

- Finally, search for any IP tracker website on Google and enter the copied IP Address for tracing the email back to its source.
So with this, you have successfully traced the email back to its source. Likewise, you will be able to get complete information regarding the email’s source, location, DNS, Reverse DNS, ISP name and much more from the IP tracking website. These tracking websites also provide a geo-location finder using a 3-D map. You may take its help as well.
Read Next: 9 Best Email Apps for Android in 2019