

One of the beauties of WordPress as a blogging platform is the fact that it’s just a skeleton, allowing its users to add whatever pieces of flesh they want to it. It does this through its extensible architecture called plugins, but if you don’t know how to use plugins in WordPress, you completely miss out on the advantage of using WordPress!
Howbeit, a newly installed copy of the most popular blogging tool (WordPress of course) can already serve the purpose of running a successful blog with minimal functionalities.
But at this point, I think the Content Management System (CMS) is being underused. To see it’s full potentials, make use of its extensions commonly called Plugins.
What are WordPress Plugins?
These are pieces of software that can be added to a WordPress site to extend its functionalities or add some new features to it.
Plugins allow WordPress site owners to do just anything with their websites. Initially, WordPress was known for its blogging powers. But plugins allow you to turn it into a full blown eCommerce website, Complex membership sites, News sites, Business directory, Multilingual websites, Question & Answer Website, Online communities, etc.
As a matter of fact, there is a plugin for everything you can think of when it comes to running a WordPress powered website.
Here is what makes it even more exciting…
Though creating a plugin to properly fit and function correctly requires expertise in PHP/MySQL programming language and database engine, you don’t need to worry about it at all.
As a user, there are just a few things to work on and none of these is so technical:
- Define exactly what you need the plugin for
- Search and download the plugin from the plugin repository or hire a qualified developer for custom plugin
- Follow simple steps to install, activate and setup the plugin
To give you some ideas, check out this post on the 15 Best WordPress Plugins for Social Media, SEO, and Better Visitor Engagement which includes a list of plugins that are used on this blog.
How to install and activate WordPress plugin
Before we move on, I assume you already have your plugin ready. There are two ways to install depending on where your plugin zipped file is:
- Installing directly from the Wordpres plugin directory.
- Installing from your local drive.
1) Installing directly from WordPress plugin repository
This is the simplest and quickest way to install any plugin on your WordPress Website. This is however only possible if the plugin is available on the online directory.
The good point is that these plugins are made available within your WordPress dashboard. So there is no need to go download them to your local drive.
Go to Plugins -> Add New

This should take you to the new plugins installation page.
You will have to type the plugin name, Author name or keyword in the search box. This will pull up the list of matching results.
All you have to do is click on the Install Now button:
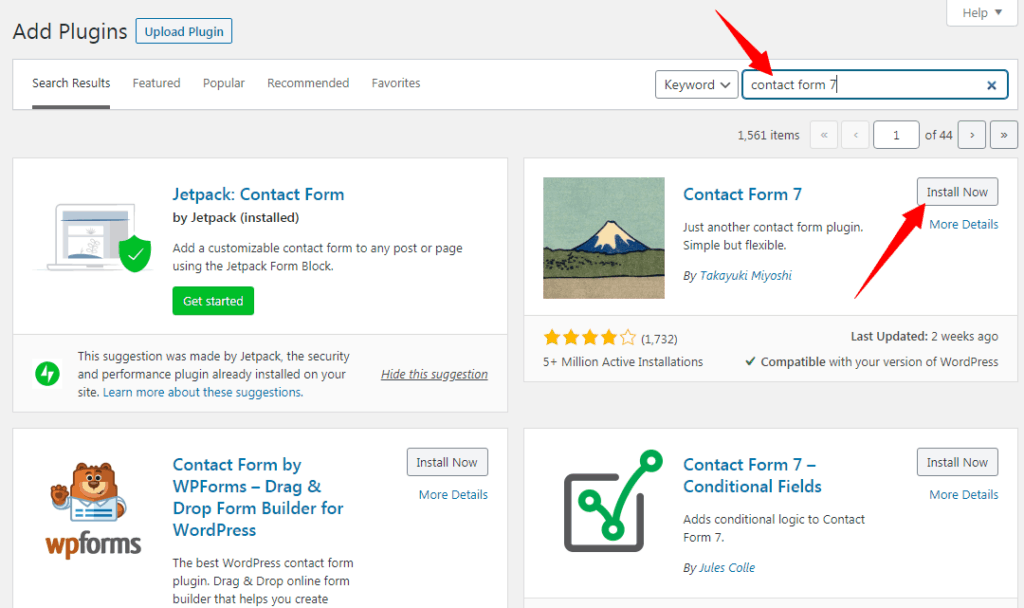
Once installed, the Install Now button label will change to Activate.
You simply should click this button to activate the plugin. Follow the developer’s instructions to properly configure and enable the plugin.
Note that in some cases, activating the plugin doesn’t mean its functions are enabled. That’s why you must always read the plugin’s installation and setup manual.
2) Installing a plugin from your local drive
There are actually two ways to pick a plugin from your local drive and install on your site.
#1. Browser Upload
The first and easier method is to upload using your browser. On the plugin installation page, click Upload Plugin button to browse your local computer for the file:
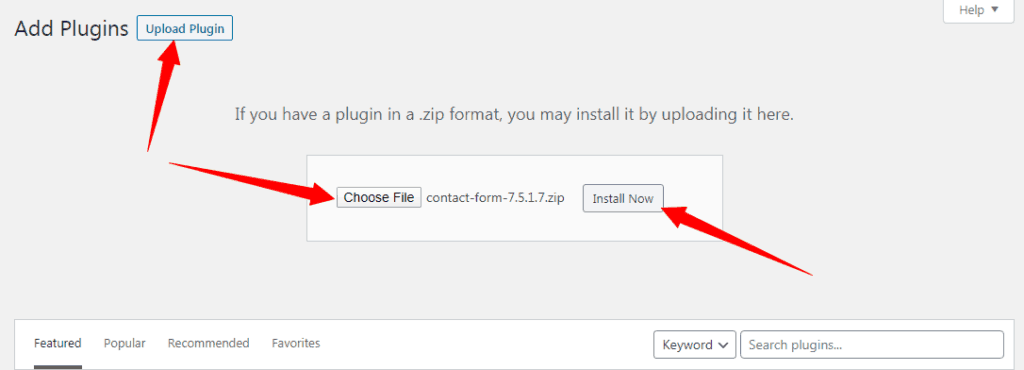
By clicking Install Now, the plugin will be uploaded and installed automatically. Make sure the file you are uploading is a zip file type like: contact-form-7.5.1.7.zip. Any other format is not supported
Once it’s uploaded and installed, be sure to click the button to activate it.

Again, this may not mean the functionalities of the plugin are enabled. Follow developer’s instructions.
#2. FTP Upload
This is more complicated and requires the use of a File Transfer application generally referred to as FTP (File Transfer Protocol).
I’m going to give you simple steps to follow if this is the only option you have. Maybe you got your plugin file from your developer or you downloaded it from the repository (which I do not recommend though).
- First, download an FTP client. You may want to use FileZilla for free. All you need is the copy that’s appropriate for your Operating System (Windows, Mac, Linux)
- Second, you will need your FTP server parameters (Address, Username, Password, Port). Without these, you won’t be able to perform the task. Ask your web host or webmaster for this info.
- Third, unzip the zipped plugin file into a single folder. This is very important and I’ll tell you why in a bit.
Make sure you follow the instructions to install the FTP client on your platform. Start the program and create a connection.
There are several ways to connect to your remote server but FileZilla makes it easy:
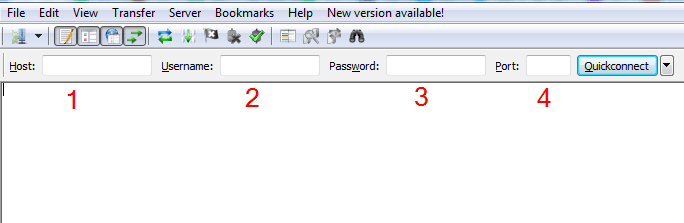
1: Enter your FTP server’s IP address or your domain name
2: Enter the FTP username. This may be same as your Control Panel username
3: Enter the password provided
4: If a port is required, enter it here
Click the Quickconnect button
At this point, we’ve done two things:
- Downloaded and installed the FTP client
- Connected to our blog through FTP
NB: If you have errors, make sure all the 4 connection parameters are correctly entered. If the errors persist, contact your host.
The next step is to unzip your plugin:
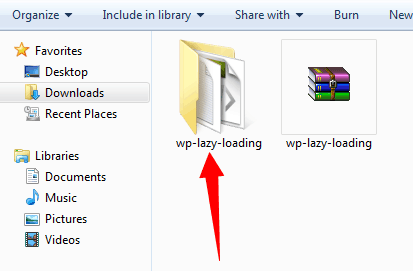
Note that with the FTP method, you won’t upload the zipped file (wp-lazy-loading.zip for instance). If you do that, the installation won’t work at all.
Let’s now move the plugin folder (which contains the plugin php, image, css files) from your local computer to your blog. Go back to the FTP application:
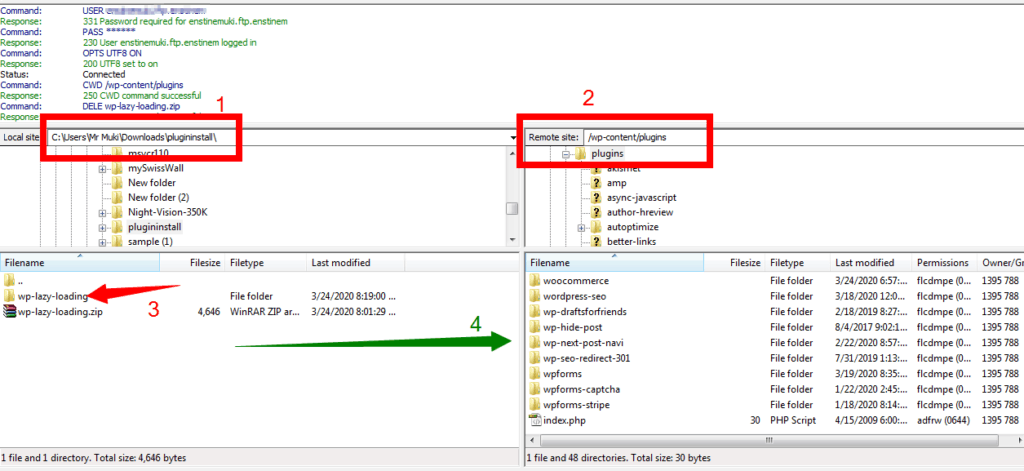
Make sure you are connected to your blog. Click the Quickconnect button
1: You have to browse this section to the folder on your local drive where the plugin file is found. In this demo, we put our plugin in the plugininstall local folder.
2: This section is made up of a list of file and folders on your blog’s root folder. Locate and open the wp-content folder and click to open the plugins sub folder. Doing this will load the content of the plugins folder in 4
4: Righ-click (Windows) the plugin folder in 3 and upload to the blog:

This may take some time to upload the plugin files to your blog depending on how heavy the plugin is or how many files are in the folder.
Once the files are completely uploaded, go to your WordPress dashboard -> Plugins -> Installed Plugins.
Look through the list of installed plugins. You should see the newly uploaded plugin waiting to be installed and activated:

Simply click the Activate button and follow any instructions to enable it.
Now, we’ve seen three different methods to install and activate Plugins in WordPress. You should go with the most convenient one for you.
Before you install the next WordPress plugin
I often advise my students not to rush into installing any plugin. A couple of factors must be checked first:
- Make sure you run a backup of your blog. That alone is another subject but basically, you may want to get to your host to help with backing up a copy of your blog before any major modifications. Installing a new plugin may completely break your blog and if you didn’t save a copy, you may panic and run into losses.
- Make sure the plugin is useful. Don’t install any plugin because grand ma spoke about it.
- Find out if there is any compatibility issues. With some new plugins, you may not have instant breakage on your blog. It may take some time before you start noticing some malfunctions on your blog and you may not realize the plugin is responsible.
- Make sure the plugin is constantly updated: Stay away from plugins that have not been updated for the past 1 or two years. Chances are that these are abandoned projects. They may create security and/or serious compatibility issues on your blog.

The negatives of installing a new WordPress plugin
Many starters who want everything on a single website end up with a long list of (necessary) plugins. While WordPress plugins are simple to get and install, they come with a list of drawbacks:
#1. Slow load speed
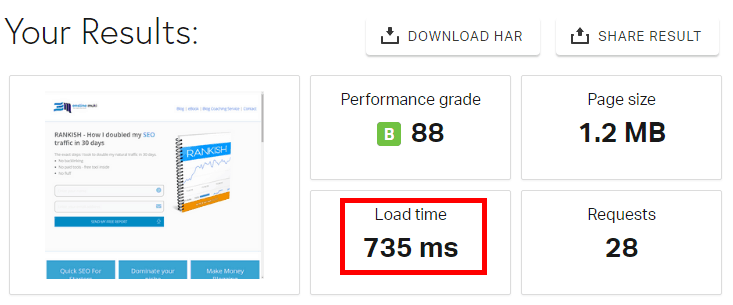
If you care about search engine traffic and natural visibility, this should pull your concern up, as we know one of the SERP ranking factors is load speed. If the load speed of your website is above 2 seconds, you should be thinking about doing something.
The last time I checked mine (about 3 mins ago), it was a bit on the upper side of half a second, which is impressive if you ask me:
There are three ways a plugin may slow down your blog:
- Database calls: Each time a database request is executed, there is a delay in loading your page. The more the requests to run, the more your site runs slow
- JavaScript and Cascading Style Sheet: These are all file types used by many web programs to display results on Internet browsers. A plugin running on your blog may be referencing Js/Css files from external location which impacts your load speed.
- Poorly coded plugins: There is no way you can guarantee that all plugins out there are well coded. Anyone including newbie and amateur programmers can create a plugin. Poorly coded plugins may lead to serious load time slowdown.
One of the things I did to improve my site’s load speed was to remove some idle and not-so-important plugins. While this keeps my readers happy, it contributes positively to my search engine ranking.
#2. Security and backdoors
This is one of the biggest problems with plugins. Some are meant to create backdoors to be exploited for malicious purposes. Others may just have security flaws that may expose your blog to hack attacks.
#3. Compatibility issues
Activating a simple plugin may just turn your entire website off because of conflicting functionalities. In some cases, accessing your dashboard to disable the plugin becomes completely impossible.
If this happens, you’ll have to get to your support person or connect to your site through FTP or Control Panel to rename the newly activated plugin folder. This will instantly disable the plugin and restore your access.
Measuring the impact of new plugins on your blog
One error a lot of WordPress site owners do is not measuring changes on their sites caused by the installation and activation of new plugins and themes.
I came across a blog post on how to determine changes caused by activating new plugins on your blog. This comes with installing another plugin. However, I do install the plugin only when I need it. I think this is a great way to make sure any installations that may bring massive negative impacts get identified early enough.
Constantly update your plugin
For every plugin you have on your blog, make sure you have the most recent copy. Updates are motivated by security, compatibility and functionality factors.
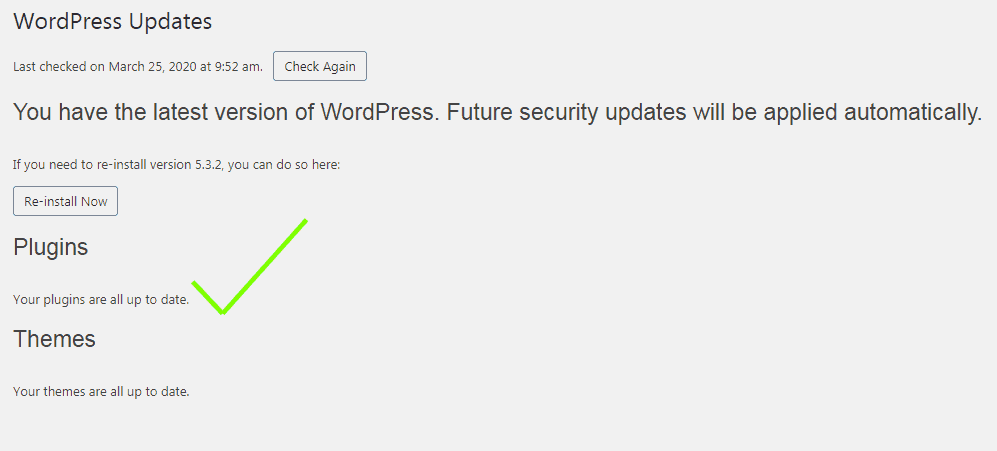
Most plugin developers constantly publish new versions of their software. The good news is that WordPress will always let you know if an update is available. Once there is any alert to update a plugin, do not hesitate to do it.
- First, check for the new functions that are added
- Then backup your entire blog to avoid any damages
- Update the plugin
- Check for any impacts as described above.
Conclusion on how to use plugins in WordPress
WordPress is one of the unavoidable tools for any startup in today’s digital world. While plugins are a way to add power to any WordPress site, caution should be taken. If a new plugin causes negative impact to your website, take it down and look for an alternative.
Thanks for reading and let me know what you think in the comment box.