
WordPress is huge. According to the latest stats, WordPress powers almost 35% of the web — and growing quickly. With so many sites using the CMS and so many new sites bursting onto the scene, there’re a lot of new users taking their first steps in the wonderful world of WordPress. People from all walks of life and many of them are bound to ask the same questions about using WordPress. That’s one of the reasons why we launched a free WordPress for Beginners course. In addition, you can quickly get answers to common WordPress questions in this big guide.
New to WordPress? Don’t worry! Our FREE WordPress for beginners training is here to help. Find out how to set up your own site, learn the ins and outs of creating and maintaining it, and more. Soon you’ll be able to do it all by yourself!
Table of contents
- 1. How to start a WordPress site?
- 2. How to choose a host for your WordPress site?
- 3. How to get to the WordPress dashboard
- 4. How to install and activate a WordPress theme
- 5. How to install a WordPress plugin
- 6. How to change the site title in WordPress
- 7. How to add a page to WordPress
- 8. How to delete a page in WordPress
- 9. How to change the font size in WordPress
- 10. How to add a footer
- 11. How to embed Youtube videos in WordPress
- 12. How to do SEO on WordPress
1. How to start a WordPress site?
So you’ve decided to start your own blog. Hooray! Before you start blogging away, you’ll have to take some steps, like setting up your own WordPress site. But there’s more to starting your own blog! Here, we’ll give you some more pointers on how to hit the ground running.
A purpose, niche, but don’t forget to have fun!
While years ago you’d follow blogs because of the person behind them, nowadays it’s all about answering people’s questions, a purpose for your blog and link building. Or that’s what it might look like. Don’t forget that blogging should be fun, as it is fun! There’s no such thing as too many blogs, as there’s no one like you. It’s cliche, but it’s the truth.
Before you start your blog, you need to decide whether you just want to write for fun or to help others and get high rankings. In the first case, you can start a personal lifestyle blog with everything you love. In the second case, you might need to find yourself a niche as this will increase your chance of ranking tremendously.
When you know who you’re writing for and what to write about, you can start working on your first blog posts! Want to make sure this post will be awesome? Then read this step-by-step guide on how to craft the perfect blog post.
Read more: How to start a blog »
2. How to choose a host for your WordPress site?
What to look for in a WordPress host? There are hundreds, if not thousands, of WordPress hosts. How to pick one that’s perfect for you? Check out this curated list of WordPress hosts that we’ve gathered, and consider the following aspects when making a decision.
Speed and stability
Are you going for a small travel blog? Or are you planning to cater to the clothing needs of half a country? Based on what you’re planning to do with your website, you should pick a host that has reliable uptime and keeps running during busy hours. Make sure they can provide a seamless way for you to grow. Because as you gather more daily visitors, you will need to upgrade your hosting at some point.
Accessibility and services
It is good to know if your host provides a support crew that is willing and able to help you with both your financial and technical questions. The following services might also be useful:
- Alternative ways to access your data in case your WordPress website breaks.
- A user‑friendly control panel that suits your needs.
- The service to register and/or maintain domain names.
Security
Even if you don’t know much about the internet and security, you want your websites’ visitors to be safe. Go for a hosting provider that, at the very least, offers the following:
- (Installation of) Paid or free SSL certificates.
- Up‑to‑date server software.
- Continuous malware/virus scans.
Optionally, check for:
- The option for a 1-click staging environment: this makes building and maintaining a site much easier.
- Data retention and regulation protocols: based on your country’s laws, make sure you know where the data is stored and how it is handled.
- Backup services: if something breaks, you will want to be able to restore it quickly.
A decent firewall (sometimes provided as an additional service, like CloudFlare).
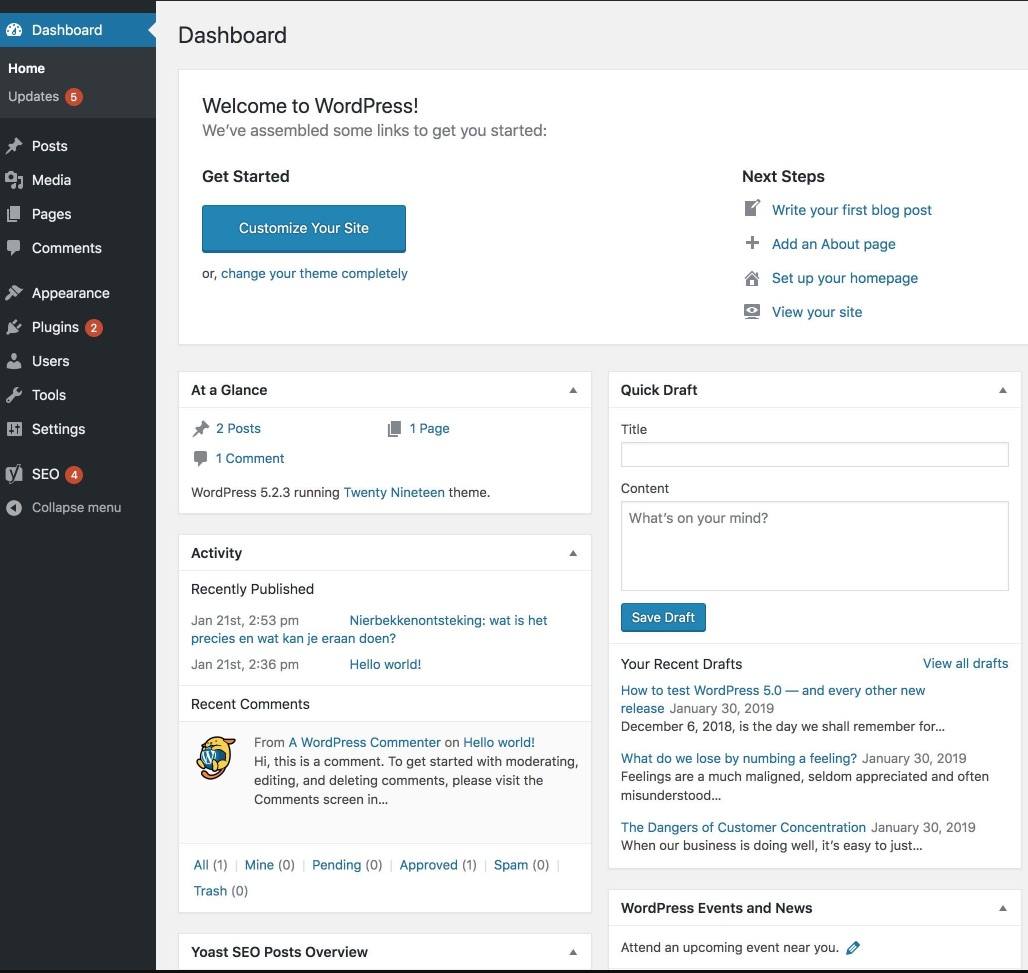
3. How to get to the WordPress dashboard
The WordPress dashboard is the first thing you see when you log into WordPress. From there, you see an overview of various dashboard widgets with relevant information. For instance, our Yoast SEO dashboard widget gives you a quick overview of the SEO health of your site.
But if you’ve never logged into your WordPress dashboard before, finding it can be a little tricky. When you installed WordPress, you were guided into the WordPress dashboard automagically after the installation process. However, if you haven’t saved the URL of your WordPress dashboard, logging back in is not that easy.
Luckily, there’s a solution that works for all WordPress sites. When you add /login/ or /admin/ to the URL of your site, you will be sent to the login screen. Upon logging in, you’ll be sent to your WordPress dashboard. So what does that look like? If your domain, for example, is everydayimtravelling.com, the login URL would become everydayimtravelling.com/admin/ and this will prompt you with the login screen. For future convenience, bookmark that page as soon as you’re logged in so you’ll even have a quicker way to log in.
4. How to install and activate a WordPress theme
A theme governs the layout of your WordPress site. That includes, among other things, the appearance of your posts and pages, and the location of the menus and sidebars. Not surprisingly, finding the right theme is quite important for your website as it makes your site stand out from the masses. But, with so many choices out there, that may be harder than it seems. So, make sure to spend some time and effort and choose the best WordPress theme for your site.
Once you have chosen a theme, installing and activating it is easy. There are two ways to install a new theme in WordPress.
A. Installing a theme from the WordPress directory:
You can install a theme from the WordPress repository. In addition, it is also possible to buy premium themes from a variety of sellers. To install and activate a theme, follow these steps or check out the free WordPress for beginners course.
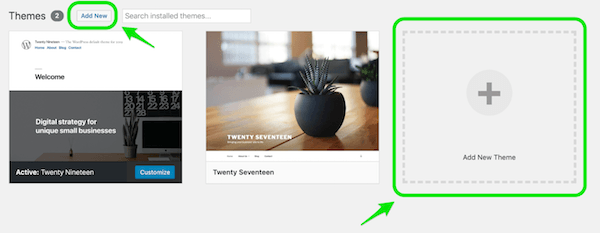
- Open the Themes overview screen
In the admin menu in your WordPress Backend, click on Appearance, then Themes. The Themes overview screen will open. - Click the Add New button or the Add New Theme area
At the top of the screen, you’ll find the Add new button. Alternatively, in the themes overview area, there is an Add New Theme square. Click on either one, to open the screen with available themes. - Preview the theme
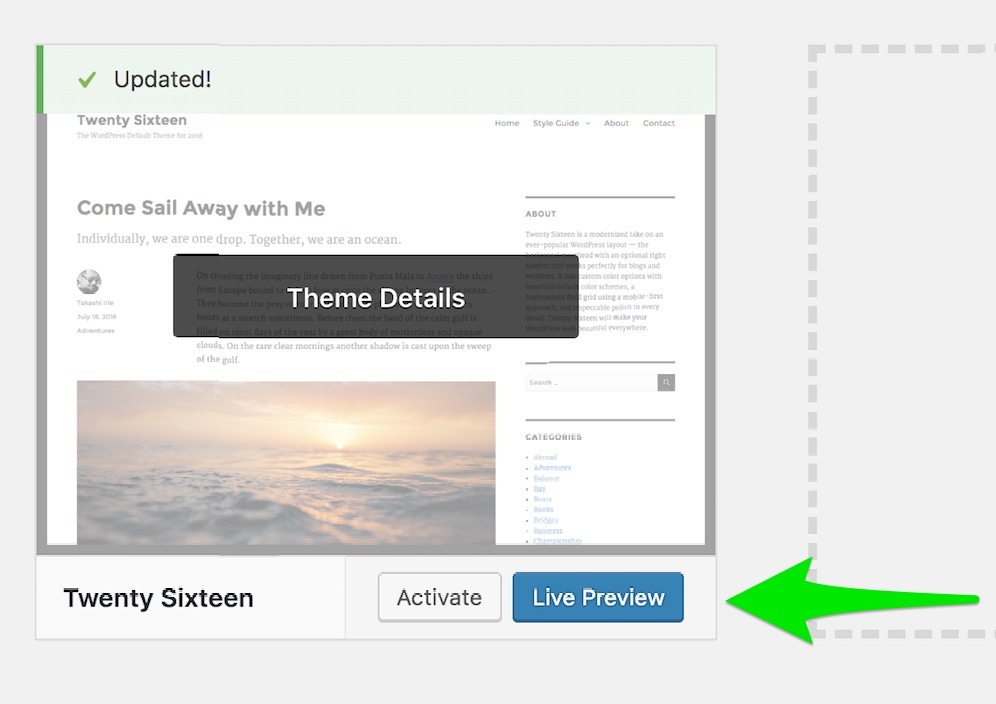
Before you install a theme, it is a good idea to see how it looks on your site. You can do this by hitting the Preview button. Note, this is not an exact match of your site, but it does give you a really good idea if the theme fits your goals. - Install the theme
Hover over the theme you want to use and click Install. The Install button will transform into an Activate button. - Activate the theme
Click the Activate button. The theme will be activated, and it will change the appearance of your website. - Go check what your site looks like on the front end!
B. Upload a theme
You can also add a theme that you’ve downloaded from outside the WordPress directory, this could be from one of the many online theme shops out there. The theme will have to be in a .zip format! To install and activate it, follow these steps or check out the free WordPress for beginners training.
- In the Themes overview screen, click Add New
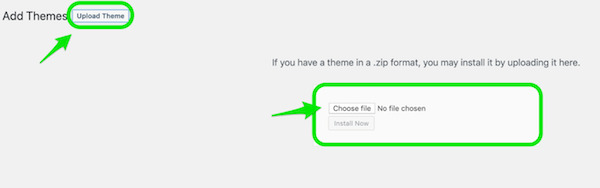
Once you have accessed the Themes overview screen through the admin menu, you’ll see the Add New button at the top of the screen as well as the Add New Theme square in the area below. Click either one to open the screen with available themes. - Click the upload theme button
At the top of the screen with available themes is the Upload Theme button. Click the button. You’ll see the new option to upload a .zip file. - Click the Choose file button
Once you click the button, a dialogue box will appear, that will allow you to choose files from your computer. Find and select the .zip file that you previously downloaded. - Install the theme
Click the Install Now button. Your theme will be installed and added to your themes overview. - Activate the theme
In the themes overview screen, hover over the theme, and click Activate. The theme will activate, and it will change the appearance of your website. - Go check what your site looks like on the front end
Curious for more? Check out this lesson on themes of the free WordPress for beginners course.
5. How to install a WordPress plugin
Plugins can change or improve the functionality of your site in various ways. As a WordPress user, you’ll surely need to install a plugin at some point. How do you do that? Easy. You can do it in two ways. Either install a plugin from the WordPress plugin directory or upload a plugin you have downloaded from a third-party. Please note that only free and approved plugins are featured in the WordPress plugin directory.
A. Install a plugin from the WordPress directory
Let’s start by installing a plugin from the WordPress directory. Just follow these simple steps:
- Access the WordPress plugin directory
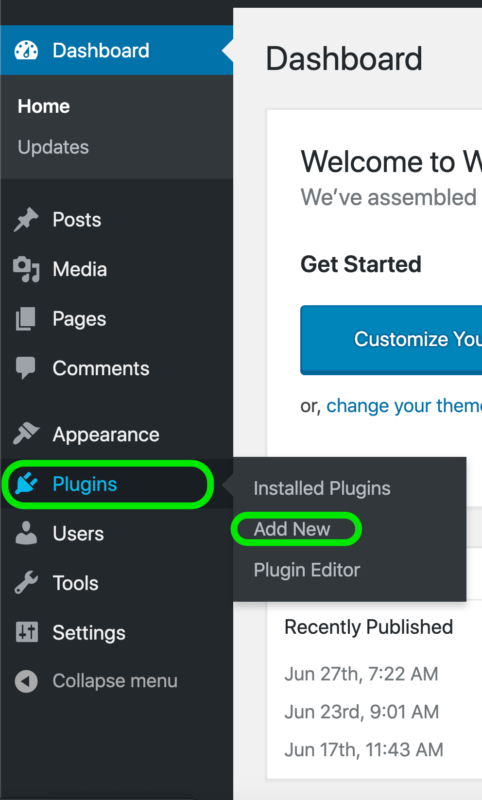
In the WordPress backend, go to the admin menu. Hover over the Plugins menu item, and select Add New from the fly-out menu. The WordPress plugin directory will appear. - Find the plugin you want
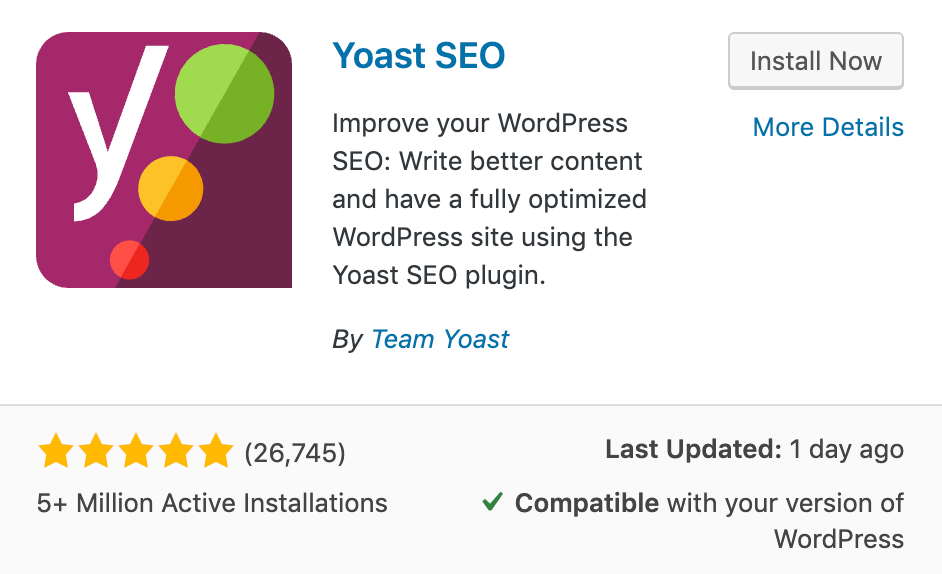
Use the filter tabs in the toolbar, or search for plugins by typing in a keyword, author, or tag in the search box. - Check the quality of the plugin
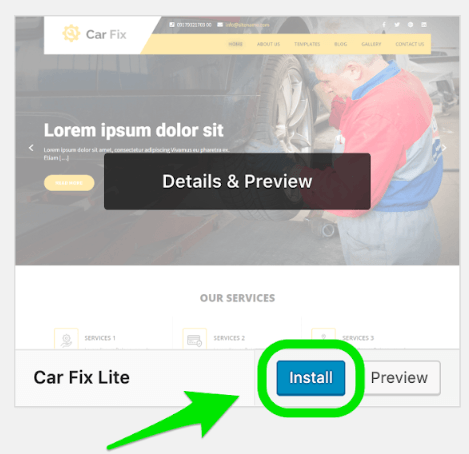
Each plugin is featured in a box with basic information. A good quality plugin will have good reviews, a high number of active installations, frequent updates, and it will be compatible with your version of WordPress. - Install the plugin
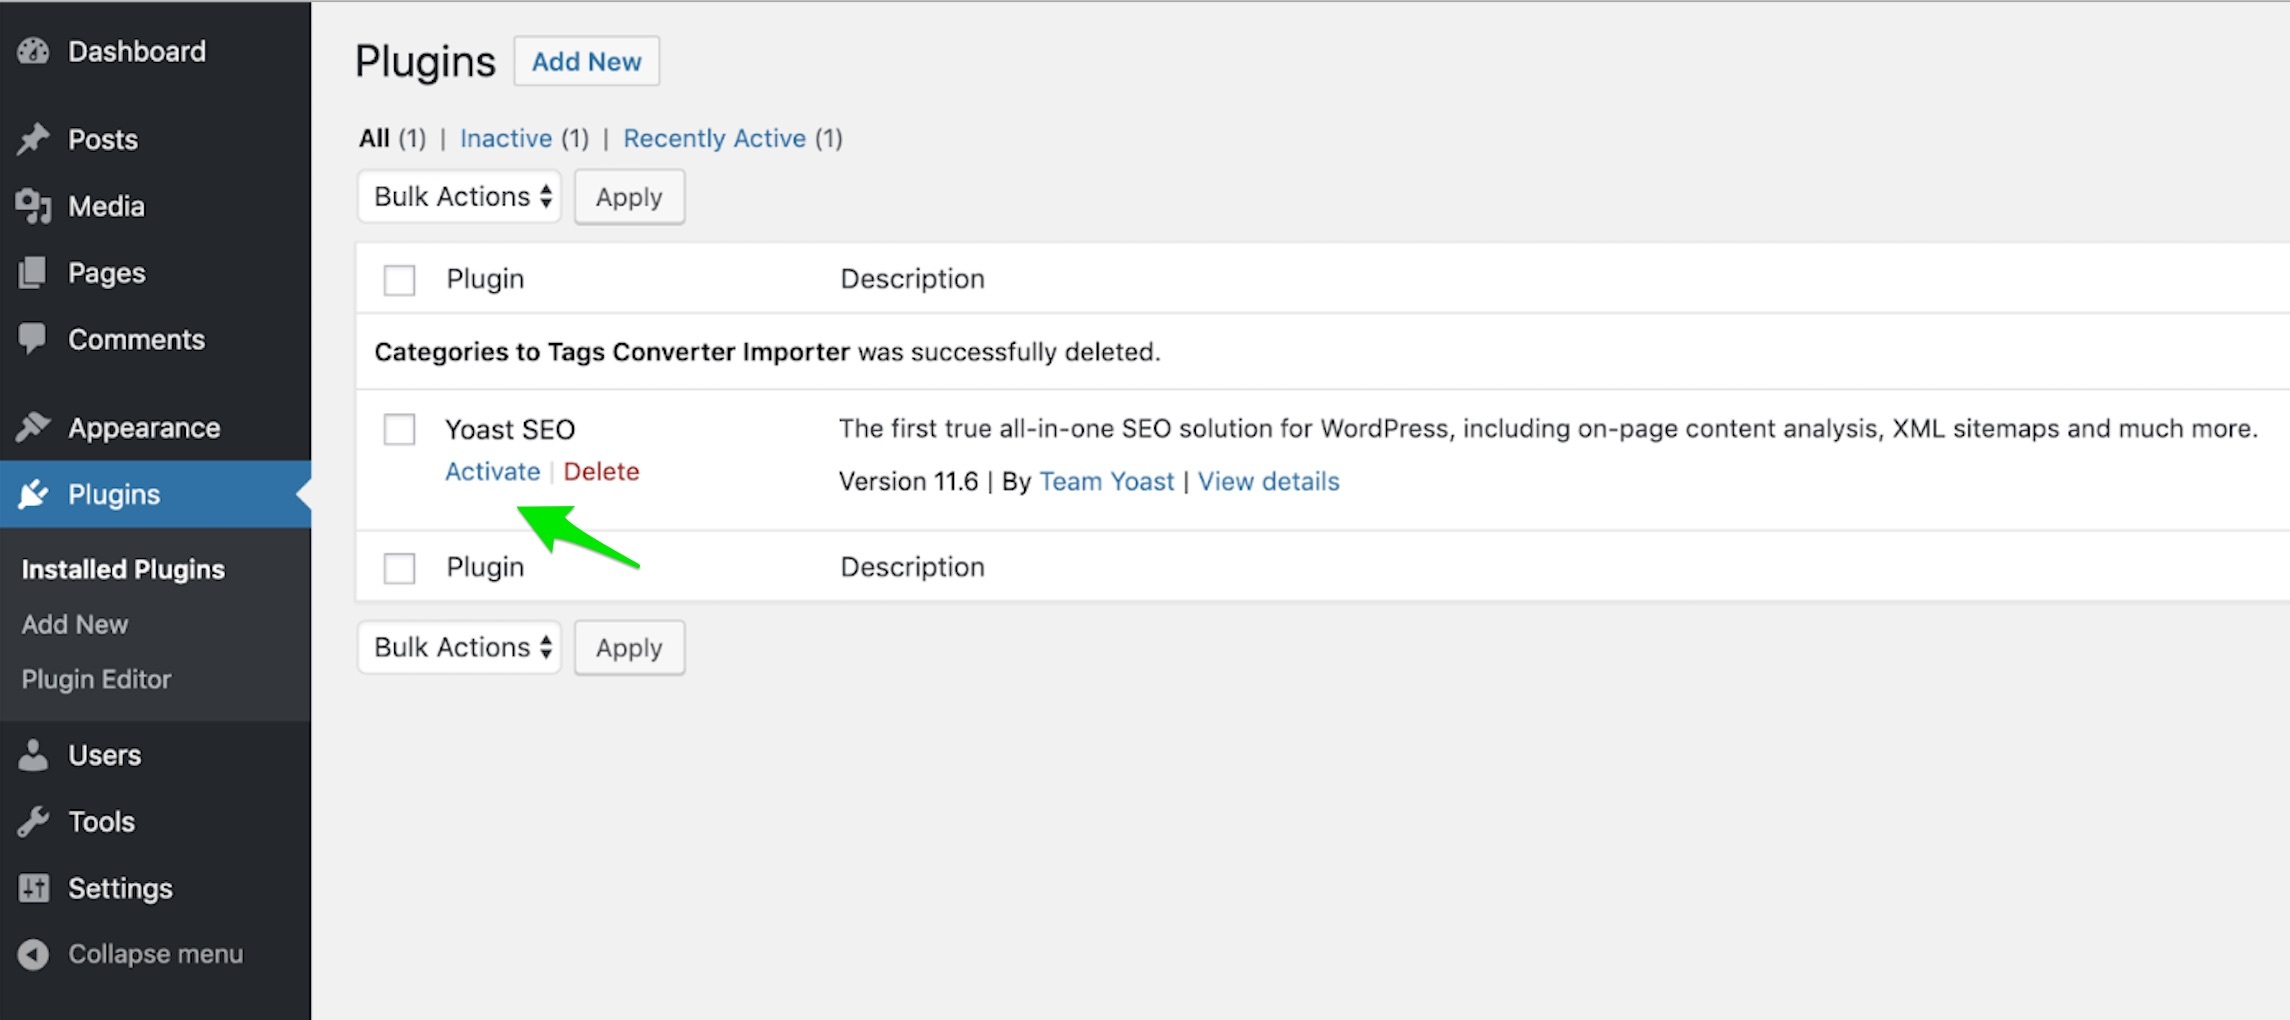
Click the Install Now button in the plugin box. Once the installation is complete, the Activate button will replace the Install button. In addition, the plugin will appear on the Installed Plugins screen. - Activate the plugin
Clicking Activate is crucial for the plugin to work. You can activate the plugin in the plugin box by clicking the Activate button when the installation is complete. Alternatively, you can click the Activate link in the Plugins overview screen.

B. Upload a plugin
The WordPress plugin directory has a lot of plugins, but it does not have all of them. You can also find some cool plugins on third-party sites like, for example, Yoast SEO Premium. But no worries, you can still easily add these plugins to WordPress. To upload a plugin to WordPress, follow these steps:
- Download the plugin from the third-party site
Note that you will need to download the plugin in a .zip format. Otherwise, the upload may fail. If the plugin is not available for download in that format, contact the plugin provider. - Access the WordPress plugin directory
In your backend, go to the admin menu. Hover over the Plugins menu item, and select. Add New from the fly-out menu. The WordPress plugin directory will appear. - Upload the plugin
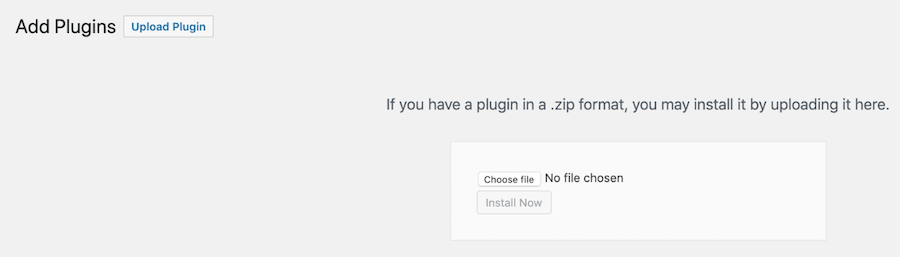
In the WordPress plugin directory, click the Upload Plugin button at the top of the screen. A new option will appear to add a file. Click the Choose file button, which will trigger a dialogue box to open. Find and select the file from your computer and click Open. - Install the plugin
Click the Install Now button, and the plugin will be installed. - Activate the plugin
Remember, you always need to activate a plugin after installing it. Go to your plugins overview, locate the plugin, and click the Activate link.
6. How to change the site title in WordPress
Setting your site title is an important step when creating your website. Your site title is the name that will show up at the top of the browser window, in bookmarks, and when people share your site on social media or via messaging apps.
To set your site title, select Appearance > Customize from your admin dashboard menu.
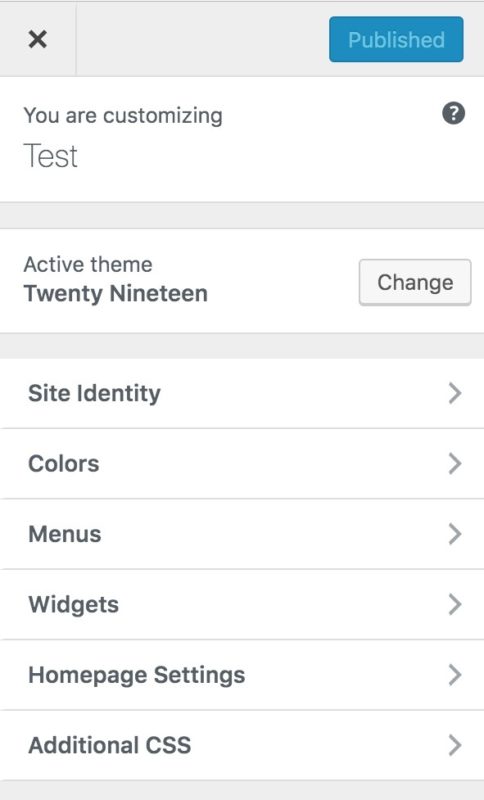
This will open the Customizer, which offers a lot of options to customize your site — as you may have guessed from the name. The option we need is right at the top, under Site identity > Site title.
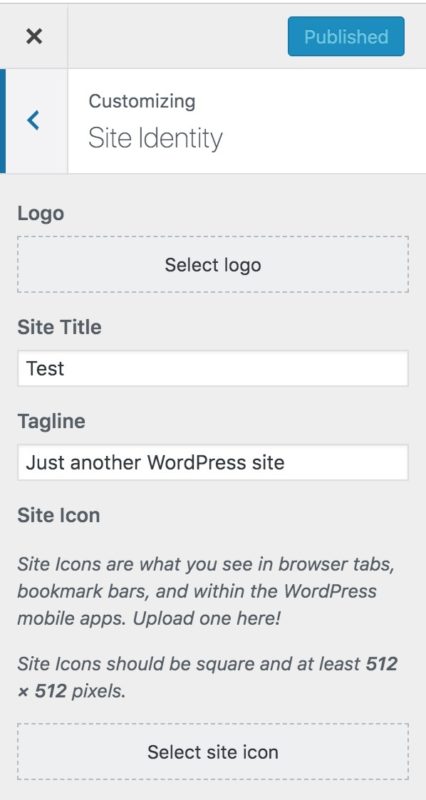
Enter the name you have chosen for your website, and if possible, try to keep it short. You’ll want to have plenty of space left in the search results to also display the title of your post or page. You can learn about why titles are important here.
And, while you’re there, make sure that you change your site’s favicon, which is called a site icon in WordPress. Find out how to do this in our step-by-step guide on changing your favicon.
7. How to add a page to WordPress
Pages form the backbone of your site structure. Naturally, it is quite important to know how to add a page in WordPress. Luckily, it’s quite easy. Just follow our instructions, and you’ll be adding pages to your WordPress site in no time.
To add a page, do this or check out the free WordPress for beginners training:
- Access the Page editing screen
To access the page editing screen, hover over the Pages menu item in the Admin menu and choose the Add New tab from the flyout menu. - Add a title
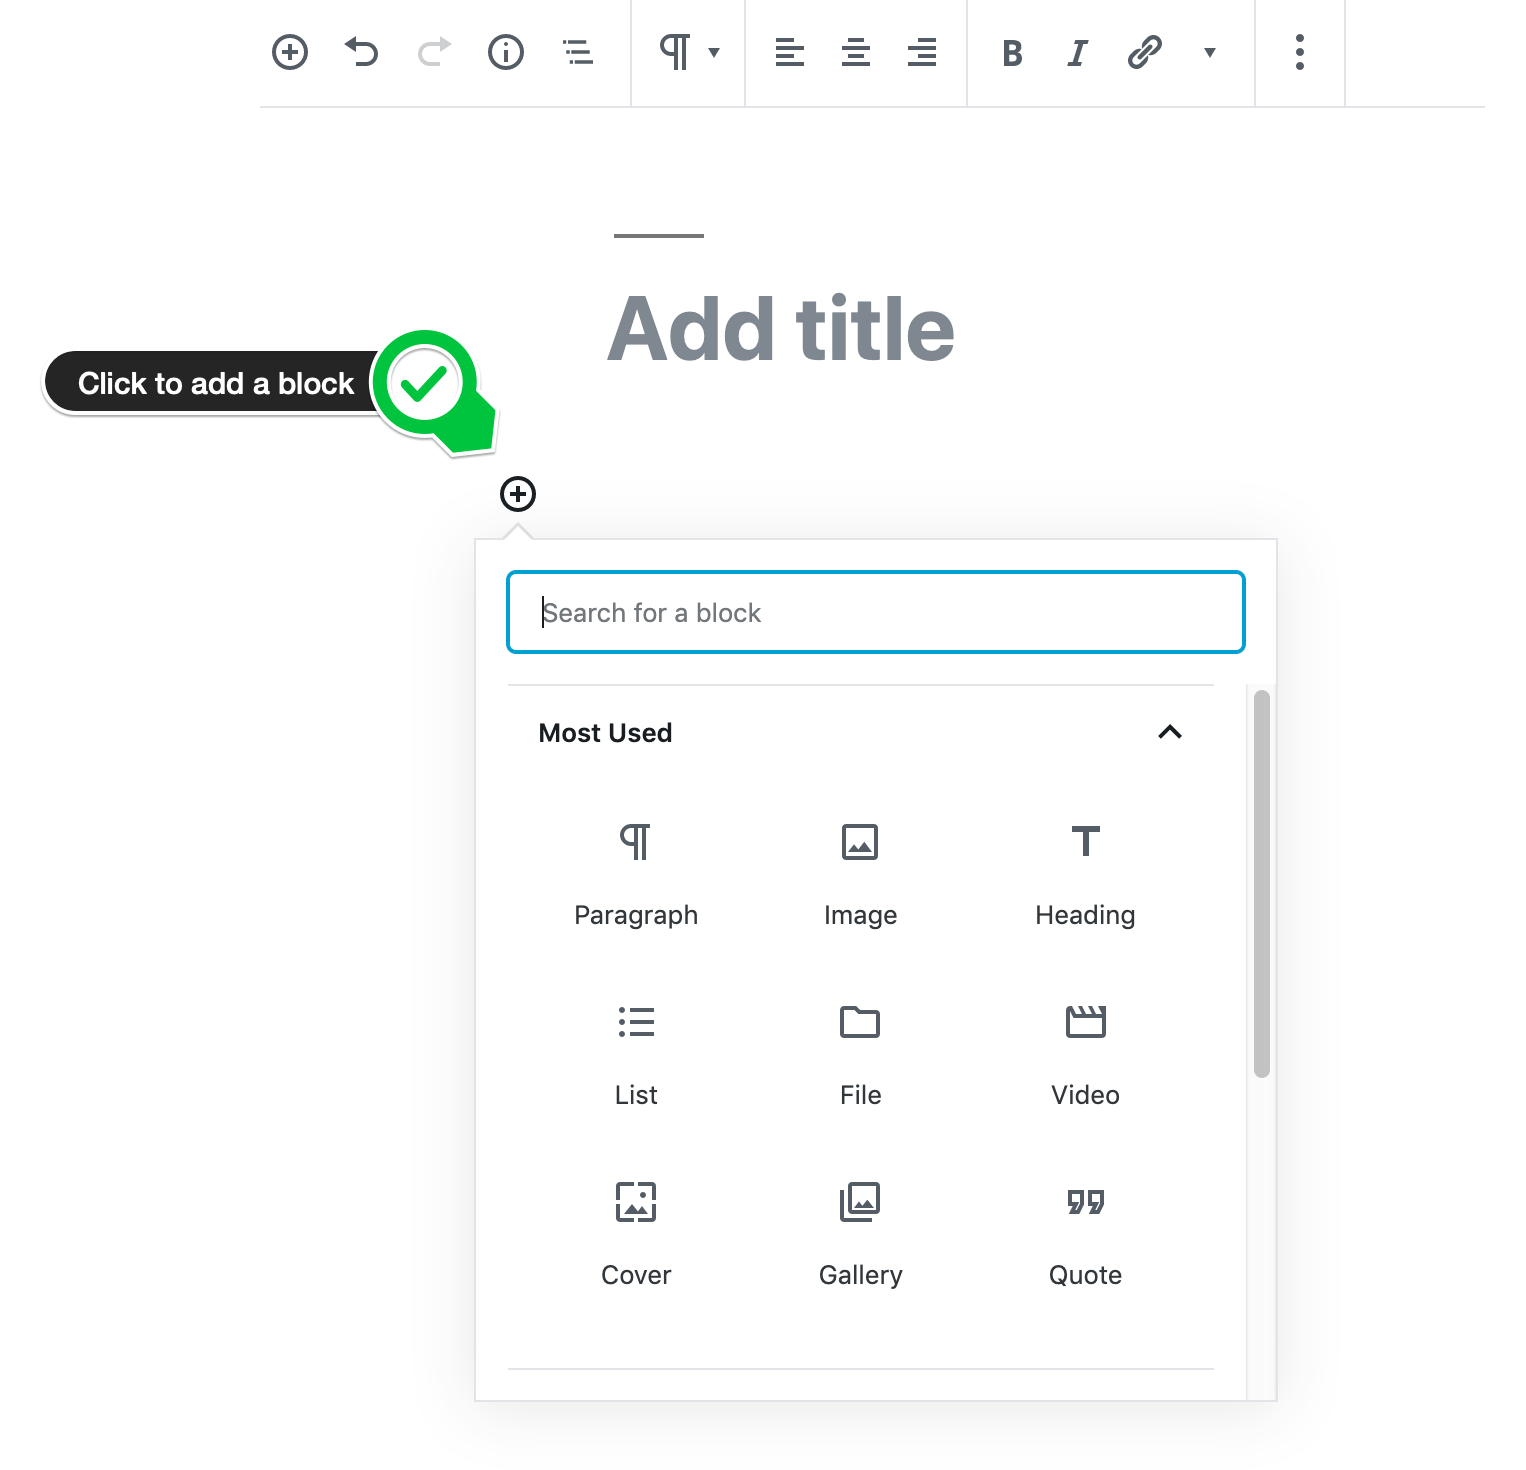
In the editing screen, you will see a block with the text Add title. Add the title of your page there. Click enter to create a new block. - Add content
Add the content of your page by choosing the appropriate block. If you want to add text, choose the Paragraph block. To add a subheading, choose the Heading block. Choose an appropriate new block for each new type of content you want to add. For example, add an Image block for an image, or a Video block to add a video to your page. - Preview the page
When you’re done adding content to the page in the editor, we’d advise previewing what the page will look like on your site. To do that, click the Preview button in the top right corner of the screen. - Publish the page
When you’re satisfied with the preview, all you need to do is click on the Publish button. Your page will be published.
Curious for more? Check out this lesson on creating pages in WordPress of the free WordPress for beginners course.
8. How to delete a page in WordPress
You might think deleting a page from your site is as easy as just hitting that delete button. But with deleting a page, you’ll also delete one or more URLs. This usually results in a ‘404 not found’ error… Which isn’t great, neither for visitors, nor Google.
So, think before you delete a page. You have two valid options after deleting a page: redirecting it to another page or showing search engine spiders a 410 header, which indicates the page is deleted intentionally. Redirecting a deleted page is the best choice when you have other content on your site that is similar to the deleted content. The goal still is to provide the user with the information he or she was looking for. If there’s no other page that answers the user’s question, you need to decide if you want to improve the existing page or show a 410 header instead. You can set such a header in code, but it’s much easier to do with one of the many redirect plugins for WordPress.
Redirect a page
There are different kinds of redirects, but a 301 redirect is what you should use when you redirect the deleted page to another one. This redirect, called a permanent redirect, makes sure the link value of the old page will be assigned to the new URL. You can redirect posts or pages easily with the Yoast SEO redirect manager, as it will ask you what to do with a URL when you delete a page. Just enter the replacing URL and you’re done!
Show a 410 Content deleted header
Is there no other page on your site that will give the reader the information he or she is looking for? Then it’s better to delete or improve that page. In case of deleting, you’ll need to send a ‘410 content deleted’ header. By using this HTTP status code, you’ll let Google know that you removed the URL on purpose and that Google can remove the URL from its index faster. In the Yoast SEO redirect manager, you can also choose the option to show a ‘410 content deleted’ page after you’ve deleted a page.
9. How to change the font size in WordPress
What if the WordPress theme you’ve chosen is perfect — except for one little thing? The font size is just a little bit off. Do you need to find yourself a completely new theme because of this? Of course not! Changing the font size in your WordPress theme is relatively easy, but it does involve a little bit of CSS coding. We’ll help you! These are the steps you need to take to change the font size in WordPress:
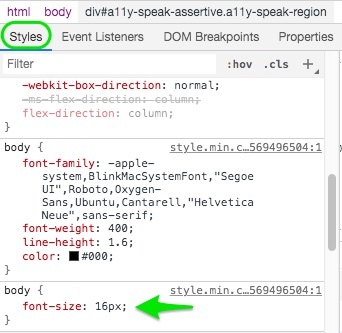
- First, you’ll have to identify what the current font size is. You can do this by opening the Inspector of your browser. When you right-click on the text you’d like to see in a different font size, you’ll be greeted with a menu that will have a direct link to your browser inspector tool. They look different from browser to browser, but they all work in a similar fashion. In Chrome, the menu item is called Inspect and in Firefox Inspect Element. Go ahead and click on that.
- Next up is finding the relevant CSS code that dictates the current font size. You’ll be looking for a section inside the Inspector you’ve just activated on the right-hand side of the screen called Styles.
- Below that, you’ll see lines of code that match the element you’ve clicked on. You’ll see a line that has something like font-size: 14px or font-size: 1rem.
- You can manually change the value of that line of code to, for instance, font-size: 16px. You’ll immediately see that change reflected in the open screen of your website. This is how you can check which value works best for you.
- Once you’ve made up your mind on what you’d like to change it to, it’s time to write that down. You’ll also have to save the CSS element in which you changed the value. Most of the time this will be either a p or an h2 or h2 if you’ve selected a title.
- You’ll need to entire CSS code snippet for our next step, but it will look like something like this: p {font-size: 16px;}
- The next step is to navigate to your WordPress dashboard and find the Customize menu option inside the Appearance menu.
- Click that and you’ll see a preview of your site on the right-hand side of your screen and a menu on the left-hand side. Inside this menu, you’ll find the Additional CSS menu.
- Click on that menu option and you’ll see an input field. Here, you can paste the CSS snippet you saved earlier. As soon as you’ve pasted it, you’ll see the effects reflected on the right-hand side of your screen.
- If it has the desired effect, go ahead and save your settings by clicking the Publish button inside the Customizer section. Afterwards, you click on the plus ( + ) sign in the top left-hand side of the Customizer to close the customizer screen. That’s it — you’ve now successfully changed the font size of your WordPress site.
10. How to add a footer
Many themes have a so-called footer. The footer at the bottom of your pages is a good location to add some links to the less prominent content on your site, such as your address and contact information, terms of service and privacy policy. Not every theme has one, and the ones that do, often have different ways of activating and filling the footer. The Genesis theme, for instance, uses the Customizer settings to get this done, while other themes have a different setting for it. So, you best look around in the settings to find it. Here’s one of the most used ways of adding a footer to your theme.
- Go to Appearance > Widgets from your admin dashboard.
- On the left of this page are widgets that you can add to various places in your site’s theme. Those locations are listed on the right.
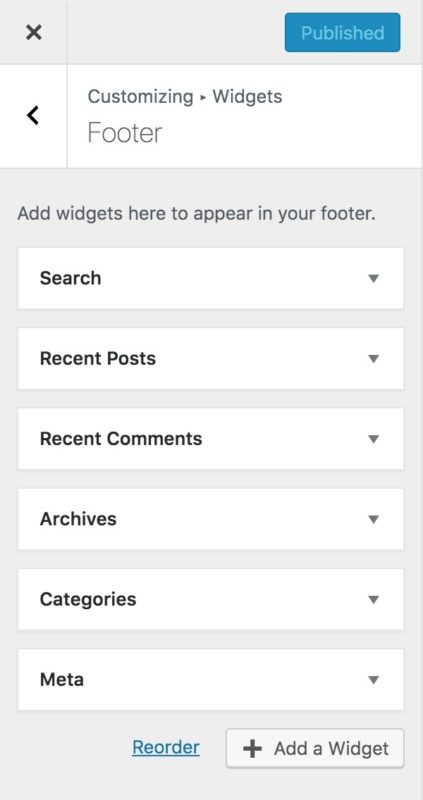
- Find the widget that you want to add, and drag it to the location called “Footer”.
- That’s it!
11. How to embed Youtube videos in WordPress
To really engage your audience, making your content visually appealing is key. One of the easiest ways to do this is by adding some images, or even a video. Embedding video hasn’t always been easy, but thanks to the block editor in WordPress 5.0, it is now! When you are editing a post or a page on your site, here’s how to do it:
- Go to Youtube and find the video you want to add to your content.
- Click the Share icon and copy the URL it displays.
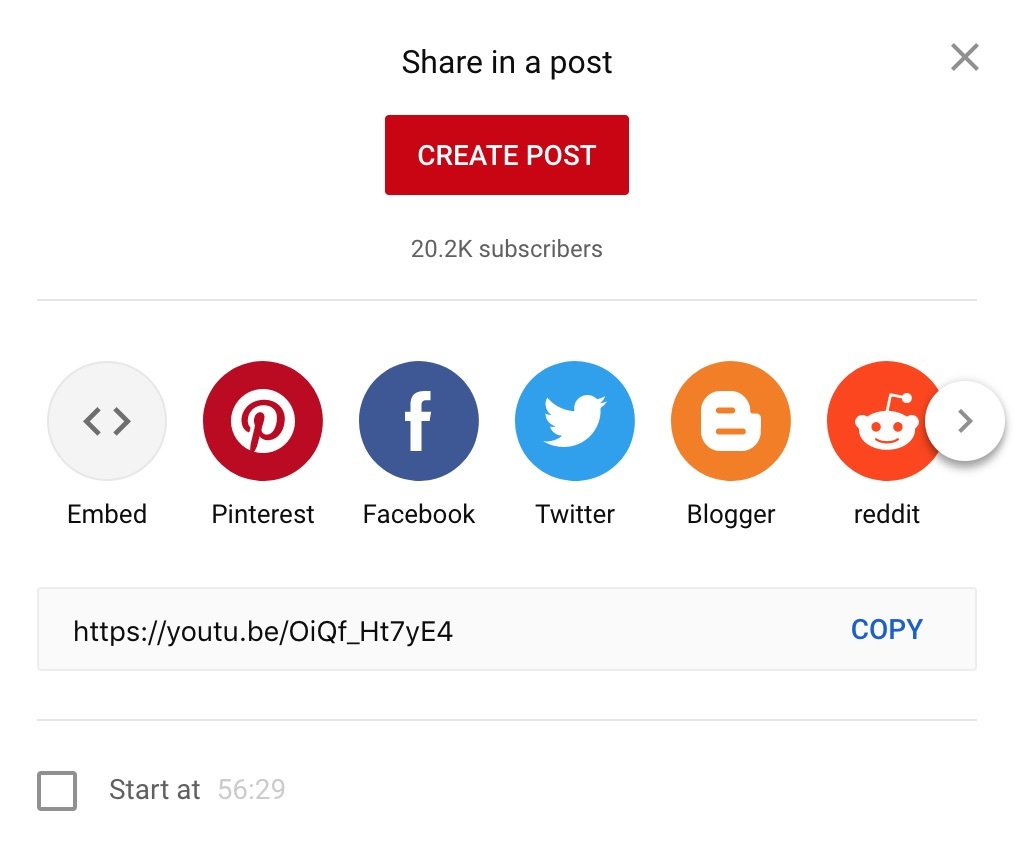
- Open the post or page on your site you want to add the video to.
- Press the + icon where you want the video to appear to add a new block.
- Paste the URL of the Youtube video, and it should automatically convert to an embedded video!
- If you want, you can change the styling of the video to make it stand out.
12. How to do SEO on WordPress
Search Engine Optimization (SEO) is the practice of optimizing your site and content to reach a high position in the search results of Google or other search engines. WordPress itself is already pretty SEO-friendly, but it still pays off to do WordPress SEO. Let’s look at a few important SEO aspects.
Technical SEO
An important first step to take when optimizing your WordPress site, is to make sure everything ‘under the hood’ of your website is in good shape. Technical SEO encompasses many things, such as:
- Good site speed is crucial for SEO, so make sure to:
- Measure and monitor your site’s speed;
- Check if your site is running on a modern server with updated software, at a web host that offers great performance;
- That your WordPress theme doesn’t slow down your website.
- As people are often browsing on their phones, your site should work well on mobile.
- Your site should be secure, so:
- Configure HTTPS to offer your visitors a secure connection.
- There should be few dead links on your site, so:
- When deleting a post or page, don’t just leave a 404 error page.
- Avoid duplicate content so search engines don’t get confused.
- Add structured data to help search engines make sense of your content.
Content SEO
Besides working on your site’s technical side, you should also optimize your content. There are three pillars of content SEO:
- Every content strategy should start with keyword research: these are the steps you take to get a list of keywords you want to rank for.
- Proper site structure helps search engines make sense of your site and helps avoid competing with your own content, so:
- Work on your internal linking to roll out the carpet for search engines;
- Build a cornerstone content strategy to help your most important articles rank;
- Make sure you manage your categories and tags well.
- When it comes to SEO, quality content is king. That’s why you should work on your SEO copywriting:
- Write readable copy that opens up your content for a wide audience. Good readability could benefit your rankings.
- To ensure that the search engines pick up on your post or page, optimize it for your keyword.
Holistic SEO
At Yoast, we believe in holistic SEO: ranking by being the best result. That’s why, in our opinion, flawless user experience (UX) should be part of your SEO strategy. We also believe that websites should be usable for everyone, which is why accessibility matters.
There are also outside factors that affect your (WordPress) SEO, such as link building, social media, and local SEO. We call this off-page SEO. While it can take some effort, working on this aspect of SEO for your WordPress site is also part of a holistic SEO strategy.
Yoast SEO
As you can see, there are several sides of SEO, and it’s a lot of work to keep everything on track. Luckily, the Yoast plugin will help you work on many aspects, from site structure to content optimization to technical settings. That’s why every website needs Yoast SEO!
Keep reading: WordPress SEO: the definitive guide »
The post How to use WordPress: Answering 12 common WordPress questions appeared first on Yoast.