From this guide, you could download and install the OxygenOS Port based on Android Pie for your Redmi Note 7 Pro. The port is based on v 9.5.8 of the OxygenOS. Follow the instructions given below to flash it onto your device.
Redmi Note series has managed to carve out an impressive bunch of favorites for itself. Owning to its exceptional build quality and tons of features at such a low price, it is definitely becoming among the most loved brands. Likewise, the latest offering from Xiaomi, the Redmi Note 7 Pro is following along the similar lines.
The device got launched with MIUI 10 based on Android 9.0 Pie out of the box. On the performance front, it has Qualcomm Snapdragon 675 chipset running on 8 cores. Moreover, the internal storage is a massive 128GB and could further be expanded via a microSD card. As far as the camera goes, the dual rear camera has a 48MP + 5MP combination whereas the front has a 13MP setup.
But even with such amazing features, many users feel short on the software front, i.e. the customized Android that Xiaomi has to offer. There are many reasons for the same, primary two being the tons of bloatware that MIUI has within itself and present of ads, that too within the device’s Settings menu. Although the normal users don’t have much choice in this, if you are among those geeks who like tweaking the device’s software, then there is definitely some good news for you.
An OxygenOS Port based on Android 9.0 Pie could now be ported on your Redmi Note 7 Pro. The process is fairly simple. But before beginning with the procedure, please have a look at the Prerequisites and Downloads section below.
Warning
The below port has been extracted from the OnePlus 7 Pro device and is being installed on the Redmi Note 7 Pro. So obviously there will be quite a few bugs (mentioned below). Likewise, expect some stability issues. Don’t use it as a daily driver. It is recommended to try this only if you have a spare device.
Also, installing TWRP Recovery and then flashing the port on your device is a complicated process. Only proceed if you are fully aware of the risks and consequences associated with it. DroidViews or any of its members will be held liable if anything happens to your device, even if you follow the guide as mentioned.
Bugs
No custom ROM or port is free from bugs. The same is the case in this port. The following are some of the bugs associated with it.
- Always On Display doesn’t work
- Issues with haptic vibration
- FP Wake Up
Prerequisites
- Have a complete backup of your device. This is because this process requires an unlocked bootloader with TWRP Recovery installed. And the process of bootloader unlocking will wipe your device completely. Moreover, installing the OxygenOS port also requires you to wipe everything present on your device.
- Redmi Note 7 Pro with an unlocked bootloader.
- Keep your device charged to a minimum recommended level of 50% to avoid any sudden shutdown during the process of flashing the OxygenOS port.
- Enable USB Debugging on your device. Enable it from Settings > Developer Options. Or take the help of our detailed guide on how to enable USB Debugging on any Android device.
Downloads
How to Install OxygenOS Port on Redmi Note 7 Pro
The process is to be divided into two sections. In the first section, we would be installing TWRP Recovery. Likewise, the next section will talk about flashing the OxygenOS Port with the help of the installed TWRP Recovery.
Install TWRP Recovery on Redmi Note 7 Pro
- Rename the downloaded TWRP Recovery to twrp.img.
- Transfer it to the folder where you have installed the Android SDK and Platform Tools.
- Inside the same folder, type cmd in the address bar.
- Connect your device to PC via USB Cable.
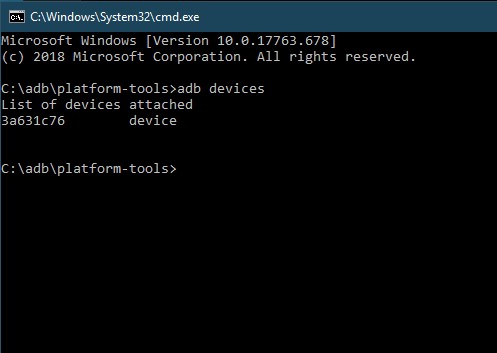
- Type in the below code to make sure that a successful ADB connection is established between your device and PC:
adb devices

- Now enter the below code to boot your device to fastboot mode:
adb reboot bootloader
- Once in fastboot mode, you can easily flash the TWRP Recovery now. Just enter the below code:
fastboot flash recovery twrp.img - Now you may reboot your device. Use the following command:
fastboot reboot

TWRP Recovery is now successfully installed on your device. Head over to the next section to install the OxygenOS port v9.5.8 on your Redmi Note 7 Pro.
Steps to Install Ported OxygenOS on Redmi Note 7 Pro
- Download and extract the OxygenOS port on your PC.
- Connect the device to PC and enter the below code to boot it to TWRP Recovery:
adb reboot recovery
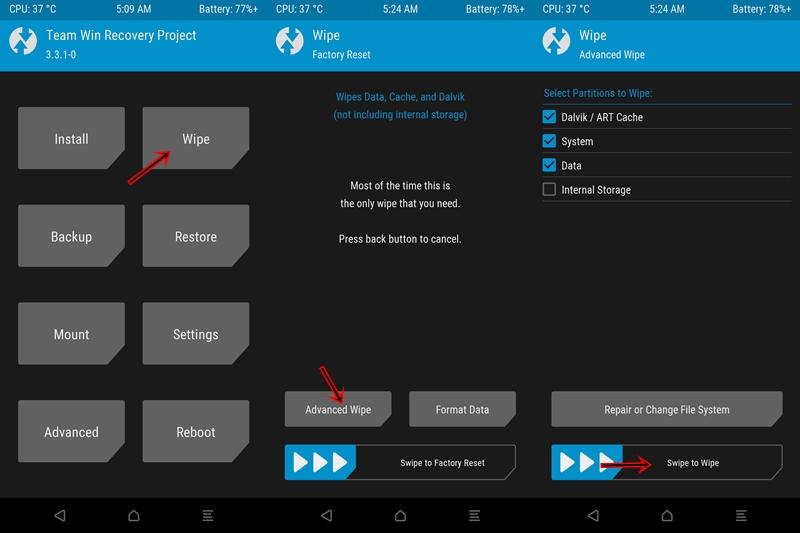
- Now you need to wipe everything before beginning with the installation process. Under TWRP Recovery, tap on Wipe.
- Go to Advanced Wipe and select everything except Internal Storage. Do a right swipe on the Swipe to Wipe button.

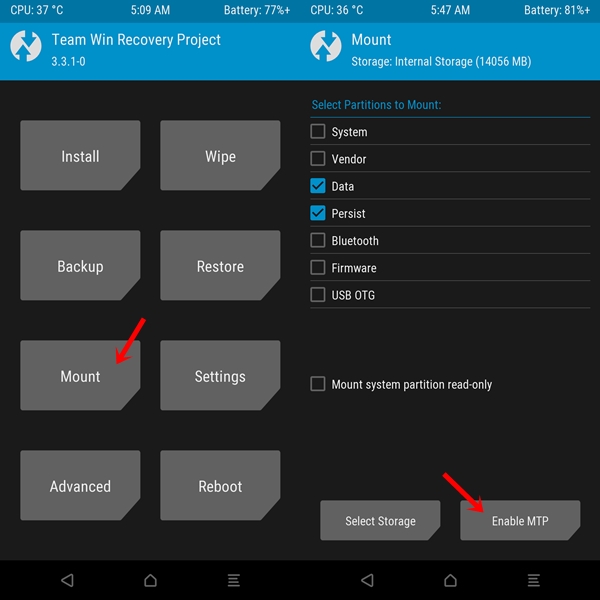
- Now go back and tap on Mount. Tap on Enable MTP.

- The device will now be shown on your PC. Copy the vendor.img, boot.img and system.img files from the OxygenOS port and place it in your device’s internal storage.
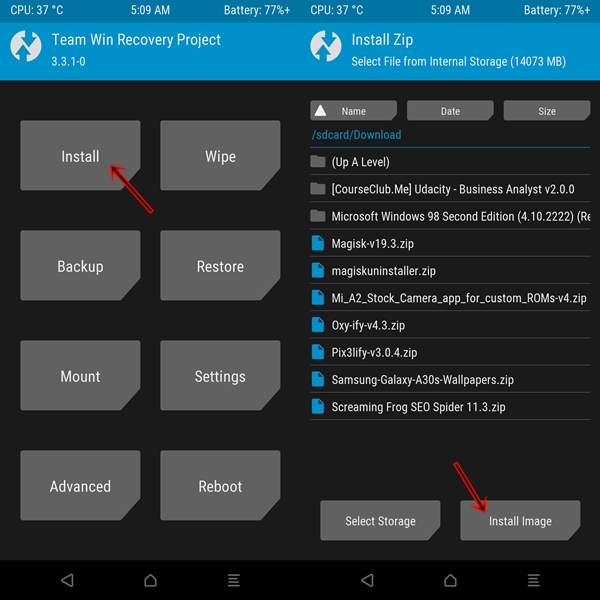
- Go to Install and tap the Install Image button present at the lower right.
- Navigate to the location where you have placed the vendor.img, boot.img and system.img.
- Select the system.img file, perform a right Swipe to flash. Do the same for the boot.img and vendor.img.
- Once done, go to the Reboot section of TWRP and tap on System.
- Your device will now reboot to Android System with OxygenOS Port installed.

Congrats! The OxygenOS v9.5.8 Port based on Android Pie is now successfully installed on the Redmi Note 7 Pro. If you have any queries with respect to any part of this guide, do let us know in the comments below.