Learn how to set up your Twilio SendGrid account to send to addresses issued by iOS 13’s new Sign In With Apple feature.
This guide assumes that you have, or will, integrate the Sign In With Apple feature as part of Apple iOS 13 release today in your app and/or website and wish to deliver email through SendGrid to users who use the private email relay option in the Sign in With Apple feature.
Back in June, Apple held their annual World Wide Developer Conference in San Jose. Along with their usual OS updates, they announced a new OAuth solution called, “Sign In With Apple.” This new feature allows Apple users to quickly sign into websites and apps using their Apple ID. It also contains a new privacy feature that allows Apple users to share a unique, app-specific email address instead of their personal email address. These addresses look something like “abcd123@privaterelay.appleid.com” and are sent through a private relay service meant to improve privacy for those who want greater control. This allows the user to deactivate the email address in the future if they wish to completely stop receiving emails from the app.
To ensure that only the app that was issued the app-specific email address can send email to the user, Apple has laid out a set of steps that developers must take in order to successfully deliver mail. Failure to complete these steps will result in mail being bounced with the reason “550 5.1.1 bad mailbox name.”
In order to fulfill all of Apple’s requirements, you’ll need to configure your Twilio SendGrid account in a specific way. This blog post will walk you through getting everything in place to start sending to these new Apple addresses.
CALL OUT: Update (September 26, 2019) – In an effort to make sending to Apple’s new relay addresses even easier, we’ve added new functionality to expedite the process of configuring your Apple Developer account. Below, in the recommendation configuration, we’ll explain how to construct an email address that you can whitelist on your Apple Developer account to allow email to be accepted by Apple’s relay. If you reach the limit Apple places on the number of addresses you can whitelist, you might need to follow the alternate configuration instructions to whitelist an entire domain instead of individual addresses.
Recommended Configuration
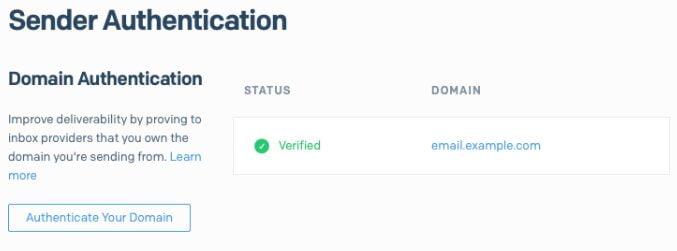
If you haven’t done so already, make sure you complete the Domain Authentication process on your SendGrid account. For instructions on how to set up Domain Authentication, see our documentation.
Navigate to https://app.sendgrid.com/settings/sender_auth and locate the domain configured (and will be using as your sending domain). Click on it. The entire “name” (including the subdomain) is what will be used as the host portion of the whitelisted email address, so copy this down somewhere.

The sender auth page will show you the entire domain value you’ll need to use (both the subdomain and domain).
Next, you’ll need to locate your account number. This is located on the same row under the “value” column. It is the number between the “u” and the first “period.” Copy this down as well.
Finally, take your account number and the domain you authenticated, and combine them into the following format: bounces+[account number]@[authenticated domain]. So in our working example, if I had an account number of 12345 and the domain I saw on the Sender Authentication page was email.example.com, then my whitelisted email address will be [email protected].
Take this formatted email address and log into your Apple Developer account. Once logged in, go to the Certificates, Identifiers & Profiles section. Select “More” from the sidebar, and click “Configure Sign In with Apple.”
In the second section titled “Individual Email Addresses,” paste in the email address you constructed and hit “Register”. You should immediately see a green check mark show up next to the email address. If you see an error, double check and make sure you successfully completed Domain Authentication on your SendGrid account.
You’re now ready to send to Apple relay addresses.
Alternate Configuration
Prerequisites
Before you begin this 4-step process, you’ll need to confirm that you have access to the following:
- The Sender Authentication section of your Twilio SendGrid account
- The DNS panel of the domain you’ll be sending from
- The Apple Developer portal for your app
- An SSL certificate for your domain
- A webserver to host files over HTTPS
Prerequisites
Before you begin the 4-step process, you’ll need to confirm that you have access to the following:
- The Sender Authentication section of your Twilio SendGrid account
- The DNS panel of the domain you’ll be sending from
- The Apple Developer portal for your app
- An SSL certificate for your domain
- A web server to host files over HTTPS
Step 1: Setting Up Domain Authentication
The first requirement Apple lays out is implementing Sender Policy Framework (SPF) on your domain. You can easily do this by completing Domain Authentication within Sender Authentication in your Twilio SendGrid account. For instructions on how to set up Domain Authentication, see our documentation.
NOTE! It is critically important that you turn off automated security when completing this process. Failure to do so will result in issues later in the configuration process.

Be sure to disable the “Use automated security” option under Advanced Settings.
If you have an existing Domain Authentication that you want to use and it was originally set up using automated security, you’ll need to create a new Domain Authentication with automated security off while being certain to use the same domain.
Pro Tip: Changing the root domain of your existing authentication will require rewarming that domain with Gmail. You want to avoid any changes to that root domain to not slow this process down, or affect existing mail flows.
You’ll need to completely validate the Domain Authentication before continuing on to the next step.
Step 2: Registering Your Domain Authentication With Apple
After you’ve successfully validated your Domain Authentication, you’ll be redirected to the Sender Authentication home page. Locate the Domain Authentication you just set up in the table view. Copy the entire domain of the Domain Authentication, which usually has a subdomain along with the root domain you entered during the configuration process:

After you’ve copied the entire subdomain and domain, head on over to Apple’s developer website and log into your Apple Developer account. Once logged in, go to the Certificates, Identifiers & Profiles section. Select “More” from the sidebar, and click “Configure Sign In with Apple.”
In the first section titled “Domains and Associated Email Addresses,” paste in the Domain Authentication you configured back in your Twilio SendGrid account. Make sure this is the entire domain containing both the subdomain and root domain and then hit the “Register” button. You’ll be prompted with a download link which, when clicked, will download a unique text file to your computer.
Step 3: Hosting Apple’s Association Text File
The text file you downloaded in the previous step needs to be published at https://example.com/.well-known/apple-developer-domain-association.txt where “example.com” is replaced with the subdomain and domain you copied from your Twilio SendGrid account. This is to prove to Apple that you’re in control of the domain.
Log into your publicly accessible web server and upload the text file, making sure it is at the /.well-known/apple-developer-domain-association.txt path. If you don’t have a publicly accessible web server, many providers that offer domains also provide web hosting, such as GoDaddy and Dreamhost.
Apple also requires that this file be accessible over HTTPS. This means that you’ll need to have your web server configured with an SSL certificate. Many web hosting providers provide this functionality, sometimes for free. Consult your web hosting provider for more information.
Finally, add a new A record to your domain containing the IP address of your web host. The A record needs to be located at the subdomain and domain you registered in the Apple Developer portal.
Pro Tip: If your DNS provider and web hosting provider are the same, there’s sometimes an option to “Create A Subdomain.” This will usually create a new web host for you to upload files to as well as add the needed A record all in one step.
Once you’ve added the A record and uploaded the file, try pasting https://example.com/.well-known/apple-developer-domain-association.txt into your browser (replacing “example.com” with your subdomain and domain). If the contents of the file you uploaded shows up in your browser, you’re ready to move on to the next step. If a file doesn’t show up, double check and make sure you’ve uploaded the text file to the correct location. If you see a security warning about a certificate, or the connection not being private, you haven’t configured HTTPS correctly. Make sure that the SSL certificate that was issued is for your domain (and the subdomain you’re using). Contact your SSL certificate provider for more info.
Step 4: Finish Registration
Back in the Apple Developer portal, go back to the Sign In With Apple setup page. Hit the “Verify” button. If all was set up correctly, the domain should be verified and a green check should appear next to it.
You are now ready to send to the new Apple relay addresses. We recommend testing your implementation by signing into your app with your own Apple ID, and attempting to send to the app-specific email address that is issued. You can use Email Activity to verify that the message was delivered. If you have questions, we recommend reaching out to our Support Team.
Please note, the majority of this setup and management occurs outside of the SendGrid console. SendGrid Support can only help with the steps that happen within your SendGrid account (like Domain Authentication setup).