
With Pinterest quickly becoming a powerhouse in retail, marketing, and search, more and more people are beginning to focus on this social media platform turned social search engine.
If you’re a business, Pinterest can certainly help you, but if you’re a soloprenuer or individual promoting your own personal brand, Pinterest can help also. Authors, bloggers, business people, and celebrities have joined the Pinterest ranks and are doing quite well (anyone following Michelle Obama or businessman Gary Vaynerchuk on Pinterest?).
In case you’re still wondering exactly how Pinterest can help your brand, here are a few examples.
Fast Pinterest Facts:
- About 25% of consumers reported buying a product or service after discovering it on Pinterest.
- Melyssa Griffin, an entrepreneur with a strong personal brand, used Pinterest to grow her email list from 2,000 subscribers to 40,000 in one year.
- Multiple bloggers cite Pinterest as their #1 source of website traffic.
- One pin can continue reappearing in Pinterest and sending you traffic months after you post it.
How to Use Pinterest for Personal Branding
To use your Pinterest account to get more website traffic, email subscribers, and purchases, you need to set your account and profile up right. For this post, we’ll assume you already have a Pinterest account – since 200 million people do. We’ll discuss how to convert that account into a personal branding and traffic referral tool.
Some people keep their current account as is and create a new Pinterest account for their branding purposes. This strategy is useful if you plan to manage multiple Pinterest accounts for multiple sites or personal brands. If you only plan to have one professional account though, I recommend using your personal one with the tips provided – otherwise, you might find it both confusing and annoying to have to switch between accounts every time you open Pinterest.
If you don’t have a Pinterest account yet, you can follow these same steps to set one up and start using it for branding at the get-go. And, lucky you, you’ll be able to save some time by skipping at least one of these steps.
Step 1: Switch to a Pinterest Business Account
While you don’t have to have a business account to use Pinterest for personal branding, you do need it to track your analytics.
A Pinterest business account is free and enables you to track your views, pins, and audience.

Switching to a business account doesn’t change any of your settings, boards, or profile details. It just gives you additional features, such as the ability to boost a pin or see analytics.
You can see things like:
- Top-performing pins
- Top-performing boards
- Clicks to your site
- Where your audience is located
These analytics will show you the best times to post, and will enable you to see what kinds of pins perform the best for you, and learn more about the people viewing and repinning your posts.
You can easily switch to a business account in your settings – make sure to use your business email and identify your business type in the settings as well.
(Don’t have an account at all yet? Sign up for one here.)
Step 2: Confirm Your Website
Adding a website link to your profile is an obvious benefit, but it’s also required in order to use Pinterest analytics.
Once confirmed, the link will appear in your bio, and Pinterest can show you how often pinners click to your site through your pins or bio link.
In addition, your Pinterest profile picture will automatically appear on all the pins from your site.

How you confirm your site depends on where your site is hosted, but it’s usually pretty straightforward. For all sites, you need to add your web address to the appropriate box in your Pinterest profile settings, then click ‘Confirm’. A box with some information will pop up, and depending on your site, you’ll either need to copy it or download a file and then insert the information in your site somewhere (find your site host here to see how to confirm your particular site).
After you’ve completed all the steps, it may take a few days for Pinterest to officially confirm your site. When they do, you should receive an email letting you know. Don’t let this delay slow you down though – you can still continue the next 2 steps while waiting for your confirmation.
Step 3: Fill Out Your profile
Name
Even though you’re using a business account, you can still use your personal name – but only if that makes sense for your goals. If you’re trying to promote your blog more than yourself, you can use your site’s name. I recommend choosing whichever one your audience is more likely to search for or mentally connect with your brand.
If you’re choosing to create an entirely new account for your brand that’s separate from your personal one, you may want to use your business or blog name. That way, you can use your personal name for your personal account.
I use my personal account as my professional one too (more on how to do that below), so I chose to keep my own name. But Krystal Kleidon, a successful blogger, chose to name hers according to the site she wanted to drive traffic to.

It’s worth noting that she runs more than one Pinterest account, because she owns more than one site, so using her own name on all of them would naturally have been confusing.
Neil Patel, a digital marketing guru, recommends including keywords in your name, as Krystal has done above. Since Pinterest is more search engine than anything else, this approach makes sense – but I would caution you to limit the keywords to only the most relevant ones and keep the name shorter rather than longer to avoid being spammy (and frankly, annoying).
Bio
Your bio is another great place for keywords, because they will fit naturally. This is your chance to explain what you do and who you do it for.
A few ideas for what to include:
- What you pin about
- Your title/role/job
- Your location
- Language that’s similar to what people will see on your other sites
- Keywords you plan to pin about most
- Short fun fact to make you relatable
- Link to lead magnet
Here’s Melyssa Griffin’s bio. I’d say she’s doing pretty well for herself on Pinterest, wouldn’t you?

Profile picture
If you’re using Pinterest for personal branding reasons, a picture of yourself is completely appropriate. Plus, it adds a personal, human touch to your profile.
Make sure your photo is a professional, high-quality shot. I recommend using the same (or very similar) photos across all your social networks to help people easily identify you.
Step 4: Clean Out Your Pinterest Boards and Create New Ones
This is the biggest, most time-consuming job of them all. So take a deep breath – go ahead, I’ll wait – and then we’ll jump in.
First, let’s address the main goals of your profile:
- Look professional and knowledgeable
- Drive traffic to your site
- Hold all the original pins from your site
These goals will drive the rest of the actions we take in this post.
Make all your personal boards secret
(Of course, if you’re making a new Pinterest account for branding purposes, you get to skip this step.)
I do mean all of them. I know, it’s sad, but the only inconvenience I discovered from doing this was that I can no longer send any of the pins on these boards to anyone. So if you like to send recipe pins to your hubby (like I do), you’ll just have to send them from the regular Pinterest feed, not your own boards.
You need to hide all these boards, because they aren’t relevant to your target audience, and are likely not related to what you do. While Pinterest is known for the massive web traffic it refers, that traffic only does you good when it comes to your site, so your profile should only attract those people who may potentially come to your site – otherwise, you’re wasting time by attracting people who don’t care about your work and who’ll never buy from you.
As you’re choosing which boards to hide and which new ones to create, don’t choose based solely on what’s popular on Pinterest.
Here’s a pretend example:
Mary has a gardening business. She wants more engagement with her Pinterest presence, and she knows that pinners love both recipes and Christmas stuff. So she makes a public “Christmas recipes” board and pins away.
She does indeed get lots of repins and follows on the board, but she doesn’t get any traffic or follows on her other boards or profile. None of the new people she’s attracted are looking at the pins from her site. None of them care about signing up for her email list or reading her gardening blog – they’re only coming for the Christmas recipes.
In the end, she’s only received a deceptive spike in engagement that’s left her with no increase in business. And she never sees those people again after the Christmas season.
Be brutally honest with yourself about which boards truly relate to your niche and audience.
Update your existing public boards
If you’re like me, you’ll end up with a few boards left containing pins that are on-topic for your brand. Now it’s time to clean those boards up.
Change the board name and description.
- It should be more business/brand focused and clearly explain what the board is about.
- It should contain a relevant, frequently-searched Pinterest keyword.
- The descriptions should explain who will benefit from the board. They can use keywords too.

Clear out the board.
- Delete any pins on the board that aren’t relevant enough to the new board title.
- Add helpful pin descriptions where necessary to justify the pins being there.
Re-organize the boards.
- Drag and drop on desktop to reorder.
- Organize your boards in the way that makes the most sense for you.
- Order of important of your services
- Order of relevance
- Order of lead generation potential
Create new boards
Now it’s time to fill up all that empty space we just made by hiding all your other boards. Create new boards that are specific to your niche and popular among your audience. With some simple Pinterest Keyword Research, you’ll know which items fall into those categories.
Doing Pinterest Keyword Research
Again, don’t make a board just because a topic is trending on Pinterest – stick to what’s relevant to you and what will bring you potential customers. If that happens to be a popular Pinterest topic, it’s your lucky day.
You can do Pinterest Keyword Research easily to learn what topics in your niche are popular, and what language is used for them. Type one relevant word into the search box and read the suggestions that pop up. Also, once you conduct a search, read through the suggestion bubbles at the top of the page. All these suggested words are dictated by frequent searches.
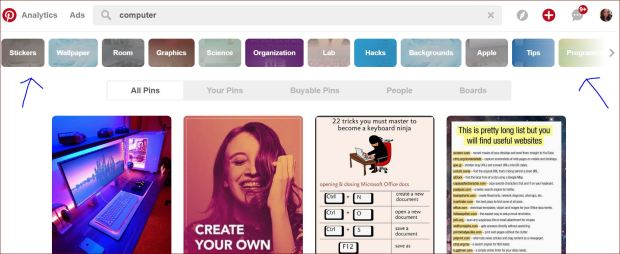
Filter the results by people, pins, or boards to get more ideas, follow more people, and find good pins to repin yourself.
Choosing your boards
An easy way to get board ideas is to follow other people in your niche and see what’s working for them.
The more specific your boards are, the better, but to get started, you can make more general boards and then later split them into several more specific ones when you have enough pins and traction on the first board.
For example, a board called “Marketing Tips” could become multiple boards, such as “Website Ideas,” “Blogging Tips,” “Content Marketing for Beginners” etc.
You should definitely have a board that’s dedicated to your site – that’s where you can freely pin all your articles, landing pages, content upgrades, and opt-ins. From there, you can repin those pins to your other appropriate boards.
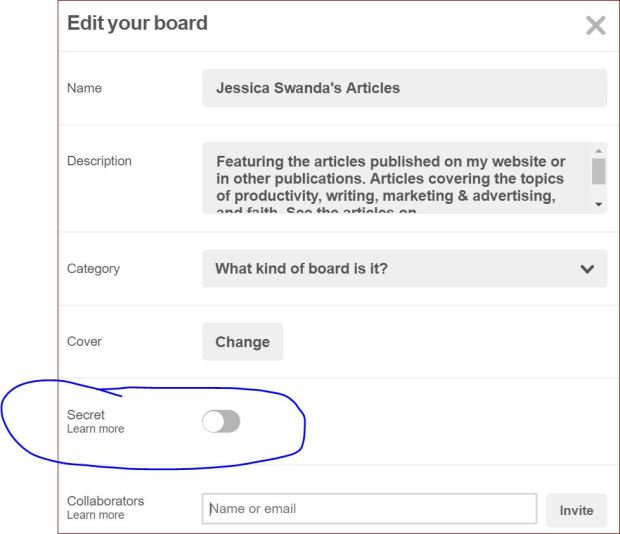
The board that’s dedicated to your site should be the first one to appear on your profile, and its name and description should clearly explain what the board contains.
For instance, my first board is named “Jessica Swanda’s Articles,” and its board description is:
“Featuring the articles published on my website or in other publications. Articles covering the topics of productivity, writing, marketing & advertising, and faith. See the articles on proofisinthewriting.com.”

Likewise, Melyssa Griffin named her first board “MelyssaGriffin.com” – but remember, both of us chose to name out Pinterest profile after ourselves. In contrast, Krystal Kleidon, who named her profile “The Daily Femme | Business + Blogging” named her first board “Daily Femme.”
Managing Your Boards
As you make new boards, keep them secret until you have about 20 or so pins on them. That way, the boards won’t appear neglected to potential followers.
Once you’re ready to make the board public, make sure that your board description is complete and that it contains relevant keywords.
Then continue pinning to beef the board up and get some traction.
Pin Like Crazy
After you’ve followed this checklist to get your profile and account are all set up, you can begin to pin like crazy.
There are many strategies and tips for boosting your Pinterest presence and seeing better results, but I’ll leave you with this one big one for now.
Pinning consistently makes the most difference
It makes more of a difference than getting lots of followers, or pinning 50 pins at a time, or pinning at just the right time.
Pin every day, or every other day. Even if it’s just a handful of pins – Pinning 5 a day will help you more than posting 40 at one time once a week. And, of course, make sure that some of those pins lead to your own site.