

“The money is in the list.”
How many times have you heard that thrown around? More than a few times, I’m sure.
Yes, it’s true. There’s potential for high ROI from your email list.
But the deeper truth to that statement is there’s usually more money in a list that’s properly segmented according to interest and behavior.
Tracking behavior and people’s interests and sorting them into common brackets allow you to batton down the hatches in your personalization efforts.
Personalization has continually shown to positively impact ROI. And one of the most helpful ways to get effective personalization is through list segmentation using Tags.
But before you run off and start throwing tags at everyone on your list, here’s what you need to know about this small but powerful feature so you can up your email marketing game.
How To Use Tags
We already touched on the why of using Tags:
To segment your list based on people’s interests and desires for better personalization.
But how do we do this? There’s the technical side, which I’ll get to in a minute, but there’s also the, “how do I do this so that it’s producing results?”
That’s an important part to get right.
Keep in mind that Tags help you to categorize and organize your email list. So you can use them to sort people into brackets of shared interests.
For example, let’s say you sell gear for both photographers and filmmakers.
These may use similar equipment, but there’s a large divide between the topics that will interest a photographer versus someone interested in making videos.
Segmenting your list to find where the individual interests of everyone in your audience lie will help you send better emails to each of them while positively impacting your email sender rating.
So you may decide to create tags like these:
- Photography
- Filmmaking
- Mobile Photography
- Film Gear
- Photo Gear
- Travel Gear
- Photography Tips
- Filming Tips
- Video Editing
These tags are important because they help you learn what specifically your audience likes to know more about.
You can then create a Segmented List to sort everyone out.
For instance, you might create a segment using both the Mobile Photography and Travel Gear tags. When someone shows interest in these through their behavior, they’re added to this list.
And if enough people are added to this list, you gain a better view of your audience by learning that you have a decent amount of subscribers who likely travel a lot but who want to be able to take great photos on their phones while on the go.
Without that segment setup, you may not have been aware that you had built an audience with that particular set of interests.
Now you can create better content aimed at these interests and increase the ROI you see from your emails.
All thanks to tags and some list segmentation.
The best part about tags in Sendlane is you can create them and use them in email campaigns and automations to tag/categorize your contacts on autopilot.
It’s fast and easy.
Here’s how.
How To Use Tags in Email Campaigns
There are a few places to add tags in your campaign:
- Links
- Images
- Buttons
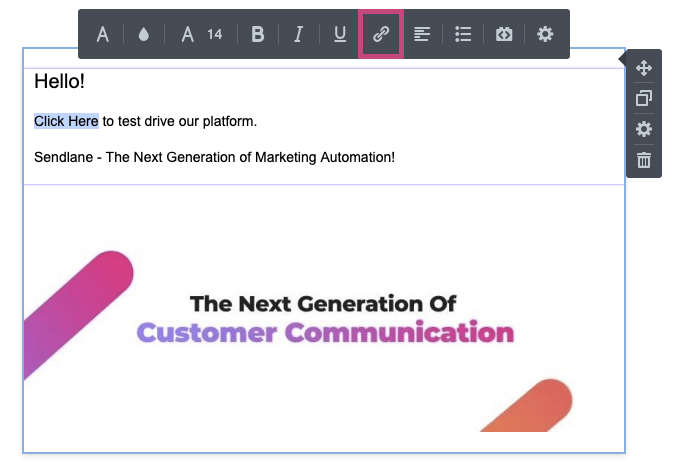
To add a tag to a link, simply highlight the copy you want to be a click-through link, then click on the link icon in the toolbar.
Clicking the link icon will make two spots.
One for the link and a dropdown menu for adding a tag.
Click the dropdown tag menu, select your tag of choice, then click Submit.


Adding tags to buttons or images is similar. However, when you click on the image/button that you want to tag the toolbar option is now a menu off to the left.

In that left menu, you’ll find the spot to place your link and the dropdown menu to choose your tag.
With those set, save and schedule your email campaign.
Now, when you send it, if someone clicks on these links, they will have the set tag added to their profile. Keep in mind though, that if you want to automatically segment tagged contacts, then you’ll need to set up your segments to do that.
How To Use Tags In Your Automations
Using tags in automations is a great way to segment your audience and learn their interests or to keep track of events and behaviors that you should be aware of.
For instance, you could add a tag specific in an automation for someone who canceled a purchase after they’ve ordered it. That way you can track the situations and trigger another automation if that ever happens.
There are a couple of ways that you can add tags within your automations:
- Within the emails that are sent through your automations
- As a part of the automation workflow
If you go about the first method, then just follow the instructions above to do so. What does the second way for adding tags to your automation look like?
Don’t worry — it’s not hard.
You’ll need to be inside the automation builder to do add a tag to your sequence. To add a tag, click the small circle + button, and then select Update Contact Property.

After that, choose Add Tag from the menu.


In the next window option, select your tag from the drop-down menu.

Tah-dah! That’s all there is to it.
What’d I tell ya? Easy.
You can add more than one tag to your funnel and you can use them after a Conditional Split. It all depends on what you’re trying to do with your automation.
Target The Right Customer With the Right Message Every Time
Tags are just one part of better ROI from email marketing, but they’re an important part to utilize.
You can start with just a couple of tags and play with how you use them in your campaigns and automations. Don’t forget to set up list segments while you create your tags to help keep things working together.
And if you need any other ideas for how to use or delete tags, be sure to check this page out.
Feel free to log in and give this awesome feature a try in your Sendlane account.
Don’t have an account with us? No problem! You can sign up for a free 14-day trial to play around with this and all our other features.