Most people are worried about how to get Google to index their pages, not deindex them. In fact, most folks try and avoid getting deindexed like the plague.
If you’re trying to increase your authority on search engine results pages, it can be tempting to index as many pages on your website as possible. And most of the time, it works.
But this might not always help you get the most amount of traffic possible.
Why? It’s true that publishing a large number of pages that include targeted keywords can help you rank for those particular keywords.
However, it can actually be more helpful for your rankings to keep some of your site’s pages out of a search engine’s index.
This directs traffic to relevant pages instead and keeps unimportant pages from coming up when users search for content on your site using Google.
Here’s why (and how) you should deindex your pages to get more traffic.
To get started, let’s explore the difference between crawling and indexing.
Crawling and indexing explained
In the world of SEO, crawling a site means following a path.
Crawling refers to a site crawler (also known as a spider) following your links and crawling around every inch of your website.
Crawlers can validate HTML code or hyperlinks. They can also go extract data from certain websites, which is called web scraping.
When Google’s bots come to your website to crawl around, they follow other linked pages that are also on your site.
The bots then use this information to provide up-to-date data to searchers about your pages. They also use it to create ranking algorithms.
This is one of the reasons why sitemaps are so important. Sitemaps contain all of the links on your site so that Google’s bots can easily take a deeper look at your pages.
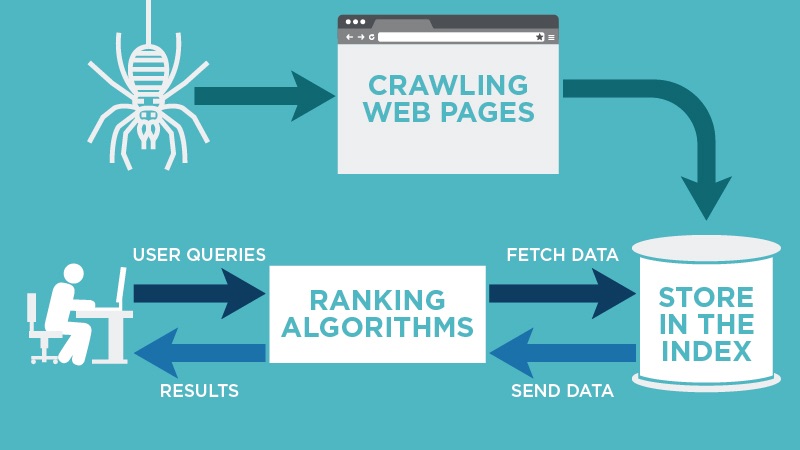
Indexing, on the other hand, refers to the process of adding certain web pages into the index of all pages that are searchable on Google.
If a web page is indexed, Google will be able to crawl and index that page. Once you deindex a page, Google will no longer be able to index it.
By default, every WordPress post and page is indexed.
It’s good to have relevant pages indexed because the exposure on Google can help you earn more clicks and bring in more traffic, which translates into more money and brand exposure.
But, if you let parts of your blog or website that aren’t vital be indexed, you could be doing more harm than good.
Here’s why deindexing pages can boost traffic.
Why removing pages from search results can boost traffic
You might think that it isn’t possible to over-optimize your site.
Too much SEO can ruin your site’s ability to rank high. Don’t go overboard.
There are many different occasions where you may need (or want) to exclude a web page (or at least a portion of it) from search engine indexing and crawling.
The obvious reason is to prevent duplicate content from being indexed.
Duplicate content refers to there being more than one version of one of your web pages. For example, one might be a printer-friendly version while the other is not.
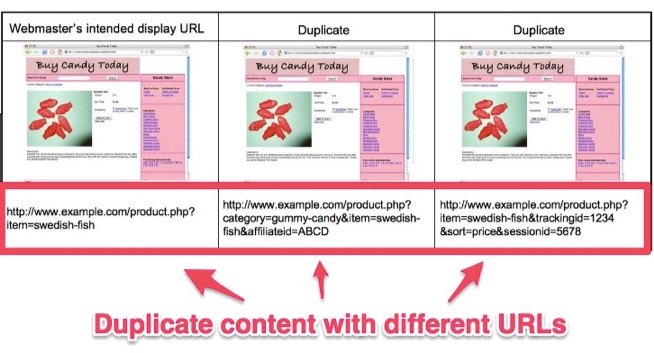
Both versions don’t need to come up in search results. Only one does. Deindex the printer friendly version and keep the regular page indexed.
Another good example of a page that you might want to deindex is a thank-you page – the page that visitors land on after taking a desired action such as downloading your software.
This page is usually where a site visitor gains access to whatever you’ve promised them in exchange for their actions, like an e-book, for example.
You only want people to end up on your thank-you pages because they completed an action you want them to take, like purchasing a product or filling out a lead form.
Not because they found your thank-you page via Google Search. If they do, they’ll gain access to what you’re offering without having to complete the action you desire.
Not only is that giving away your most precious content for free, but it could also throw off the analytics of your entire site with inaccurate data.
You’ll think you’re capturing more leads than you really are if these pages are indexed.
If you have any long-tail keywords on your thank-you pages and you haven’t deindexed them, they could be ranking pretty high when they don’t need to be.
Which makes it even easier for more and more people to find them.
You also need to deindex spammy community profile pages.
Remove spammy community profile pages
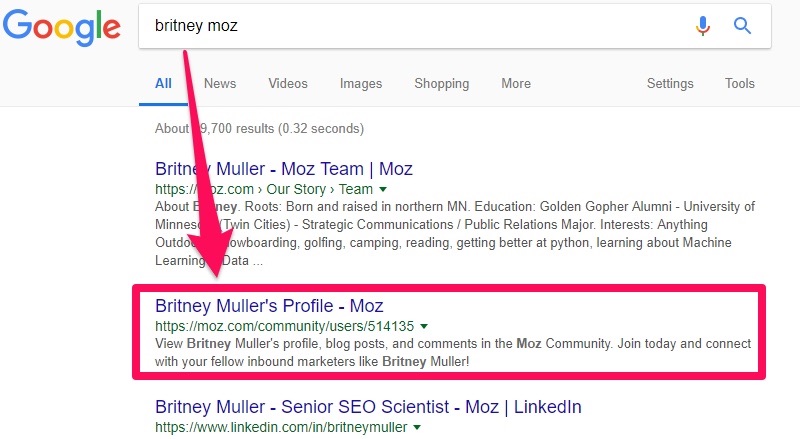
Britney Muller of Moz recently deindexed 75% of Moz’s website and found huge success.
The majority of the types of pages she deindexed? Spammy community profile pages.
She noticed that when she did a site:moz.com search, over 56% of the results were Moz community profile pages.
There were thousands of these pages she needed to deindex.
Moz community profiles work on a points system. Users earn more points, called MozPoints, for completing actions on the site, like commenting on posts or publishing blogs.
After sitting down with developers, Britney decided to deindex profile pages with under 200 points.
Instantly, organic traffic and rankings went up.
By deindexing community profile pages from users like this one with a small number of MozPoints, irrelevant profiles stay out of search engine results pages.
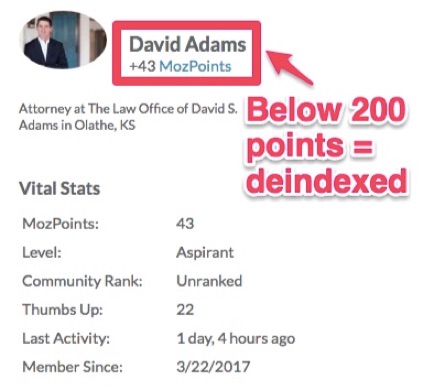
That way, only the more notable Moz community users, with tons of MozPoints, like Britney, will appear on SERPs.
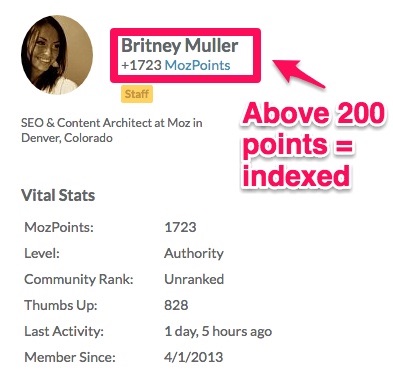
Then, profiles with the most comments and activity appear when someone searches for them, so it’s easy to find influential people using the site.
If you offer community profiles on your website, follow Moz’s lead and deindex the profiles that don’t belong to influential or well-known users.
You might think that turning “search engine visibility” off in WordPress is enough to remove search engine visibility, but it isn’t.
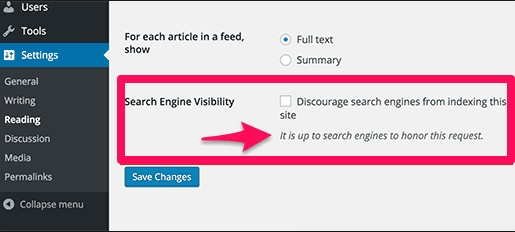
It’s actually up to search engines to honor this request.
That’s why you need to deindex them manually to be sure that they won’t come up in the results page. First, you have to understand the difference between noindex and nofollow tags.
Noindex and nofollow tags explained
You can easily use a meta tag to prevent a page from showing up on SERPs.
All you need to know how to do is to copy and paste.
The tags that let you remove pages are called “noindex” and “nofollow.”
Before we get into how you can add these tags, you need to know the differences between how the two tags work.
They are two different tags, but they can be used on their own or together.
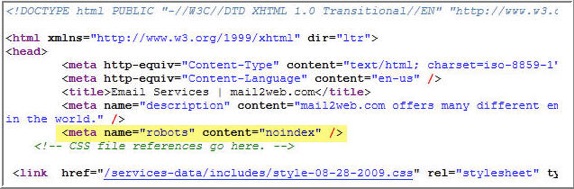
When you add a noindex tag to a page, it lets search engines know that although it can still crawl the page, it can’t add the page to its index.
Any page with the noindex directive won’t go into a search engine’s index, meaning that it won’t show up in any search engine results’ pages.
Here’s what a noindex tag looks like in a site’s HTML code:
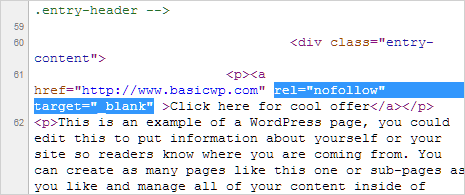
When you add a nofollow tag to a web page, it disallows search engines from being able to crawl any of the links on the page.
That means that any ranking authority that the page has won’t be passed on to the pages that it links out to.
Any page with a nofollow tag is still able to be indexed in search, though. Here’s what a nofollow tag looks like in a website’s code:
You can add a noindex tag on its own or with a nofollow tag.
You can also add a nofollow tag on its own, as well. The tag(s) you add will depend on your goals for a particular page.
Add only a noindex tag when you don’t want a search engine to index your web page in search engine results, but you do want it to keep following the links on that page.
If you have paid landing pages, it might be a good idea to add a noindex tag to them.
You don’t want search engines to bring visitors to them since people are supposed to pay to see them, but you may want the linked pages to benefit from its authority.
Add only a nofollow tag when you want a search engine to index a certain page in results pages, but you don’t want it to follow the links that you have on that particular page.
Add both a noindex and nofollow tag to a page when you don’t want search engines to index a page or be able to follow the links on it.
For example, you might want to add both a noindex and a nofollow tag to thank-you pages.
Now that you know how both noindex and nofollow tags work, here’s how to add them to your site.
How to add a “noindex” and/or a “nofollow” meta tag
If you want to add a noindex and/or a nofollow tag, the first step is to copy your desired tag.
For a noindex tag, copy the following tag:
<META NAME=”robots” CONTENT=”noindex”>
For a nofollow tag, copy the following tag:
<META NAME=”robots” CONTENT=”nofollow”>
For both tags, copy the following tag:
<META NAME=”robots” CONTENT=”noindex,nofollow”>
Adding the tags is as simple as adding the tag you copied to the
section of your page’s HTML. This is also known as the page’s header.
Just open the source code for the web page you want to deindex. Then, paste the tag into a new line within the <head> section of the HTML.

Here’s what the tag for both noindex and nofollow looks like within the header.
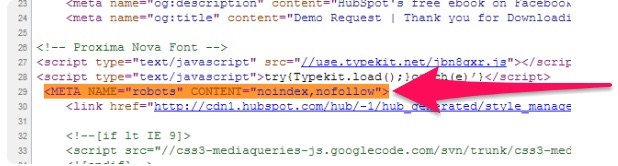
Keep in mind that the </head> tag is what signifies the end of the header. Never paste a noindex or nofollow tag outside of this area.
Save the updates to the code, and you’re done. Now, a search engine will leave your page out of search engine results.
You can cause multiple pages to be unable to be crawled by changing up your robots.txt file.
What is robots.txt and how can I access it?
Robots.txt is simply a text file that webmasters can create to tell search engine robots exactly how they want their pages crawled or their links followed.
Robots.txt files simply indicate whether certain web crawling software is or isn’t allowed to crawl certain parts of a website.
If you want to “nofollow” several web pages at once, you can do it from one location by accessing your site’s robots.txt file.
First, it’s a good idea to figure out if your site has a robots.txt file in the first place. To figure this out, head to your website followed by “robots.txt.”
It should look something like this: www.yoursitehere.com/robots.txt.
Here’s what our robots.txt file looks like.
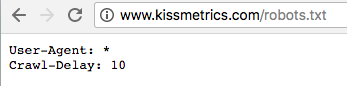
We have a crawl delay of 10 added to our site that delays search engine bots from crawling your site too frequently. This prevents servers from becoming overwhelmed.
If nothing comes up when you head to that address, your website doesn’t have a robots.txt file. Disney.com has no robots.txt file.

Instead of a blank page, you might also see a 404 error instead.
You can create a robots.txt file with almost any text editor. To find out exactly how to add one, read this guide.
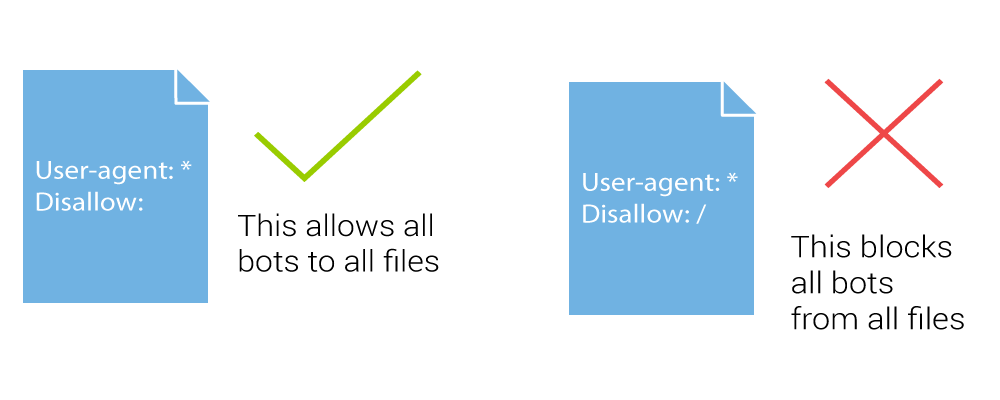
The bare bones of a robots.txt file should look something like this:
User-agent: *
Disallow: /
You can then add in the ending URLs of all of the pages that you don’t want Googlebot to crawl.
Here are some robots.txt codes that you might need:
Allow everything to be indexed:
User-agent: *
Disallow:
or
User-agent: *
Allow: /
Disallow indexing:
User-agent: *
Disallow: /
Deindex a specific folder:
User-agent: *
Disallow: /folder/
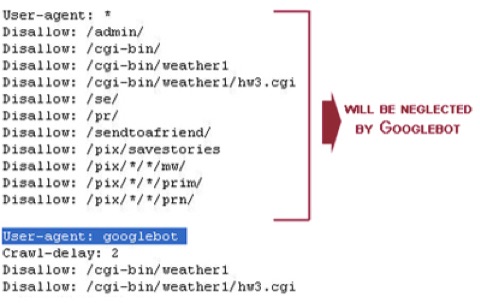
Disallow Googlebot from indexing a folder, except for one certain file within that folder:
User-agent: Googlebot
Disallow: /folder1/
Allow: /folder1/myfile.html
Google and Bing allow for people to use wildcards in robots.txt files.
To block access to URLs that include a special character, like a question mark, use the following code:
User-agent: *
Disallow: /*?
Google also supports using noindex inside of robots.txt.
To noindex from robots.txt, use this code:
User-agent: Googlebot
Disallow: /page-uno/
Noindex: /page-uno/
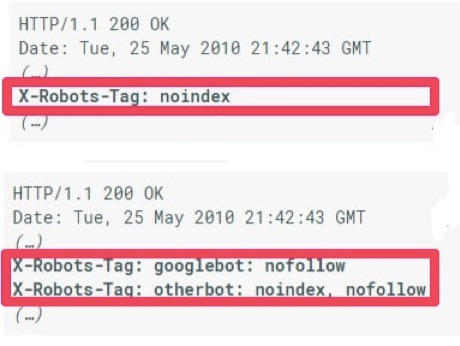
You can also add an X-Robots-tag header to a certain page instead.
Here’s what a “no crawl” X-Robots-tag looks like:
HTTP/1.1 200 OK
(…)
X-Robots-Tag: noindex
(…)
You can use this tag for both nofollow and noindex codes.
There may be some instances where you’ve added nofollow and/or noindex tags or changed up your robots.txt file, but some pages are still showing up on SERPs. That’s normal.
Here’s how to fix it.
Why your pages might still show up on SERPs (at first)
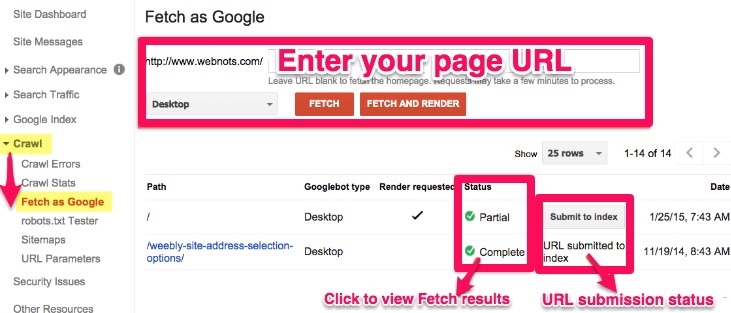
If your pages are still showing up in search results, it’s probably because Google hasn’t crawled your website since you added the tag.
Request that Google crawls your site again by using the Fetch as Google tool.
Just enter your page’s URL, click to view your Fetch results, and check your URL submission status.
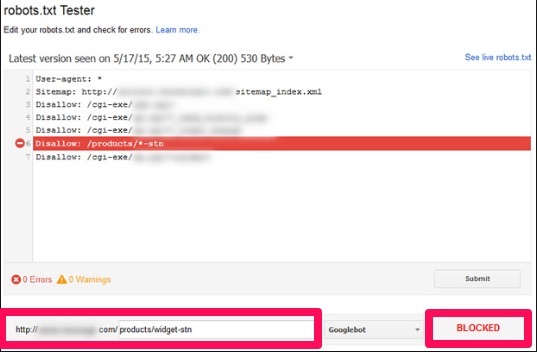
Another reason that your pages are still showing up is that your robots.txt file may have some mistakes in it.
You can edit or test your robots.txt file with the robots.txt Tester tool. It looks something like this:
Never use noindex tags along with a disallow tag in robots.txt.
Don’t meta noindex AND disallow in robots.txt
When you meta noindex a bunch of pages but still have them disallowed in a robots.txt file, the bots will ignore your meta noindex tag.
Never use both tags at once. It’s also a good idea to leave sitemaps in place for a while to ensure that crawlers are seeing them.
When Moz deindexed several of their community profile pages, they left the community profile sitemap in place for a couple of weeks.
It’s a good idea to do the same.
There’s also an option to prevent your site from being crawled at all while still enabling Google AdSense to work on the pages.
Think of one of your pages, like a Contact Us page or even a privacy policy page. It’s probably linked to every page on your website in either the footer menu or a main menu.
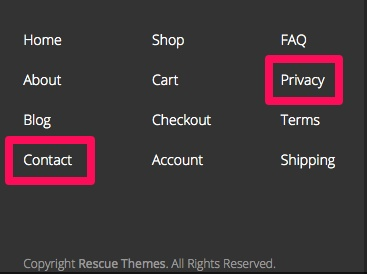
There’s a ton of link equity going to those pages. You don’t just want to throw it away. Especially when it’s flowing right from your main menu or footer menu.

With that in mind, you should never include a page that you block in robots.txt in an XML sitemap.
Don’t include these pages in XML sitemaps
If you block a page in your robots.txt file but then include it in an XML sitemap, you’re just teasing Google.
The sitemap says, “Here’s a shiny page that you need to index, Google.” But then your robots.txt file takes that page away.
You should place all of the content on your site into two different categories:
- High-quality search landing pages
- Utility pages that are useful for users but don’t need to be search landing pages
There’s no need to block anything in the first category in robots.txt. This content also should never have a noindex tag. Include all of these pages in an XML sitemap, no matter what.
You should block everything in the second category with a noindex, nofollow tag or by robots.txt. You don’t really want to include this content in a sitemap.
Google will use everything you submit in your XML sitemap to understand what should or shouldn’t be important to the tool on your site.
But just because something isn’t in your sitemap, that doesn’t mean that Google will completely ignore it.
Do a site: search to see all of the pages that Google is currently indexing from your site to find any pages you may have overlooked or forgotten about.
The weakest pages that Google is still indexing will be listed last in your site: search.
You can also easily view the number of pages submitted and indexed in Google Webmaster Tools.

Conclusion
The majority of people are worried about how they can index their pages, not deindex them.
But indexing too many of the wrong kinds of pages can actually hurt your overall rankings.
To get started, you have to understand the differences between crawling and indexing.
Crawling a site refers to bots crawling over all of the links on every web page that a site owns.
Indexing refers to adding a page to Google’s index of all pages that can show up on Google results pages.
Removing unnecessary pages from results pages, like thank-you pages, can boost traffic because Google will only focus on ranking relevant pages instead of insignificant ones.
Remove spammy community profile pages if you have them. Moz deindexed their community profile pages that had less than 200 points, and that quickly boosted their traffic.
Next, understand the difference between noindex and nofollow tags.
Noindex tags remove pages from Google’s index of searchable pages. Nofollow tags stop Google from crawling links on the page.
You can use them together or separately. All you have to do is add the code for one or each of the tags into your page’s header HTML.
Next, understand how your robots.txt file works. You can use this page to block Google from crawling multiple pages at one time.
Your pages might still show up on SERPs at first, but use the Fetch as Google tool to fix this issue.
Remember to never noindex a page and disallow it in robots.txt. Also, never include pages blocked in your robots.txt file in your XML sitemap.
Which pages are you going to deindex first?
About the Author: Neil Patel is the cofounder of Neil Patel Digital.