Editor’s Note: The following is Part 2 in a two-part series titled, “Headless WordPress with React and NextJS.”
In Part 1 of this series, we set up a simple app to display our posts using React and Next.js alongside our WordPress install. We left it lacking some extra functionality that would take us from a simple test to a real browser-accepted website. So, let’s get to work on that and really round this thing out.
First up are single posts. We’re going to continue to work in our posts.js and get some links and such working first.
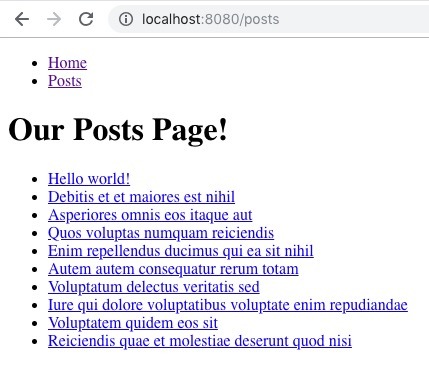
Our main update, like in Navigation.js, will be to import our Link component and wrap each of our post titles.
import Link from 'next/link'and then
<li key={ post.id }>
    <Link href={ `/posts/${ post.slug }` }>
        <a href={ `/posts/${ post.slug }` }>
            { post.title.rendered }
        </a>
    </Link>
</li>
From here we have links, but they won’t go anywhere.
In fact, if you tried, you’d get the default 404 error from express.

Dynamic Routing
This is where things get a little complicated. Out of the box, Next.js handles direct routing, but dynamic routing is a little bit more complicated. You don’t want to have a component for each of those posts; you want one to handle them all. We’ll need a custom express server to serve the routes and handle all of that for us. Next.js is handling a lot of that for us already, but we’d still need a custom server for the dynamic routes. We could fully integrate React Router into the build, but we’re building something pretty simple here and that might be a bit of overkill.
I’ve decided to utilize a middleware for Next.js called next-routes alongside a custom server to make things a bit easier to understand and less complicated, if only a little. So let’s install that:
$ npm install express next-routes --saveFrom there, let’s create a couple of new files at the root of your project named routes.js and a server.js.
In our routes file, we’ll just import next-routes and add our routes. In this case, we’ll have, as we’ve set up, our index, our posts page, and our new dynamic route for our single posts.
const routes = require( 'next-routes' );

// Setup router.
module.exports = routes()
  .add( 'index', '/' )
  .add( 'posts' )
  .add( 'single', '/posts/:slug' );
Inside our server is a little more complicated. We’ll end up with this:
const express = require( 'express' );
const next    = require( 'next' );

// Import middleware.
const routes = require( './routes' );

// Setup app.
const app     = next( { dev: 'production' !== process.env.NODE_ENV } );
const handle  = app.getRequestHandler();
const handler = routes.getRequestHandler( app );

app.prepare()
  .then( () => {

    // Create server.
    const server = express();

    // Use our handler for requests.
    server.use( handler );

    // Don't remove. Important for the server to work. Default route.
    server.get( '*', ( req, res ) => {
      return handle( req, res );
    } );

    // Get current port.
    const port = process.env.PORT || 8080;

    // Error check.
    server.listen( port, err => {
      if ( err ) {
        throw err;
      }

      // Where we starting, yo!
      console.log( `> Ready on port ${port}...` );
    } );
  } );
From the top:
- Import express (our server environment) and next (important)
- Import our new route file, our middleware
- Set up our app, set environment, and handle our requests—both boilerplate
- Add our handler which utilizes our routes middleware imported above
- Everything starting at
app.prepare()will be also pretty boilerplate- Set up the server with
const server = express(); - Make sure we utilize our handler with
server.use( handler ); - Add the default route—important for the server to work.
- Get our current port—not required, but I like setting a default so we don’t have to set a port in our
package.jsonfile - Add our listener to output errors so we still get errors in our logs
- Finally, a little message when we start the server to let you know where we should be opening the browser to, in this case
http://localhost:8080/
- Set up the server with
This is generally a pretty light server setup. Google around and check out the express docs, and you’ll probably find something very similar. Play around with it, and you’ll start to get an idea of what’s necessary and what can be updated.
Now, this isn’t going to work yet. We need to make a few updates to our project as it stands already.
In our package.json we’re going to update our dev and start scripts.
"scripts": {
  "dev": "node server.js",
  "build": "next build",
    "start": "NODE_PATH=. NODE_ENV=production node server.js"
},
We’ll just want to run our server directly instead of relying on the server that comes with Next.js. And for our start command, make sure we’re running in “production” mode.
Now running npm run dev will get our app going the same way it did before, but you may find that clicking any of the posts will still 404. This is because we need to add our new single post file.
Single Post Template
Let’s add, inside the pages directory, a new file named single.js. This will just need to match whatever you named your route in the routes.js file:
.add( 'single', '/posts/:slug' )I’m just going to copy our index.js file just to make sure everything is working as expected:
import Navigation from '../components/Navigation'
import { Fragment } from 'react'

export default () => (
  <Fragment>
    <Navigation/>
    <h1>Your soon to be single post!</h1>
  </Fragment>
)
And they are!
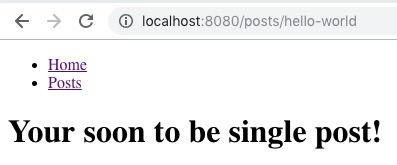
NOTE: If this doesn’t work right away, you can stop and restart your server and that may resolve any issues.
Obviously, we’re not done here. We need to get our current route slug and display the data from a new API request. I’m going to make an additional API request here, just like we did with the /posts page, but get only the post data we need. Typically on a full-blown, React-based website, I’d probably do more to store and check for already-existing data, but in the interest of simplicity, here we go!
From our existing API we know we can get a post, “Hello World” for example, using the slug from our URL: https://wordpress.test/wp-json/wp/v2/posts?slug=hello-world.
So, what we’ll do is make this request and simply save that to props using the same getInitialProps function. Inside that function, we have access to context which we will use to get the current queried slug to make our API request.
So in single.js I’ll do this:
import Navigation from '../components/Navigation'
import React, { Component } from 'react'
import axios from 'axios';
import { Fragment } from 'react'

export default class extends Component {

  // Resolve promise and set initial props.
  static async getInitialProps( context ) {

    const slug = context.query.slug

    // Make request for posts.
    const response = await axios.get( `https://wordpress.test/wp-json/wp/v2/posts?slug=${ slug }` )

    // Return our only item in array from response to posts object in props.
    return {
      post: response.data[0]
    }
  }

  render() {
    return (
      <Fragment>
        <Navigation/>
        <h1>Your soon to be single post!</h1>
      </Fragment>
    )
  }
}
I’ll convert my standard exported function into a class that extends the React Component, set up getInitialProps using context to get our slug, make an API request for our single post, and save that to our post prop. If all went well, nothing on the page should have changed, but we’ll have now successfully made a request for that data.
So, let’s get it rendered. In our renderer() function let’s make some updates, similar but not exactly the same, as our posts.js class using this.props.post for our data.
render() {
return (
<Fragment>
<Navigation/>
<h1>{ this.props.post.title.rendered }</h1>
<article
className="entry-content"
dangerouslySetInnerHTML={ {
__html: this.props.post.content.rendered
} } />
</Fragment>
)
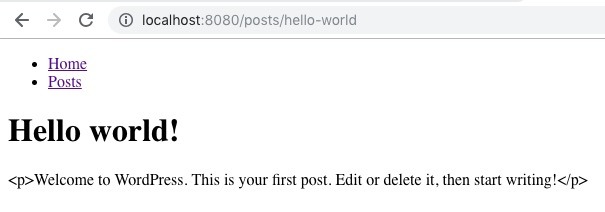
}I’ve outputted my title into the H1, and using the dangerouslySetInnerHTML function, output the rendered content from our data. You’ll find if you just output { this.props.post.content.rendered } directly the content will not be rendered as HTML, so you would see this:
As long as we know where our content is coming from, we should be good to go here. So with those updates, we can refresh the page and should get this:
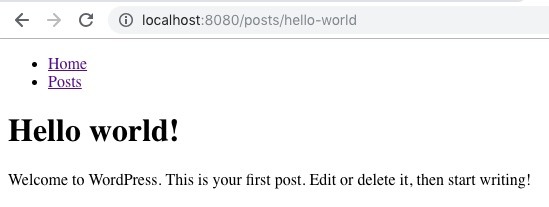
Perfect! What’s next?
The one thing missing that will make this experiment a full-fledged website is metadata in our <head>. Things like page title or description, and things like the charSet or device-specific elements (width, name, content, etc), and whether or not we want search engines to see your site are required. Luckily, Next.js has an option for this. The usage is pretty easy.
I’ll do the work in our index.js file, but the same work can be replicated in posts.js and single.js respectively. First, I’ll import Head from Next.js. This gives us access to a new component in which we can add our meta information.
import Head from 'next/head'
import Navigation from '../components/Navigation'
import { Fragment } from 'react'

export default () => (
  <Fragment>
    <Navigation/>
    <Head>
      <title>This is our page title!</title>
      <meta name="description" content="This is an example of a meta description. This will show up in search results." />
      <meta charSet="utf-8" />
      <meta name="viewport" content="initial-scale=1.0, width=device-width" />
    </Head>
    <h1>Your new server-side rendered React.js app!</h1>
  </Fragment>
)
Nothing may look like it would have changed, but you’ll notice a couple of subtle changes.
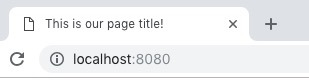
We now have a page title in our tab:
And our meta description and information show up in the code:
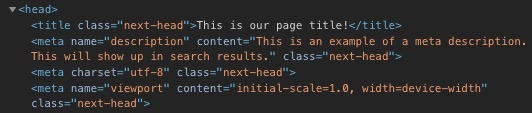
Using next/head this will now render both client- and server-side, so our status as a fully-functioning SSR is intact. We could go one step further and add support for Twitter or Facebook/Open Graph meta also, but that will be on your plate for now.
Where Do We Go from Here?
If all you need is a homepage and some posts, you’re done. Granted, we could refactor and clean things up. Perhaps introduce caching or a data store to make things a little faster, but all in all, this is pretty lightweight as it stands with a pretty nice lighthouse score.
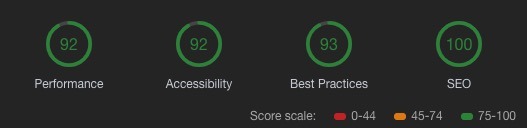
And tackling those deficiencies in performance, accessibility, and best practices wouldn’t require that much more work—just a matter of configurations and a few other files to include.
Past all that, however, you may want something a little more robust to fully replace your existing website. Well, just like any other part of this site so far, you’d need to build it. All of that WordPress functionality, like tag or category archive, search, etc., that’s on you. That would all take time and effort. If you have a plan and the know-how, go for it. I always feel good having built something that didn’t otherwise exist.
There are also plenty of existing frameworks out there with React.js or Vue.js that can accomplish more with varying levels of quality and varying depths of included functionality. So take a look around, and I’m sure you’ll find something that works for you and save some time. If you do find something, remember, it’s always a great idea to give back to the Open Source community and share any new ideas you might have.
WDS React Framework
While we’re on the subject, might I recommend the WDS React Framework, a fork of the WordPress + React starter kit from Postlight?
This framework works in much of the same way that the app we just built does, although it supports more pages and functionality. At the base level, though, it’s a simple Headless React-based website with server-side rendering which supports proper SEO.
We’ve departed from the original repo and cleaned up a lot, added some helpers to clean things up for users, including Advanced Custom Fields output, which makes custom fields super easy. With the use of the WP API Yoast Meta plugin, we added meta support for most everything that Yoast SEO allows you to manage in the WordPress admin dashboard.
This framework also handles the WordPress install and creation alongside the app. So, you only have to download and install/set up one thing to get up and running. With that, it allows you to build this site for Docker and export to another container or something like Now Desktop by the makers of Next.js to easily deploy a site.
This is a work in progress, but we encourage you to get involved and help us out. Submit an issue or feature request here and help us build a better internet.
Return to Basics
Building an app this way really requires that we return to the basics. My feeling is that a lot of websites include features that are really great in a UX/UI perspective, but also unnecessary for the user to actually navigate or absorb the site—clutter, for lack of a certain term. Not to say that widgets or some of this extra functionality aren’t nice or sometimes useful, but my opinion is that a website should be discussed and planned and executed with finality. Knowing the who, what, why, and how of a website comes in handy when building a React-powered frontend website. Certain decisions need to be made as they’ll most likely be hard coded or the flexibility of the CMS (WordPress in this case) will be ignored.
Want to check it out for yourself? I’ve thrown everything up in a repo you can play around with that you can find here.
What do you think? Is the future of the internet JavaScript? Do you prefer a different framework for building your Headless website? Preact? Vue.js? Do you prefer a different setup altogether? Let us know in in the comments below.
Happy coding!