Probably the best gallery app for Android device, the Google Photos app has managed to carve out a name for itself. From providing unlimited free storage capacity (i.e. if you upload videos in ‘High Quality’) to getting all your media files synced across various platforms, this app can do it all. Apart from that, its automatic classification of peoples, pets, and places makes it extremely easy to search for any particular object. The ability to create collage, albums, and animations is surely the icing on the cake. But what many users are unaware of is the fact that it comes with its fair share of video editing capabilities as well. Let’s have a look at these features and how you could use them to edit your videos using the Google Photos app.
Before you scroll down to learn the video editing features of Google Photos, you must not miss some cool Google Photos tips and tricks to make the most of this app.
Edit Videos using the Google Photos App
In this guide, we will have a look at some of the amazing editing features provided by Google Photos. Step by step instructions to carry out these steps will also be provided along with it. Features that will be discussed includes:
- Trimming videos in Google Photos
- Stabilizing a video
- Rotating your video with the help of Google Photos
- Creating a movie in Google Photos
- Sharing the created movie
With that said, let us now start the guide on how to edit videos using Google Photos. Also, we will be having a detailed look at all of the above-mentioned features. If you use Google Photos as a gallery app, we have 10 best gallery app alternatives that you must check out.
If you’re wondering why the background of my screenshots is dark, please be informed that I have enabled the dark mode in my Google Photos app.
How to Trim a Video using Google Photos
- Open the Google Photos App.
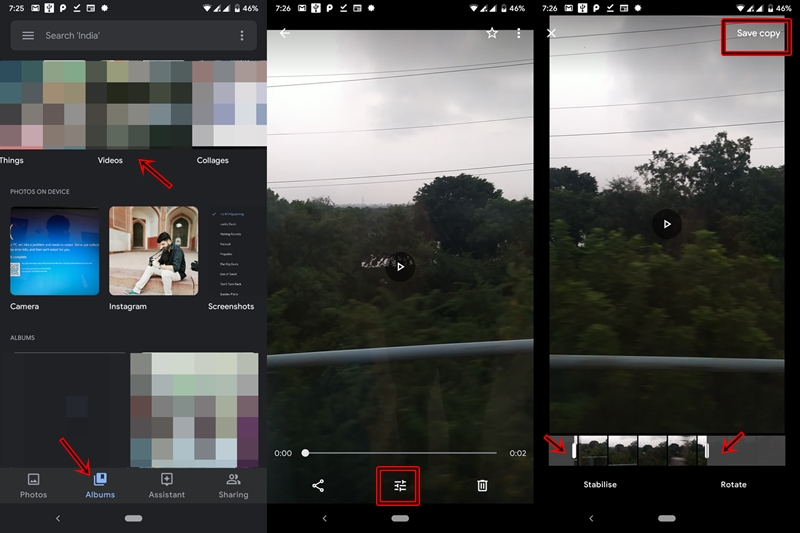
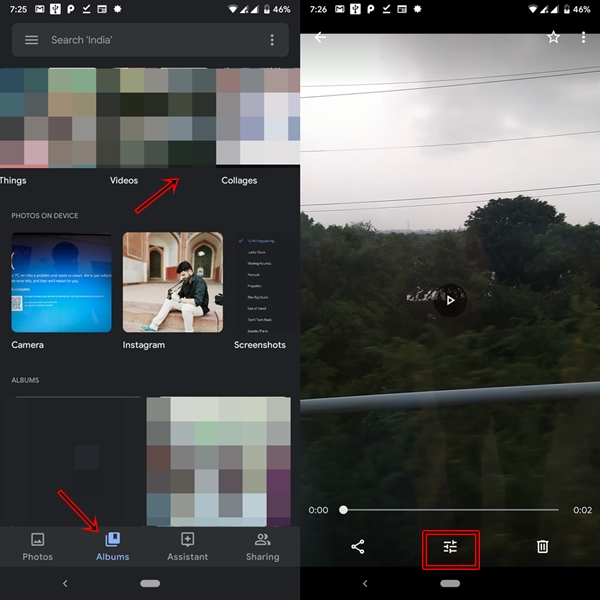
- Go to the Albums section.
- Select the Videos album.
- Tap on the desired video of your choice.

- Click on the Edit icon present at the bottom (see above image).
- Adjust the start and end part of the slider to trim the video as per the desired length.
- Tap on Save copy situated at top right.
Stabilizing a Video using the Photos app
- From the Google Photos app, go to Album.
- Select the Video section and tap on any video which you need to stabilize.
- Tap the Edit icon situated at the bottom.
- If you want to stabilize a specific portion of the video only, then drag the slider between the said portions. Otherwise, leave it as it is.
- Click on the Stabilise button. The process will begin and it may take some time depending on the size of the video and your device’s processing capabilities.
- Once done, simply tap on Save copy to save the stabilized video.

Rotate your Video with the help of Google Photos app
- Go to the Google Photos app and select the Album category.
- Under that category, select the Video album.
- Chose the video which needs to be rotated.
- As before, tap on the Edit icon.

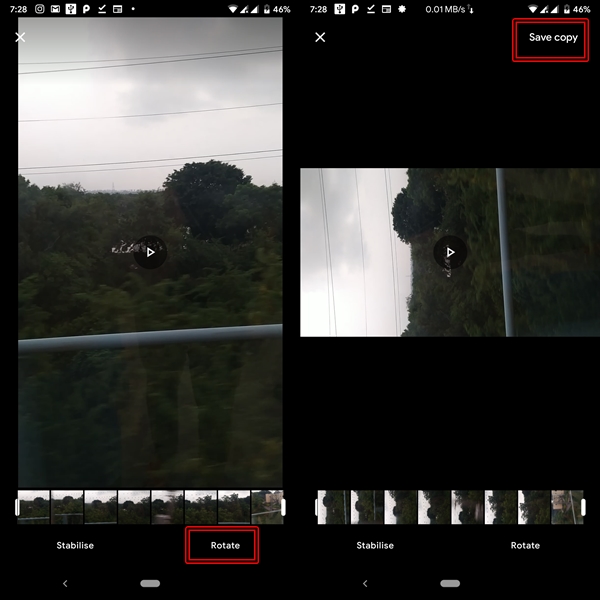
- Select the Rotate button situated at the bottom right.
- This will rotate the video 90 degrees. You may again tap on Rotate to rotate it further by 90 degrees.
- Finally, tap on Save copy to keep a copy of the rotated video on your device.
How to create a Movie in Google Photos
Till now, we have discussed the process through which you could edit videos using the Google Photos app. But it also has another amazing functionality that you might be unaware of. You could even create a short movie with cool background music using this app. The procedure is fairly simple, just follow the below instructions.
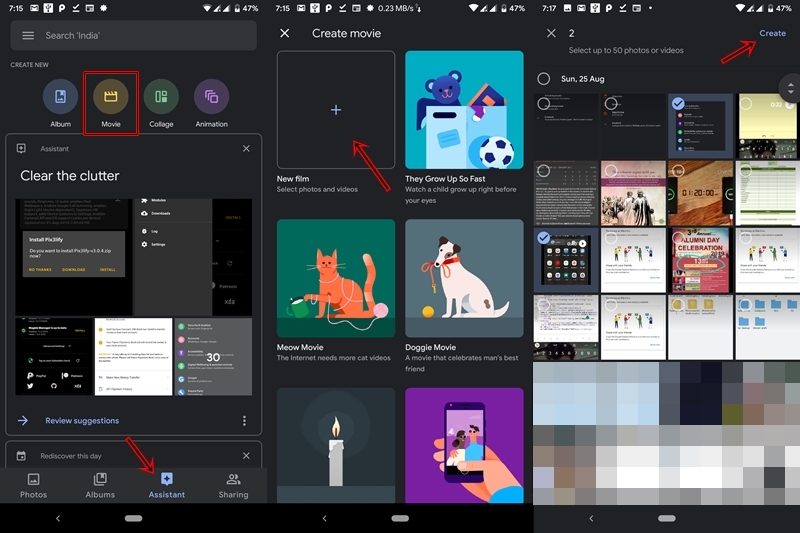
- Once you open the Google Photos app, tap on the Assistant icon (the third icon at the bottom bar).
- Now, click on the Movie option.
- You will be presented with two options here:
- Select any of the preset movies that already have added animations and background music. You simply need to add your images and videos in it. Google will then automatically create a movie for you.
- But if none of the movies match your preference, you may want to have your own custom movie. Fortunately, there is an option for that as well. Let’s see how this could be done.
- To create your own custom movie, select the first option- New film.
- Select upto 50 photos/videos of your choice. Once done, tap on the Create option.
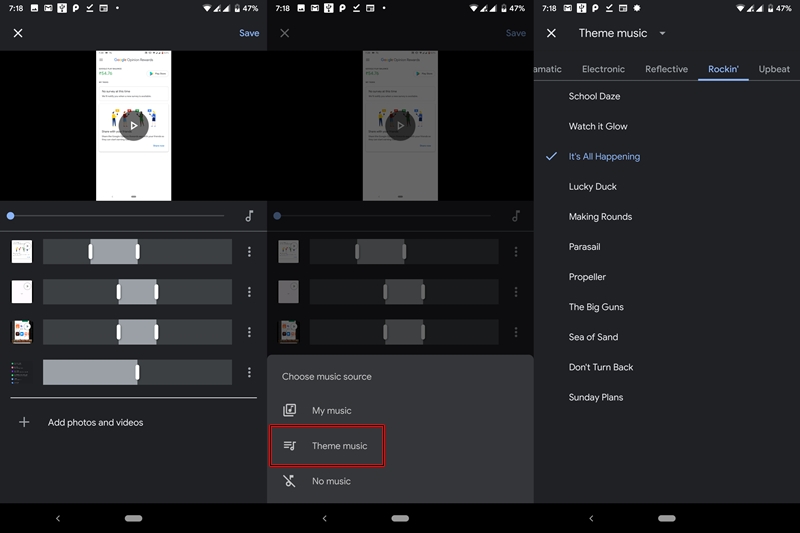
- Next, adjust the slider according to the portion of the video you want in your movie.
- Do the same for images. This is needed to select the amount of screen time you want to give to each photo.
- Next, you need to add music to your movie. Tap on the musical note icon.
- You will be presented with three options:
- My music– to add your own music.
- Theme music– to add music provided by Google.
- No music– a silent film!
- Chose the desired option. Google has tons of different kinds of music across various genres including Dramatic, Electronic, Reflective, Rocking and Upbeat. Do have a look at them.
- Once you choose the desired music, simply tap the Tick icon at the top right.
- Finally, click on Save.
- Congratulations! You have successfully created a movie using the Google Photos app. Head on to the next section and have a look at the instructions to share this movie with your friends.
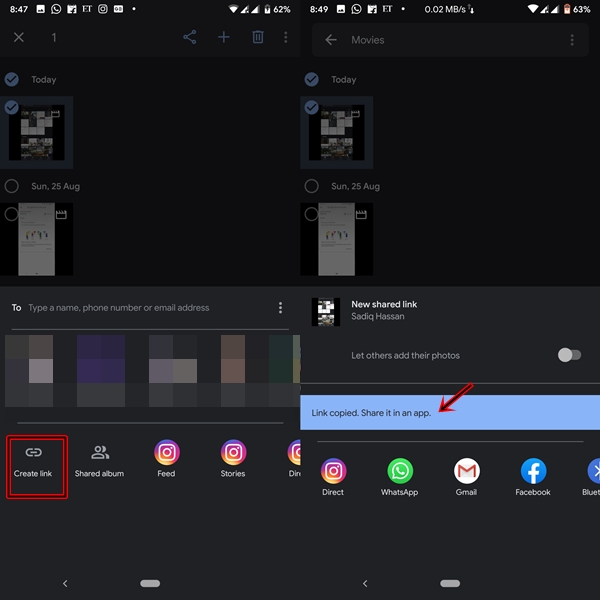
- Make sure the Google Photos app is up and running.
- Go to the Albums section. Scroll the albums present at the top bar until you reach the Movies album. You may also do the same by typing Movies in the Search box.
- Long press the movie which you want to share and tap on the Share icon.
- Although you could easily share the movie via WhatsApp, Gmail, etc. but they impose restrictions on the maximum file size that could be sent. Hence it is advisable to select the Create link option.
- Once the link gets created, you could easily share it with any app of your choice.

With this, we conclude the guide on how to edit videos using the Google Photos app. Which of the above-mentioned feature did you find out to be the most useful one? Moreover, if you have any queries regarding any of the steps, let us know in the comments section below.