Find the original post on Point Blank SEO at: %%PostLink%%
Even if the post isn’t 100% directly relevant to you, there are a few tips & tidbits (i.e. my Mechanical Turk project settings, a few outreach tips, etc.) that should be useful to anyone.
I wanted a chance to share an advanced link building process that we’ve been using internally for large eCommerce sites that carry thousands of different brands in their inventory.
For these kinds of sites, there’s one type of low-hanging fruit that’s an absolute no-brainer: retailer listing pages on brand websites. To give you an idea of what I mean, try out this search:
https://www.google.com/search?q=intitle%3A”where+to+buy”
These brands want to tell people where they can buy their products, and in a lot of cases, they’ll list off online stores. When they do, they usually link. And if they’re to a brand category page on your target site, then there’s none more relevant you could possibly get (i.e. Acer linking to your Acer category page).
But when you’re dealing with 4+ figure number of brands that your target site carries, it can become a bit of a head scratcher as to how to scrape the very bottom of the barrel for these opportunities, seeing as you don’t want to leave any of these easy links on the table.
So, here’s how we scaled things. An overview:
- Get the list of retailers your site carries
- Find the websites of each retailer
- Find any/all pages on those websites that could be a listings page
- Grab extra data on these pages & combine data
- Review those opportunities manually
- Reach out
And here’s the detailed step-by-step guide.
Step #1 – Get The List
Ask your client, or management, for an entire list of the brands the site carries. Sometimes this isn’t easy to get, as the information isn’t readily available somewhere. But there’s usually a SQL database that could be queried to get it.
The most recent client we did this with also gave us a 2nd column in the spreadsheet detailing the “product category”. So for example, if it was Acer, the category might be “computers & electronics”. This is VERY handy for future steps, so if you can, try to get the categories of these different brands when possible.
Step #2 – Find Their Websites
Unfortunately, you’ll never get the list of brands upfront, along with where their websites are. You’ll have to do this yourself. But luckily, there’s one SUPER handy tool for finding them – Mechanical Turk.
Mechanical Turk is essentially a scalable workforce that you can outsource micro-tasks to. It’s the perfect platform for what we’re going to be using it for. In this case, we want someone to use Google to find a brand’s website.
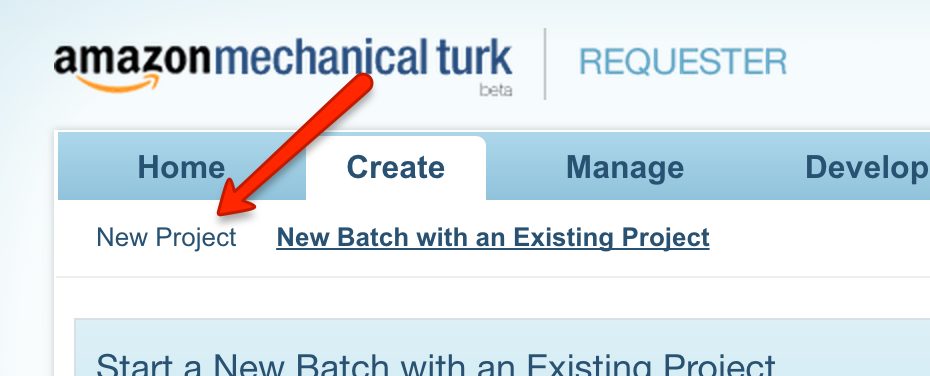
If you don’t have an account, signup as a Requester. Then navigate to the “Create” tab, and hit “New Project”.

You’ll then setup a project, which in essence, is giving your workforce instructions on exactly what you’ll be asking them to do. In this case, it’s taking an input (the brand name), and then finding their website, if they have one.
Here’s an example of our instructions for our most recent client:

As you can see, our instructions are tailored to the client in that we’re also asking for them to find out how many of the brand’s products we carry on their site. This helps us figure out if we carry a lot, or a little. The more that’s carried, the more of a case we have to get the brand to list our client. If it’s i.e. only 1, then it’s much tougher to push hard in outreach, especially if it’s i.e. a shorter listing list for a major brand (i.e. 3M). We also look to see if we carry ANY at all, in case the list we get from the client in step #1 is outdated.
Anyways, below that list of instructions, the worker is displayed the following:

Notice the two inputs they’re given: Name & Category. When we “create a batch” for this project, what we’ll be doing is uploading a 2-column CSV for those two values (the list of brand names, and their product categories). You may only have 1 input (brand name) if you can’t get any more info on the brand.
(The reason we liked the product category input is because some brand names are generic, and there are multiple companies with it. Given the product category, the worker can tell whether or not the brand website they found is for the same brand that our client carries.)
Here are a couple other details about our project that are important:
- Reward per assignment – $0.10. We could go lower, but no desire to. Cheap enough for what we’re wanting.
- Worker requirements – this is in the ‘Advanced’ section of the Project settings. See below for what I use. From my experience, this is the best sweet spot of those that are high quality, and still cheap. Don’t go for the “Masters” qualification – you’ll significantly narrow down your list of qualified workers, and will have to pay more per hit, and batches will take a lot longer to finish.

Once you’ve got that setup, you’re ready to start a new batch on that project. For a batch of 2,000 for us, it usually takes ~3-4 hours to complete 95% of it. I usually queue them up the day before I need it finished, and just come back then.
(This is FAR from a perfectly detailed description of using Mechanical Turk. See this for more information. This is simply the bare minimum, and campaign specific details, you’d need.)
Step #3 – Find Listing Opportunities
Now that we’ve got the list of websites of all of the different brands, it’s time to identify pages on each of their sites that might be listings pages.
First, you’ll need to start with a list of title/URL footprints that are popularly used to describe these kinds of pages. Here are a few of my favorites:
- “where to buy”
- “our retailers”
- “online retailers”
- “find a dealer”
Ultimately, this is one area that I won’t be giving up COMPLETELY to you :). A bit of searching will reveal the rest.
We’ve ultimately nailed it down to 10 fairly broad footprints with words like in the above example. The reason we nailed it down to 10, is because of how many individual Google searches we’ll be conducting (scraping) for each brand website. I originally had 40, but narrowed it down to 10, for the reason you’ll see soon.
Next up, take the list of websites, and go to this tool.
You’ll input the list of websites into the first text area, then you’ll input “site:” into the Prefix input, and finally the footprint into the Suffix input (with a space at the beginning).

Here’s what the output would look like for a single footprint:

You’ll then copy & paste this list of queries into an Excel spreadsheet, and then repeat the steps for each footprint you want to use.
When you’re finished, get the entire list of queries for all footprints into a single column in Excel, and sort it from A to Z. It’s not necessary, but I’ll explain why based off the tool I use for scraping Google.
Now that you’ve got this list of queries, it’s time to scrape Google for them. I personally use Link Prospector, and will be using it for this example.
With this tool, you can only scrape Google for 1000 queries at a time, so I suggest narrowing your list of footprints down to a smaller number (for me, 10), so you aren’t running an egregious amount of reports. For our client, we had 15k brands carried, so we had to generate 150 different Link Prospector reports (100 sites per report). It’s still high, but hey, it’s not 600 as it would’ve been with a 40 footprint list 
(Thus, is the limitation of Link Prospector. If you’ve got other means to scrape Google at scale, use them for this!)
When you open up Link Prospector to create a new Custom report, here are the settings I’d go with:

I only scrape 1 page per query, but you could easily do 3 or 5 at no extra cost. We’re simply using queries that would turn up a relevant page, if there was one, in the first 10 results we got back.
From there, load up your report with 1000 queries, and then hit Submit.
(At the time of this writing, reports can take a bit to finish (~30 mins), but I’ve been told by Garrett French, the brains behind the tool, that this should improve as they load up more proxies.)
When the reports are finished, you’ve now got a list of pages for each brand domain that may be a listings page. We’re now going to find some extra info on each of those pages to see if they are, in fact, what we’re looking for.
Step #4 – Grab Extra Page-Level Data
So for that list of pages we’ve scraped from Google, we’re now going to be finding some extra info about them that will give us a better idea on if they’re what we’re wanting.
Here are the things we’re looking for:
- Domain Name – for sorting/lookup value purposes.
- External Links – to see if they’re linking out on the page. If i.e. <5, high chance it’s not what we’re looking for.
- Page Title – Link Prospector supplies as well, but if you’re using other means, then grab this too.
You may have your own tools to find this info on a set of URLs, but I personally use URL Profiler for this. I’ll run the Server version on a Windows VPS overnight, depending on the number of results from Step #3.
Once we’ve generated the necessary reports for that info, it’s time combine all of the data we’ve got into a single spreadsheet. That means data from:
- The original brand list
- Mechanical Turk report
- Link Prospector report
- URL Profiler report
Here are the specific columns that we use in our finalized spreadsheet of all of those URLs of potential listings pages:
- Column A – Brand Name. From the original brand list.
- Column B – URLs. Each page scraped from Link Prospector.
- Column C – Page Title. From the URL Profiler report.
- Column D – External Links. Also from the URL Profiler report.
- Column E – LTS. A metric from Link Prospector on how relevant the URL was to the queries entered for the report.
- Column F – Domain. Not necessary in finalized report though. More so for combining data.
- Column G – Product Category. This is client-specific, given in original brand list.
- Column H – # of Products. Also client-specific, given in MTurk report.
Here are a few additional tips on the above:
- Domain – grab the domain name of the URLs entered in the MTurk report, and the Link Prospector report, and use that column as the lookup value to combine the data.
- LTS – for this number to be useful later on, make sure that all queries for a given, single brand website are in the same report, and not split up into two different reports. So i.e. if there were 30 footprints you had, having 15 for a single website being used in one report, and the other 15 in the other report, makes this score less useful. LTS is calculated by how many times a given result is found, and how highly its found, for the list of queries for that report.
- External Links – your gut feeling is to just delete all rows of data with a value of <5. Don’t do this. With URL Profiler and other tools, this number can’t be found for some URLs, and a “0” is given.
On top of that, here is the custom sorting we did for manual review purposes for the next step:
- First, sort column A, A to Z
- Second, sort column D, Z to A
- Third, sort column E, Z to A
What this is doing is first grouping the URLs together by the brand name, then sorts them from the highest # of outbound links on the page, and finally if they’re tied there, by the LTS score from Link Prospector (the higher the #, the more likely it’s a listings page).
Here’s an example of the finished product:

Now that we’ve got all the data as we want it, it’s time to review the opportunities!
Step #5 – Manually Reviewing Opportunities
It can definitely be a time-suck, but if you do want to extract as many of these opportunities as possible, WITHOUT reaching out to non-qualified prospects, you’ll have to go through the list manually.
We ultimately want to go through each brand grouping in 15-30 seconds. Here’s our quick & dirty processes:
- Scan first few URLs & Titles columns – is there an obvious listing footprint? If so, is there a high # of external links on that page?
- Scan LTS & External Links columns – are there other URLs in the list that are high in either of these #s? Do their titles/URLs warrant a page that might be a retailer listings page?
- Visit a URL – after clicking on a link, do you see any clear footprints in the header or footer of the site (i.e. a “Our Retailers” nav link)?
If those 3 don’t yield anything worthwhile, then we ultimately move onto the next brand grouping.
Step #6 – Outreach
From here, it’s bombs away! Depending on your resources, if you’re able to get a client email address, I’d start with a simple email asking them if you could be listed. Keep it as concise as possible, give evidence of you carrying their products, and be polite.
If you don’t hear anything back after following up a few times, hit the phones. This is a perfect opportunity for phone-based outreach, as it’s the kind of opportunity where you should be listed (as opposed to could). We use Hushed in order to create a phone number that’s:
- Not our outreach person’s personal cell #.
- Of the area code of the client’s headquarters.
It’s also worth noting that some clients will have existing partner relationships that you can tap into internally. Getting them to put the calls through from a person the brand’s company is familiar with can skyrocket conversions, and also means less work for you :).
Conclusion
So how much did this all cost to do for a batch of 15,000 brands, using 10 footprints each for Step #3? Let’s do the math:
- Mechanical Turk ($0.10 each) – $1,500
- Link Prospector (7 credits/batch, $0.70/credit) – $735
- Total – $2,235 ($0.15/brand)
I don’t have a number for you in terms of how many qualified prospects a batch like that would generate, but I do know that doing things at this scale & detail would mean, at the very least, an additional 50% or so links that you otherwise wouldn’t have gotten if you just went the competitor research route.
With that said, if you enjoyed the above post, then I’ve got great news for you: for the next 2 days, my Advanced Guide to eCommerce Link Building is open for registration. It’s only open to 100 more people before it’s closed for good (in order to protect the longevity of the information).
So what do you think? Are there any gaps in my process? I would love to hear about them in the comments below!
Targeting ‘Where to Buy’ Pages for Large eCommerce Sites is a post from: Point Blank SEO
Find the original post on Point Blank SEO at: %%PostLink%%