Studies show that 72% of online shoppers will abandon their cart before making a purchase. However, 26% of them will return to complete their purchase later – if they are retargeted.
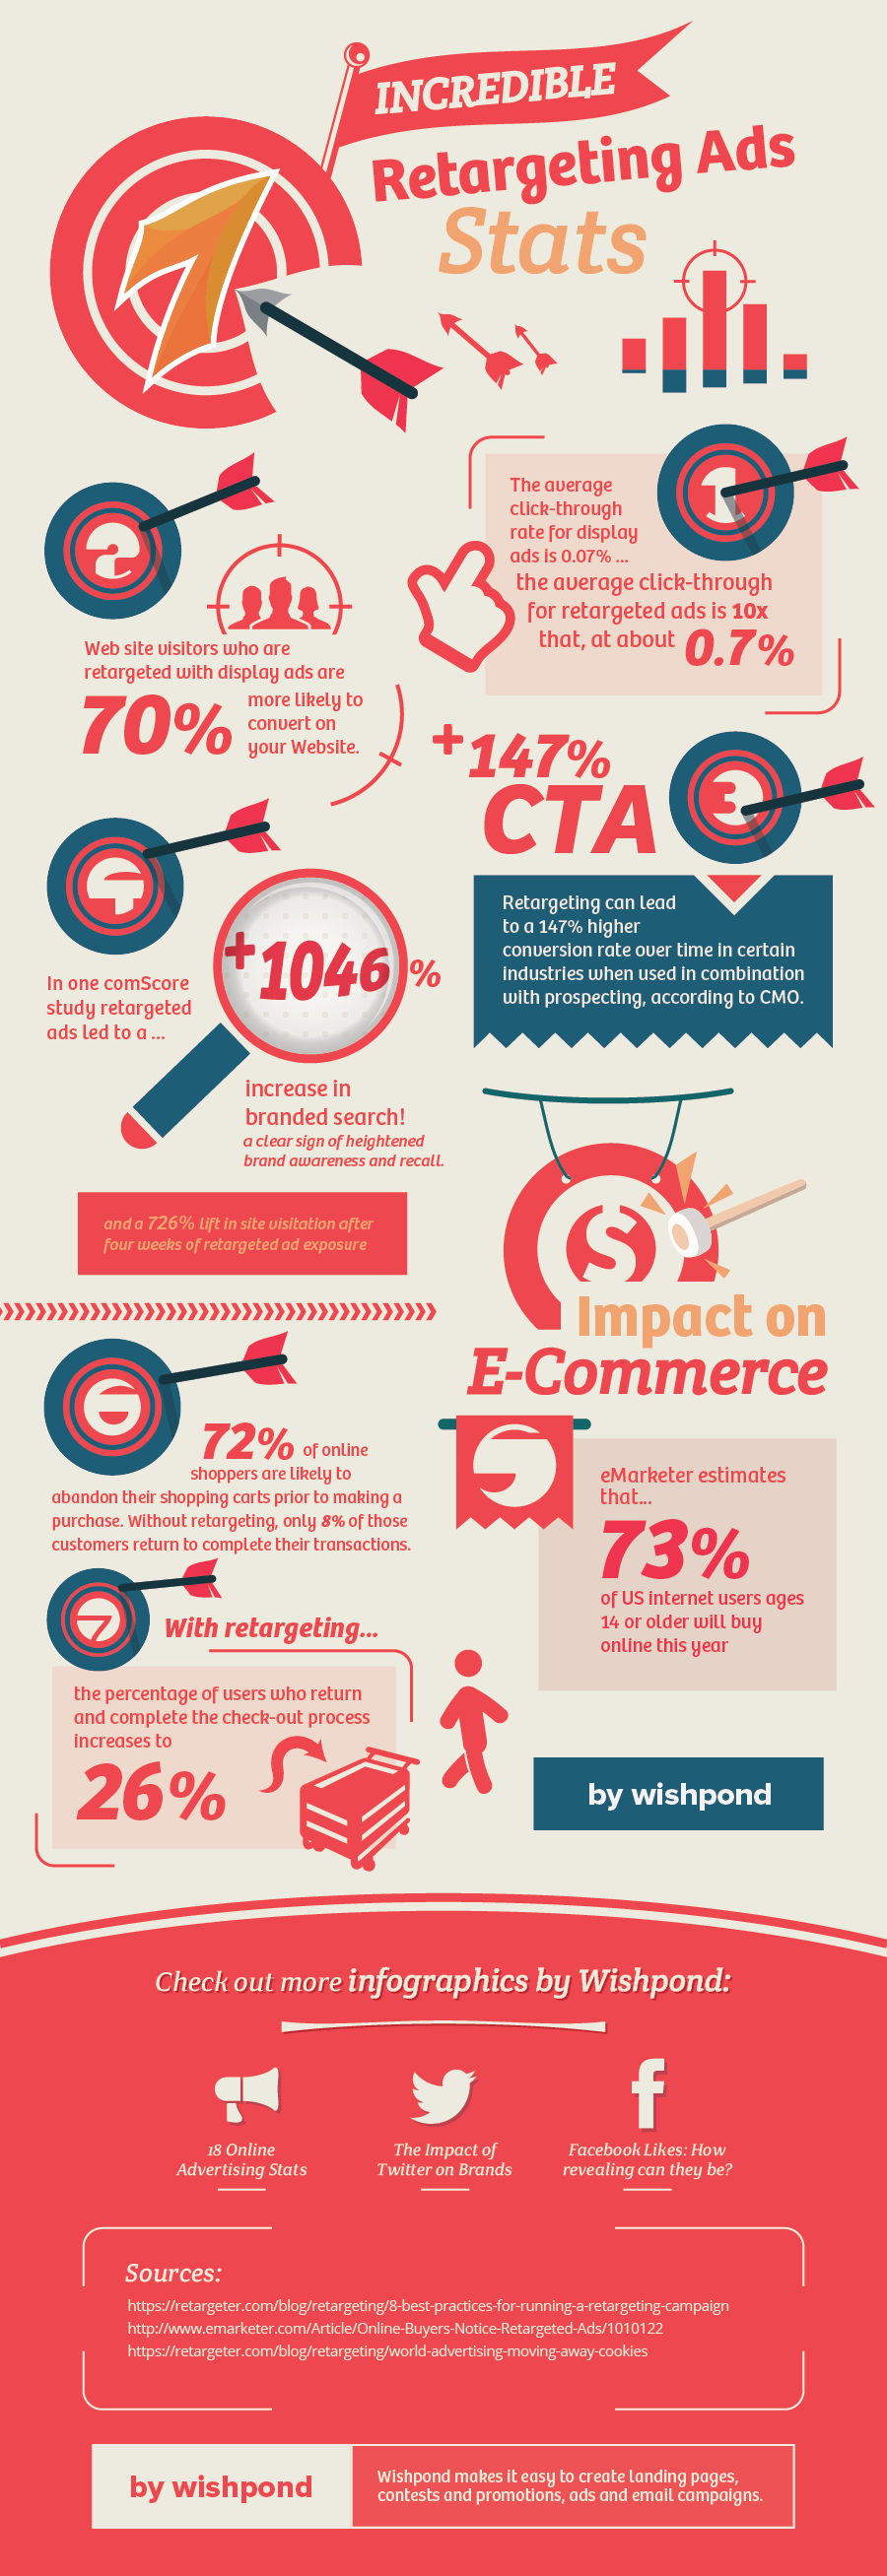
That means that setting up good retargeting campaigns can recover nearly 1 in 4 of every lost sale due to cart abandonment. For most sellers, that’s a huge revenue boost they would gladly welcome.
Customers are humans and humans are complex-indecisive creatures. Especially in the age of the Internet, our brains are constantly jumping from one thing to another.
A customer might not complete their checkout for all kinds of reasons, such as:
- They got an important e-mail from their boss
- Their 7-year-old daughter ran into the den crying
- They were just shopping around on their phone and wanted to save products for later
- They just wanted to check how much shipping would cost
- They’re still a little unsure if the value you offer is worth the price
The list goes on and on. But the good thing is that many of those problems can be overcome with a little nudge or by offering an extra bit of value.
- Customer got distracted during checkout? Maybe if they see your product in their News Feed, they’ll remember and finish the purchase.
- Customer not sure if it’s worth the value? Maybe a targeted 20% offer is what it takes to make the first sale and start building your customer relationship. The best part is that you only have to offer it to customers on the fence. Everyone else pays full price!
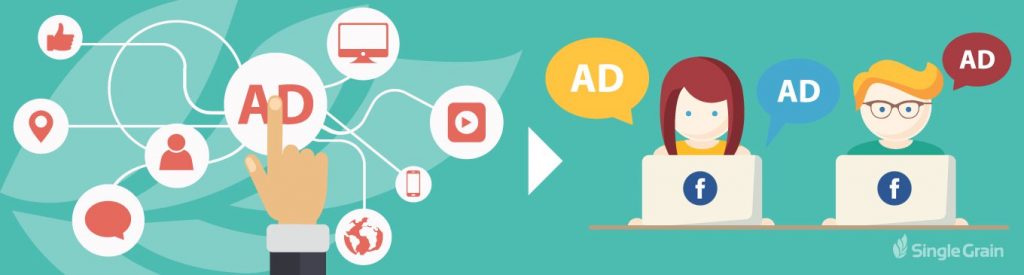
Retargeting lets you do all of this. The biggest retailers have been doing it for over a decade. But now with Facebook’s robust toolkit, every e-commerce seller has the ability to make specific, personalized retargeting ads.
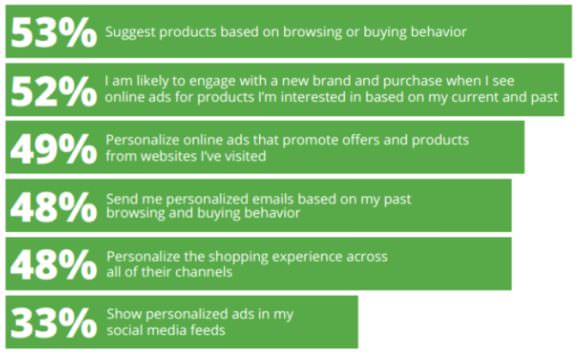
Some retailers worry that retargeting might feel invasive, but the truth is, it’s becoming the norm. Most consumers expect to be tracked online and understand that information is being used to market to them. In fact, a growing majority of customers report that they appreciate when brands retarget them with offers specific to their interest.
A good retargeting campaign shows that you’re paying attention and that you care about the customer’s buying experience.
This article will show you how to set up an effective, high-converting Facebook retargeting campaign.
Related Content: Why Retargeting Is Absolutely Essential For Any Marketing Funnel
Step 1: Install Your Facebook Pixel
The first step is to make sure you properly install your Facebook Pixel. In early 2017, Facebook replaced their old tracking and conversion pixels, so even if you’ve done this in the past, make sure you have the updated code.
Without this pixel, you won’t be able to track who’s visiting your site and how they’re behaving. So, it will be impossible to retarget them.
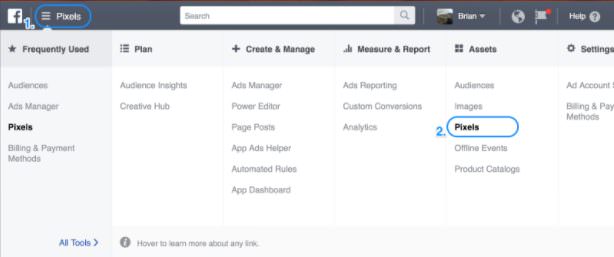
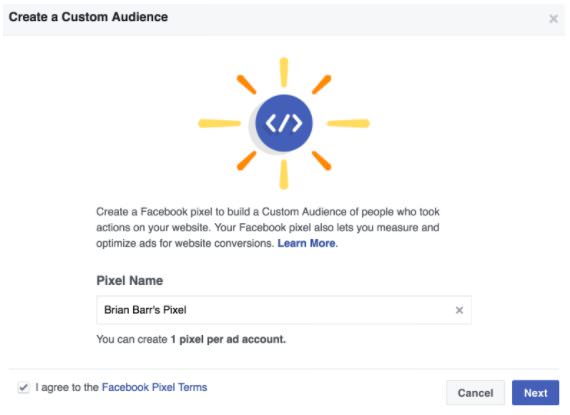
To set up your pixel, go to Menu > Pixels
If you’ve never created a pixel before, you’ll have to name it and hit “Next.”
Then you’ll need to decide how you’re going to install the pixel on your site.
Facebook currently integrates with BigCommerce, Google Tag Manager, Magento, Segment, Shopify, Wix and WooCommerce. If you’re using any of those, simply select your platform and follow Facebook’s step-by-step instructions.
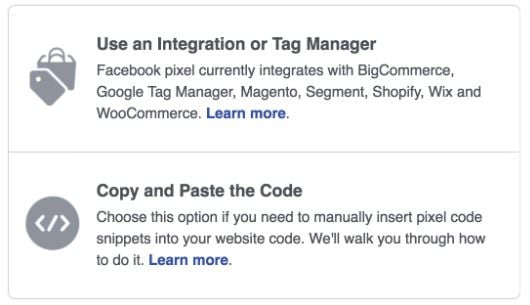
If not, Facebook still makes installing the pixel easy on any site. All you need to do is copy and paste the code between the <head> tags on your site. Most platforms should provide simple instructions for how to edit this section.
Once you find it, just paste the code. It’ll look something like this…
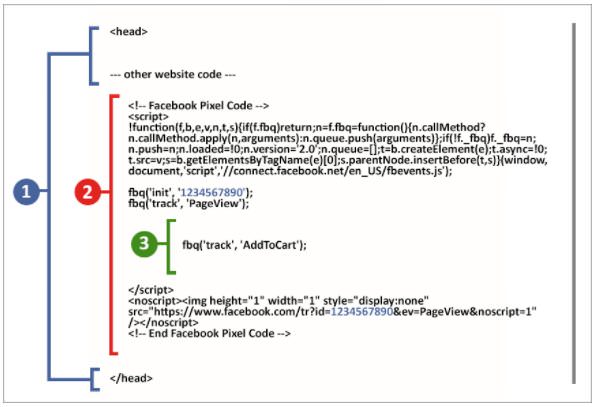
1 = <head> tags & other code (not shown)
2 = Facebook Pixel code you copy & paste
3 = Additional action tracking you add (keep reading below)
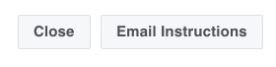
No matter which option you choose, you can also simply e-mail the instructions to your web developer or code-ninja nephew at the bottom right:
If you want to take this one step further, you can use the Facebook pixel to track specific actions that customers take on your site, like Add to Cart, Purchase Complete, etc.
The only difference here is that you’ll need to add a few extra lines of code (shown in the green #3 section above) on specific pages. Facebook has recently made this pretty easy too.
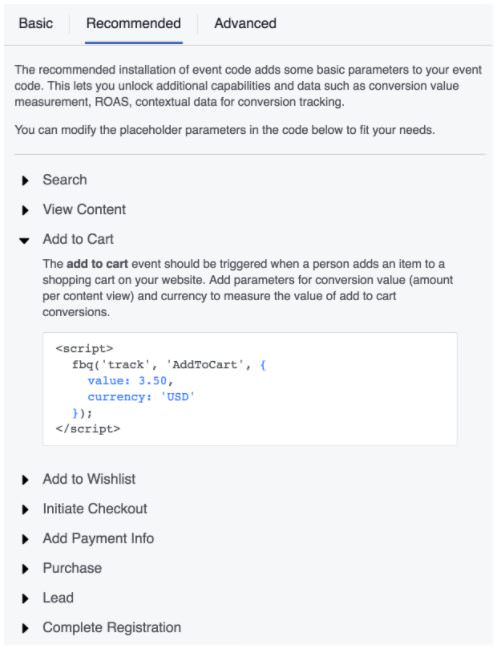
Select the action you wish to track and modify the blue parts of the code to match your values. Then copy and paste the code and follow the instructions below to know how it should be placed.
The most common pages for conversion tracking are the Checkout and Thank You pages.
Related Content: Facebook Lead Ads Can Now Track Offline Conversions
Note: If you don’t have specific values to enter, or don’t care to track them, you can switch to “Basic” at the top of the widget and just track the action itself.
This allows you to collect more data on how your campaigns are affecting your bottom line and how customers are behaving on your site. It can also help Facebook optimize your ad campaigns to maximize your ROI based on your specific goals.
Pro Tip: Download the Facebook PixelHelper plug-in for Chrome to check your site and make sure everything is installed correctly.
If you still need help, check out Facebook’s guide on Facebook Pixels.
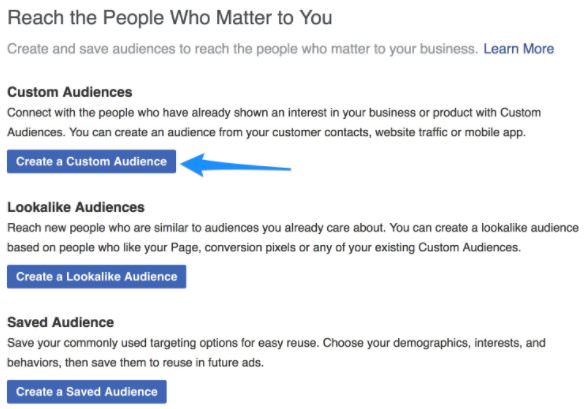
Step 2: Create Your Audience
Once you have your pixel set up, head over to Facebook’s Ad Manager and create a custom audience to retarget. Go to Menu > Audiences…

Once there select “Create a Custom Audience”
Then create an audience based on “Website Traffic.”
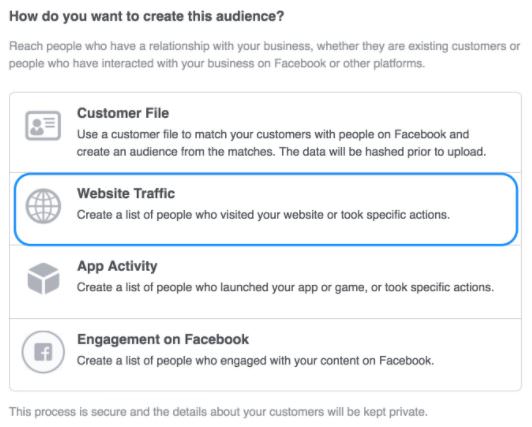
You’ll then be able to target people based on how they interact with your website…
With the following options:

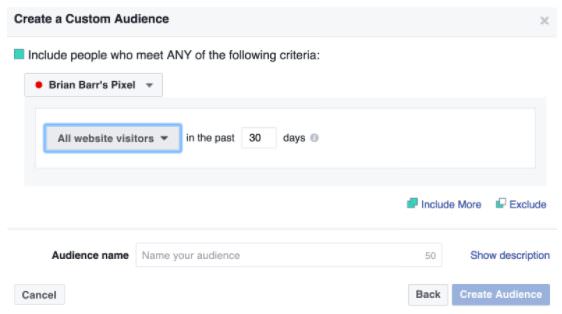
Who you’re targeting will depend on your campaign goals. For this guide, we’re going to focus on creating a campaign to capture abandoned carts.
To do this, we’ll target anyone who’s looked at both our ceramic mug products and the Checkout page. This tells us that they viewed our products and then went to checkout.
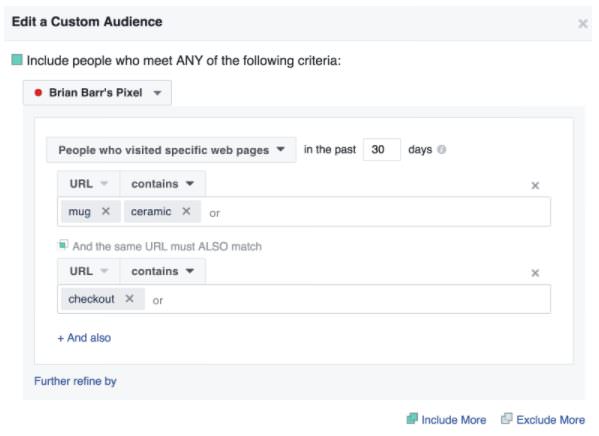
Make sure the URL parameters you include here actually cover all the products you’re looking to target. This is another key reason that your URL should always contain the product title.
Related Content: How Small Businesses Can Take Advantage of Facebook Audience Insights to Get More Leads
Now that gives us everyone who started the checkout process with our ceramic mugs. However, we don’t want to show these ads to customers who already completed their purchase. That might drive costs up and worse, annoy or confuse customers.
To avoid this, just click “Exclude” on the bottom right and filter the audience to ignore anyone who has visited your Thank You page. This should be the URL of whatever page you direct customers to after they complete a checkout.

The other parameter you can control here is time. It really depends on your goal. If you’re simply retargeting people who viewed your content or blog posts, the default 30 days might be good.
However, cart abandonment ads might be better served by 10-14 days. If the customer still doesn’t want to purchase your product after two weeks, you’re probably only annoying them and wasting money.
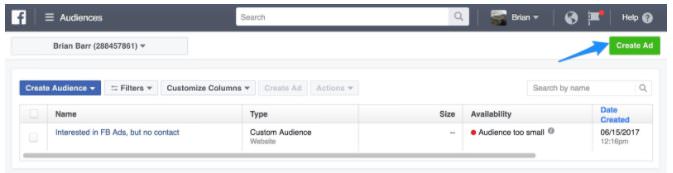
Now that you’ve set up your filters, all you need to do is name the group and save.

You’ll then be redirected to a page with all your custom audiences. If you’ve just recently installed your Facebook Pixel, don’t worry if you see a warning saying “Audience too small” under “Availability.” Facebook requires at least 20 users to fit your criteria before it can run. Continue setting up your ad and it should turn on as soon as customers start being tracked on your site.
Step 3: Create Your Ad
Once you’ve set up your audience, you need to hit them with some targeted ads. It’s usually most effective to create specific ads based on specific products or categories.
If you have a large catalogue of products, you can set up specific retargeting campaigns for best sellers and more general ones for each category. Or check out Facebook Dynamic Ads, which can create automatic ads for all your products.
That being said, you should still include your brand and logo in the photo if possible, because you’ll be getting tons of impressions from this campaign even if the buyer decides they aren’t going to buy that specific product.
When you’re ready, hit “Create Ad” in the top right corner of any dashboard view.
You’ll start by selecting your objective. The most common options here are “Traffic” and “Conversions.”

Facebook will start to optimize who they show your ads to based on who they predict will help you achieve this goal:
- Traffic Goal – this goal will encourage the most number of people to visit your store
- Conversion Goal – this goal focuses on getting customers to complete a desired action (usually a purchase)
Both goals have their place and purpose, so it’s really up to you. If you sell a high-priced product and notice that customers need to visit your site multiple times before buying, or if you’re targeting customers based on category and blog views, it’s probably best to stick with traffic goals.
Related Content: Facebook Instant Articles’ Publishers Can Now Show More Ads
Also, keep in mind that to target conversions, you’ll need to put in a bit more work setting up your site to track specific events and goals like we talked about briefly in step 1.
Conversions is a little bit more complicated, so I’ve chosen to use it here as the example. If you can follow this, setting up a Traffic campaign will be no problem for you.
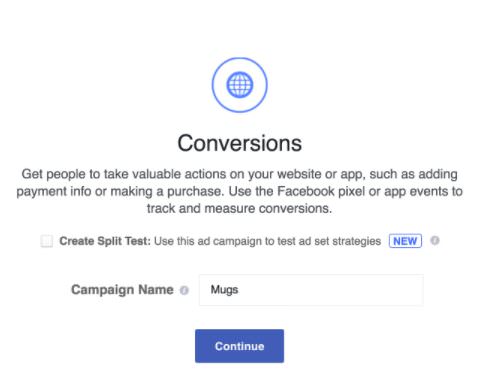
To start, name your campaign and hit “Continue.” Then you’ll need to select your conversion goal and verify your pixel.
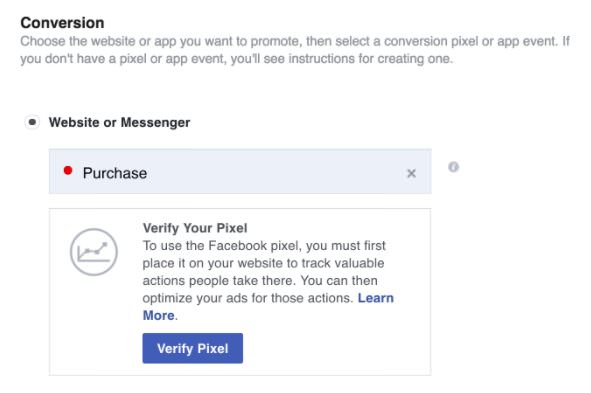
For this kind of ad the most logical type of conversion is a purchase. If you need help with this, just click “Learn More” and Facebook has some guides on setting up goals and funnels.
Then you’ll need to set your campaign audience…
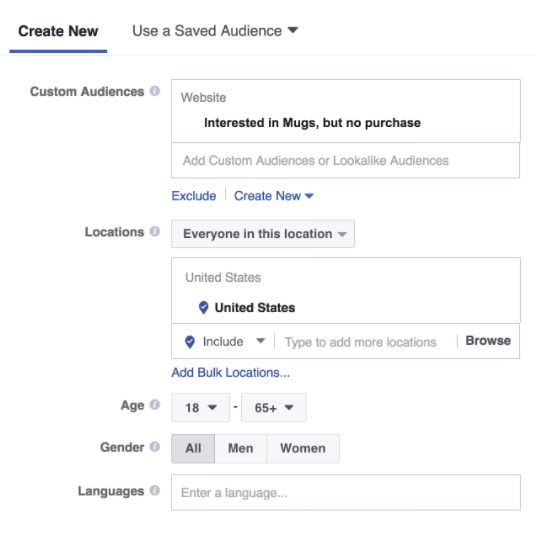
Under “Custom Audiences,” select the retargeting group you made in step 2.
And you’re done!
Unless you have a good reason, you shouldn’t narrow the audience any more. It’s already targeted based on customers who have shown interest.
The only parameter I can recommend changing is age. You may want to target customers under 18 if you sell products marketed towards teens.
After that, you’ll name the new audience, set your daily budget, and schedule.
The budget will vary heavily from business to business, but remember that you can always start small and then raise the budgets on your most profitable campaigns.
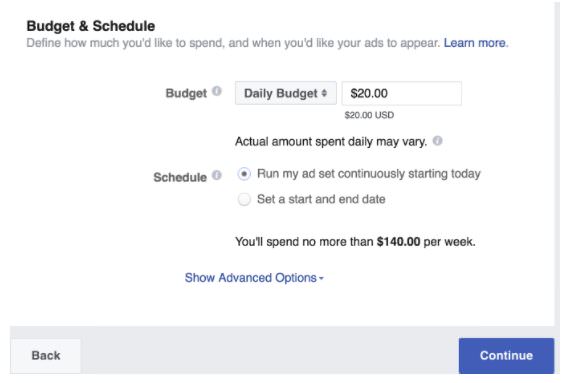
You should run your ads continuously for a retargeting campaign. You’ll have new customers finding your site and abandoning their cart every day. While you should check in and make sure your campaigns are effective, there’s no reason to stop one that’s working.
From here on, everything is the same as creating any great Facebook Ad. Make sure to spend time crafting compelling ads with bold images and action-inducing triggers.
Related Content: How To Create CTAs that Actually Cause Action
What Are You Waiting For?
Retargeting is one of the fastest ways to boost sales, conversion rates and your bottom line. With this guide you now have no excuse for not running retargeting campaigns for your best products.
Keep your brand at the top of mind of the customers who are still deciding and start recapturing sales from those people who genuinely just forgot.